RDPlus can work on your PC and here is the minimal recommended hardware:
Number of users
Equipment for XP/2003
Windows 2008 to 2019 or 7 to 10 Pro
3 – 5
1 GB ONE CPU
I5 or above 4 GB One CPU 2 GHZ
10
1 GB One CPU 2 GHZ I5 or above
I5 or above 8 GB One CPU 2 GHZ
25
4 GB One CPU 2.5 GHZ I5 or above
16 GB One CPU I7 or Xeon
50 and above
16 GB Dual CPU
32 GB Dual CPU – SSD Disk dedicated to the system
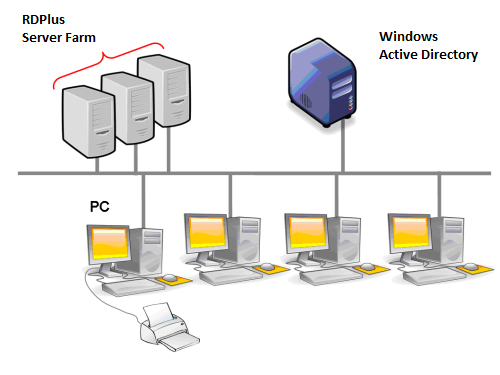
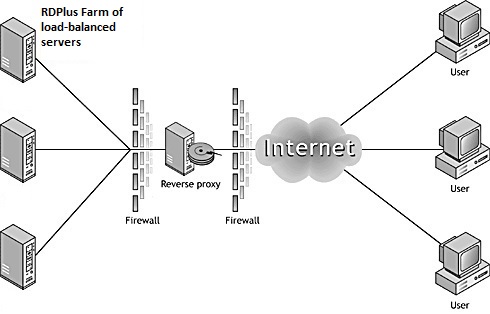
Over 50 concurrent sessions, we recommend to use a farm of servers, using the Load Balancing feature, available on the Enterprise Edition. Each server (physical or virtual ones) handling up to 50 concurrent users.
Comment: The type of hardware you need will mostly depend on what kind of resources the applications you wish to publish consume the most (CPU/memory/Disk). You might consider getting a server with SSD drives if you plan on using an application that accesses a database on your RDPlus server as it will greatly enhance the performances.
2) Operating system
Your hardware must use one of the operating systems below:
Windows XP Professional or Windows XP Home.
Windows Vista
Windows 7
Windows 8/8.1
Windows 10 Pro
Windows Server 2003 or 2003 SBS
Windows Server 2008 or 2008 R2/SBS
Windows Server 2012 or 2012 R2
Windows Server 2016
Windows Server 2019
32 and 64 bit are supported.
If you install RDPlus on a Windows 2008 to 2019 make sure the RDS or Terminal Services roles as well as the RDS Terminal Services licensing role are not installed before installing RDPlus. If these roles were present, remove them and reboot.
Windows 10 Home edition is not supported.
On Windows Server 2016, 15 sessions maximum are allowed for Remote Desktop access.
Windows Server 2019 Essentials Edition does not support RemoteApp.
3) Network parameters
The RDPlus Server must have a fixed IP address:
Remote access (from Wide Area Network – WAN)
A DSL connection is recommended as well as a public fixed address. Without a fixed IP address, you should install a dynamic DNS service like http://DynDNS.org
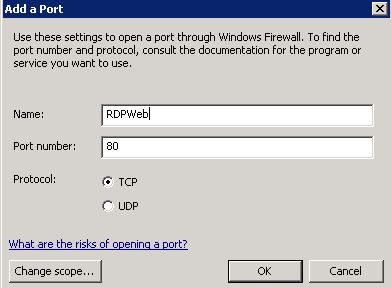
The TCP RDP port (by default 3389) must be opened both ways on your firewall.
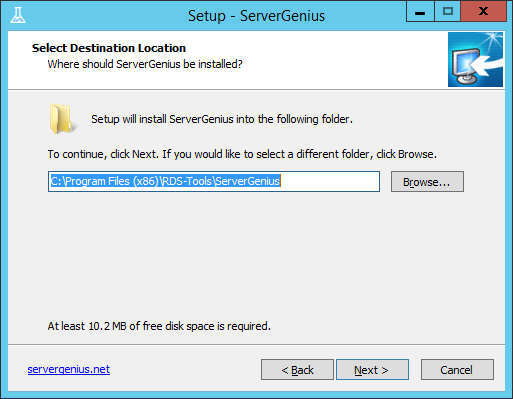
Step 1 : Installation.
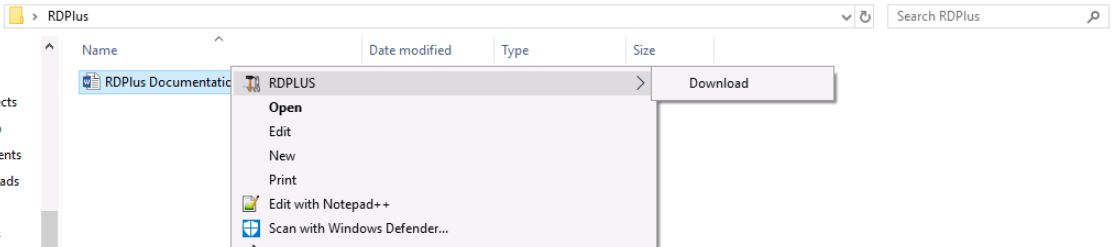
Installing RDPlus is an easy process. Just download it from our web site, run the Setup-RDPlus.exe program and wait until the program asks you to reboot. We recommend you to install Java prior to start the setup program. Java is mandatory to benefit from our great Web Access technology. See the documentation for installation.
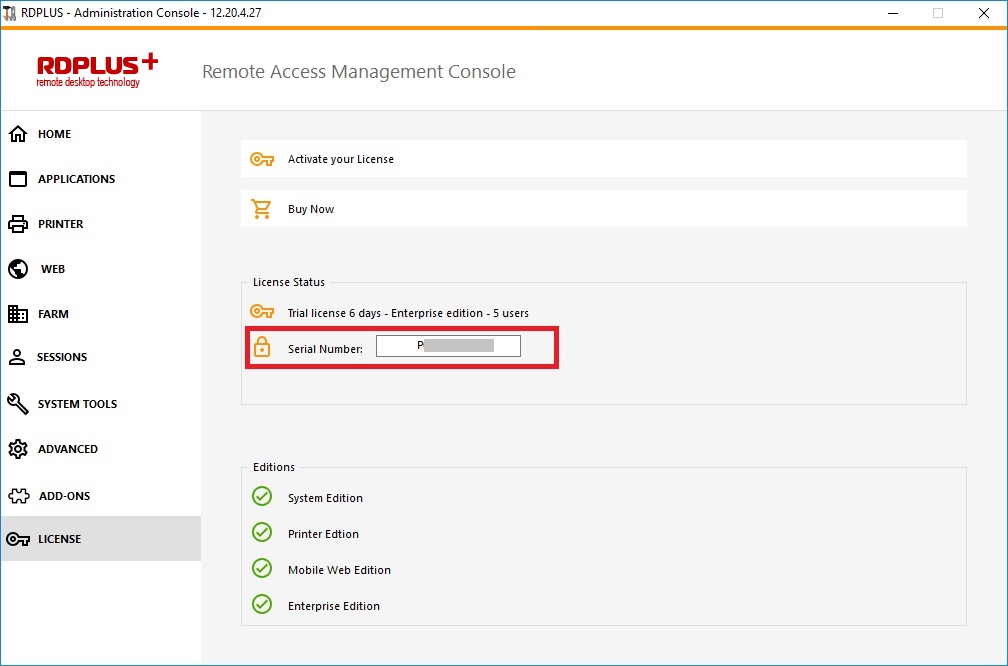
The trial version is a full RDPlus Enterprise Edition and enables up to 5 concurrent users for a period of 15 days.
After the reboot, you will see 2 new icons on your Desktop:
The AdminTool is what you need to use RDPlus.
The Portable Client Generator will create a RDPlus connection client for your users.
Pre-requisites:
On Server side:
From Windows XP to W10 and Windows 2003 to 2019 Server with at least 2GB of memory.
The operating system must be on the C drive. On Windows Server Environment, please make sure that the TSE/RDS role and the TSE/RDS licensing role are not installed to prevent conflict with RDPlus services.
It is mandatory to use a fixed private IP address and a fixed public IP address. If your ISP (Internet Service Provider) did not provide you with a fixed public IP address, you need to subscribe to a free DNS account.
On Client side:
Microsoft workstation: Windows XP, W7, W8 and W10 are supported. A PDF Reader (like FoxIt) and Java should be installed on the users PCs. Macintosh workstation: You can use any MAC RDP client, or RDPlus HTML5 clients. Linux Workstation: You can use Linux Rdesktop RDP client or RDPlus HTML5 clients.
Step 2 : Creating users.
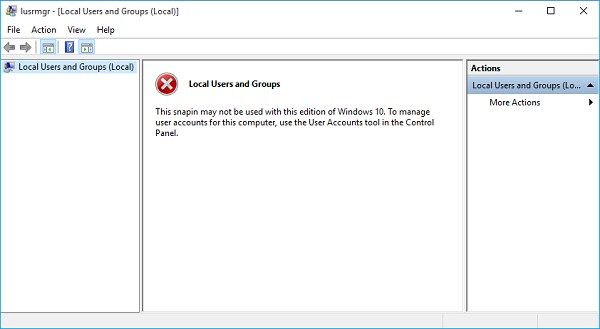
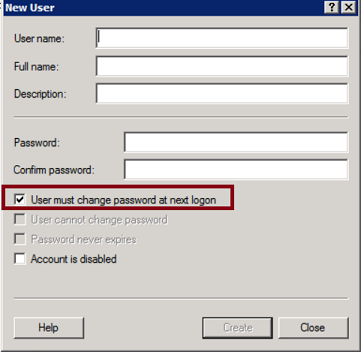
After reboot, the RDPlus host is almost ready to go. So the first action will be to create users and the AdminTool will help you to do so. Go to the System Tools tab, then click on “Users and Groups”. This will take you to the Local Users and Groups window:
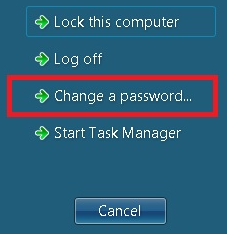
Each user must have a logon AND a password. Beware when you create users of the box checked by default: “User must change password at next logon”, if you don’t want your user to change his/her password each time, uncheck this box and check the “Password never expires” or “User cannot change password”.
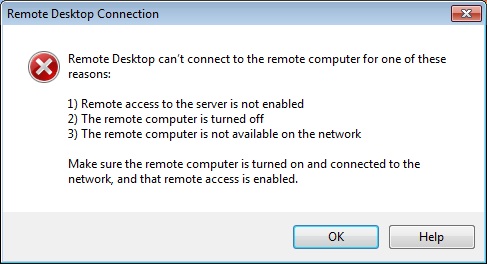
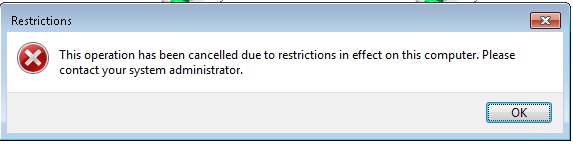
For Windows 10 Home users, the process to create users is different, since you will get this error message if you wish to create users with RDPlus:
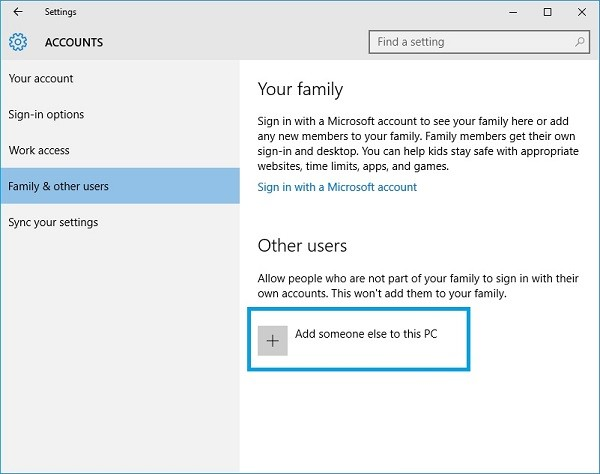
Open the Start menu and click on Settings, then on Accounts, select the ‘Family and other Users’ tab, and click on the ‘add someone else to this PC’ button:
On the ‘How will this person sign in?’ window, click on the ‘I don’t have this person sign-in information’ line at the bottom.On the next window: ‘Let’s create your account’, click on the ‘Add a user without a Microsoft account’ line at the bottom and finally, fill-in the required fields to create your user.
Step 3 : Select the most suitable client for your needs.
RDPlus complies with Windows RDP protocol. So, any user can connect locally or remotely with a standard Remote Desktop Connection client (mstsc.exe) or any RDP compatible client. To fully benefit from the RDPlus advanced features (Seamless client, RemoteApp, Universal Printer…) you can use a RDPlus generated client or the RDPlus Web Portal.
RDPlus is a very flexible solution and offers multiple ways to open a session:
Classic Remote Desktop Connection (MSTSC.EXE).
Portable RDPlus RDP client which will display a windowed environment for your remote connection that you can minimize in the Windows taskbar.
RDPlus Seamless client which will only display applications and no desktop.
MS RemoteAPP client which will display application using the native MS RemoteApp.
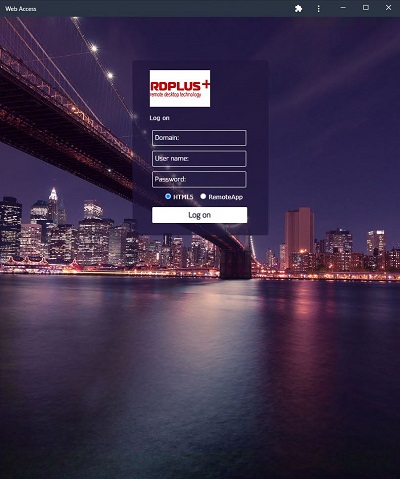
Windows client over the RDPlus Web Portal.
HTML5 client over the RDPlus Web Portal.
These clients give the user the following experience:
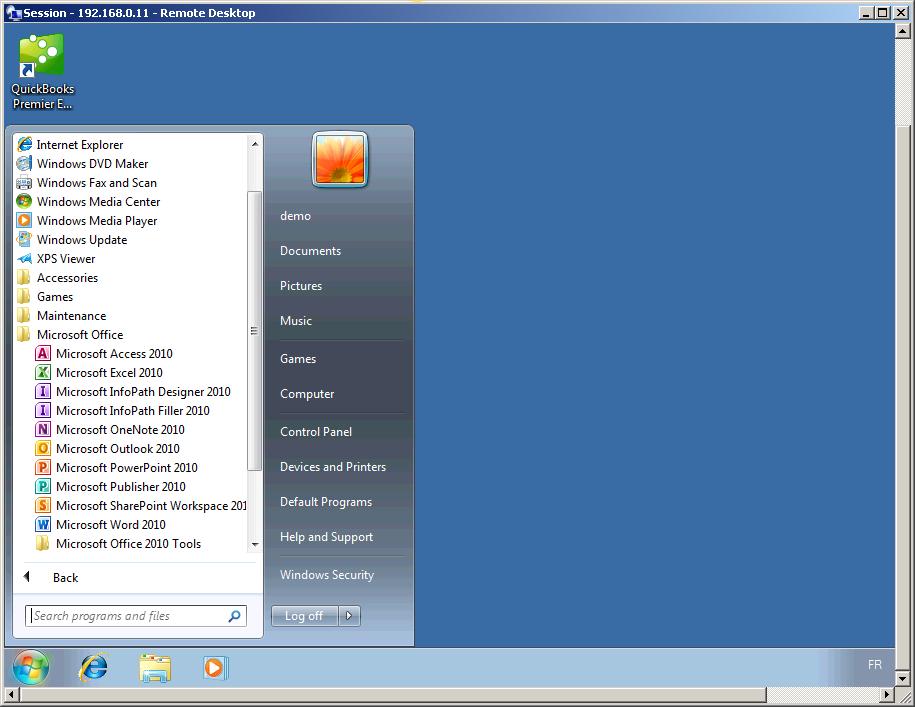
With Remote Desktop Connection (mstsc.exe)
Connection: The connection is a very standard one. The Universal Printer is not supported with this type of connection.
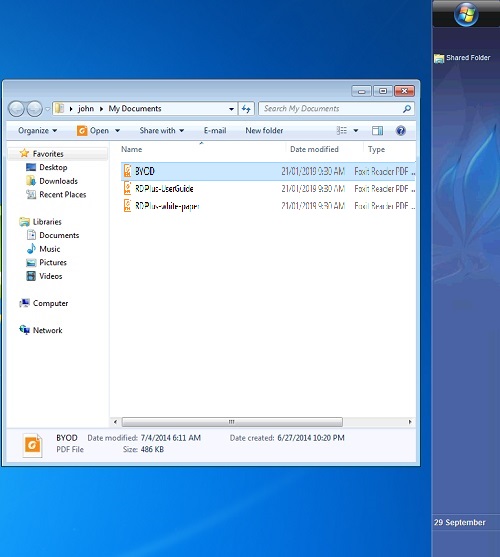
Display: Users will see their session within a Remote Desktop window. This desktop displays the content of the user’s desktop folder. If the administrator has assigned specific applications with the AdminTool, only these applications will be displayed (no taskbar, no Desktop).
This is a unique RDPlus solution, it empowers local and remote users to connect using one single dedicated program. It includes the connection program, the Universal Printing advanced feature, portability with high level of security while keeping it very simple for the users. So, it is much better than a classic Remote Desktop Connection. For more information about this client generation, see this documentation
Remote applications will exactly look like any local application. Instead of a classical Remote Desktop window, you will be free to switch between your local and remote applications without having to minimize a Remote Desktop window. If your RDPlus host does not supports the MS RemoteApp (for operating systems older than Windows 7 or Server 2008, and that you don’t have RDP6), you can use the RDPlus Seamless alternative for the RemoteApp technology. For more information about these clients, see this documentation.
Accessing your RDPlus server from a remote location
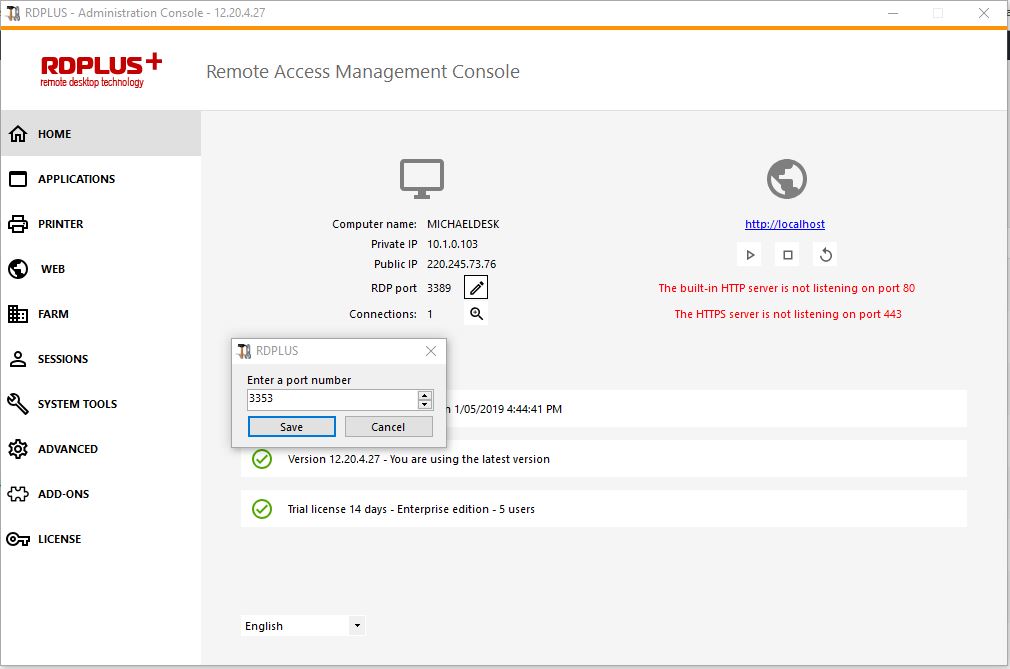
In order to access your RDPlus server from a remote location, you will have to create a port forwarding or port redirection rule of 3389/80/443 ports depending on your preferred connection method. You can change the RDP port on the Home tab:
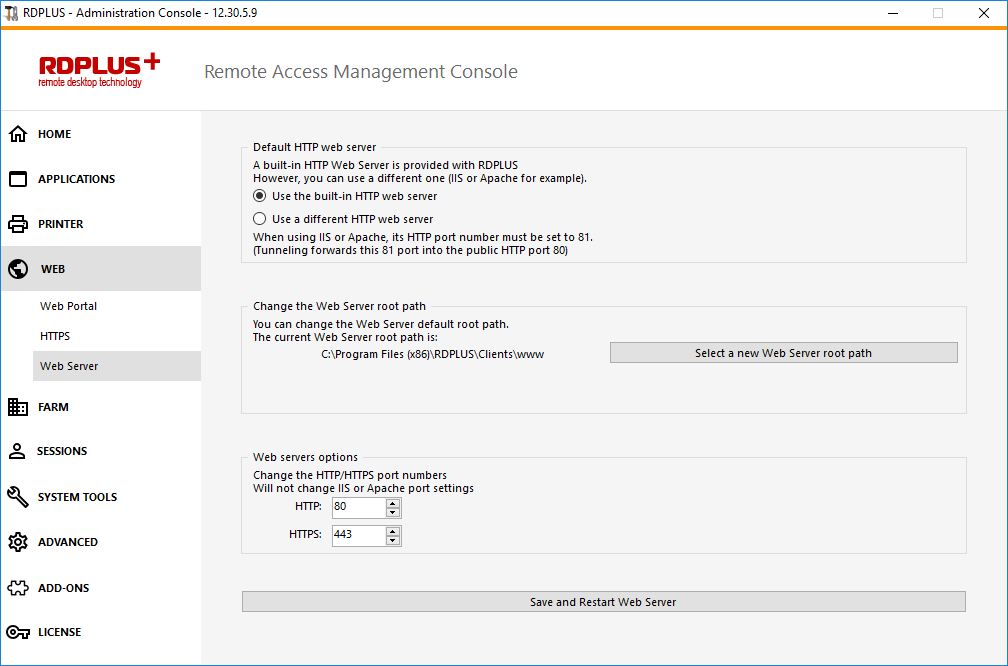
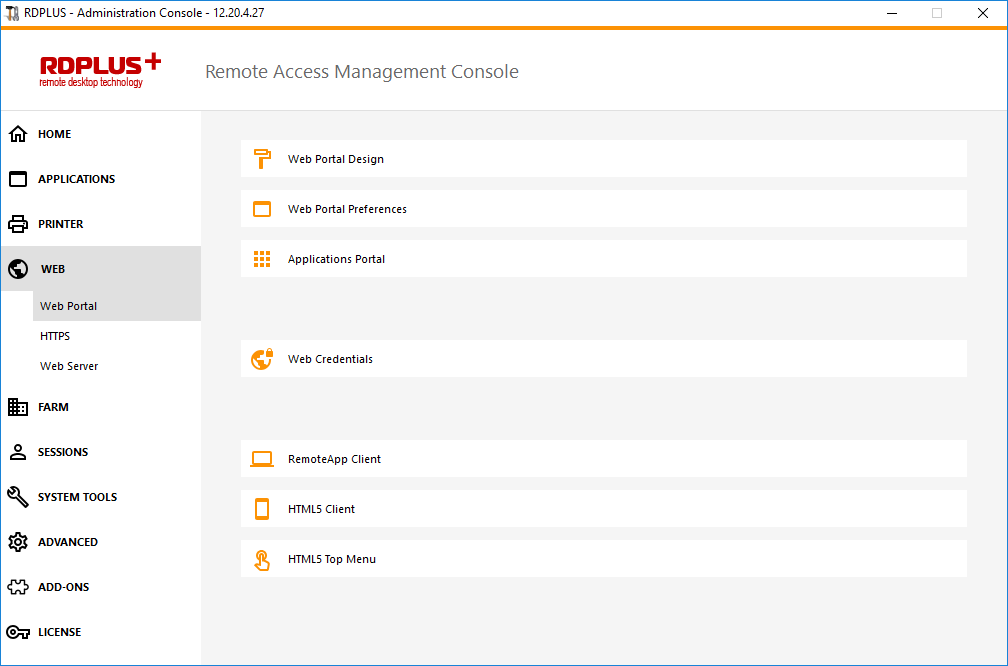
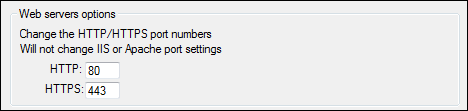
The 80/443 ports can be changed on the Web Server tab:
More information about changing communication ports can be found here.
Step 4 : Application publishing and Application Control.
One of RDPlus major benefit is the freedom to assign application to user(s) or to a group of users using the AdminTool.
If you assign one application to a user, he will only see this application.
You also can assign him the RDPlus Taskbar, the Floating Panel or the Application Panel to display multiple applications.
You can of course decide to publish a full Remote Desktop if you want to.
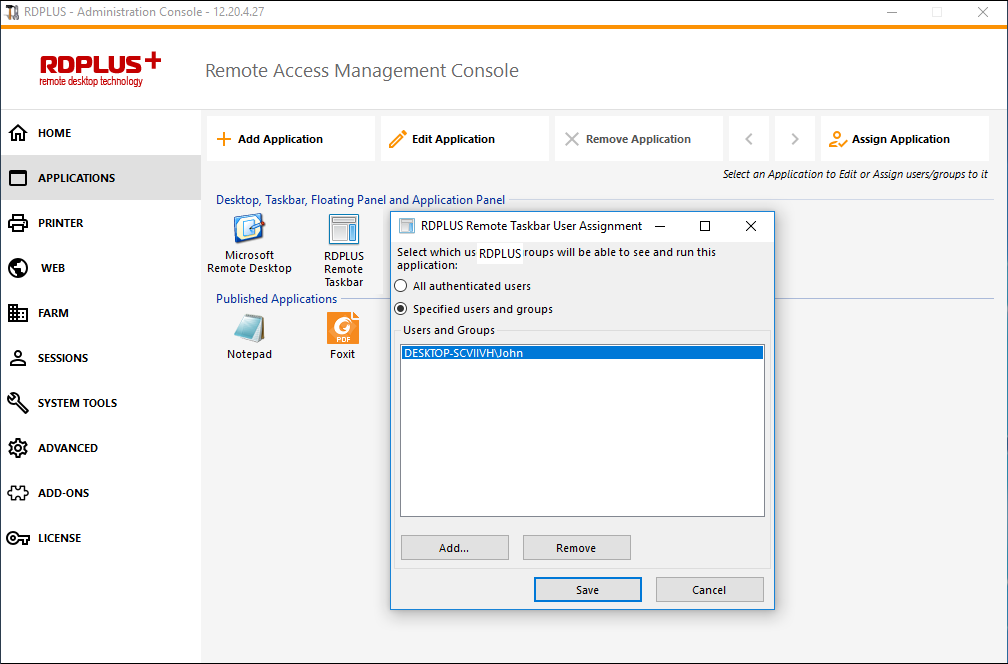
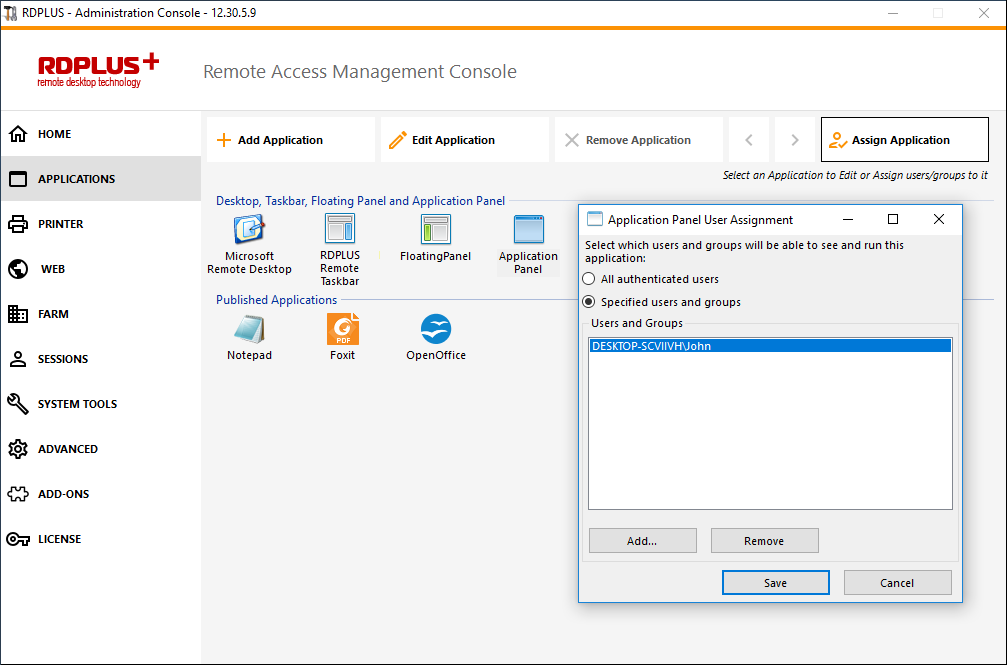
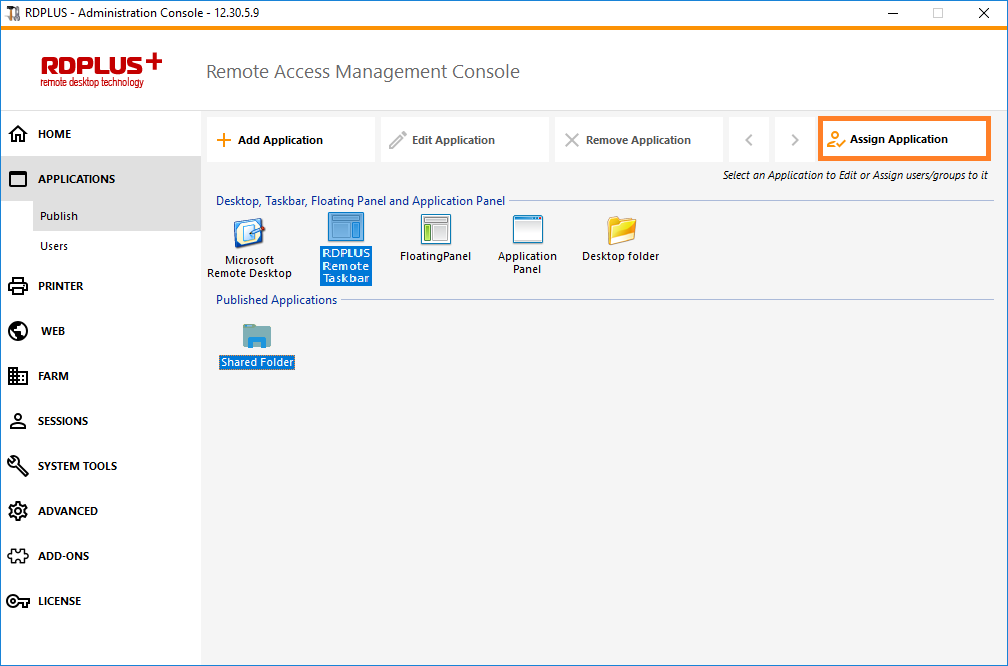
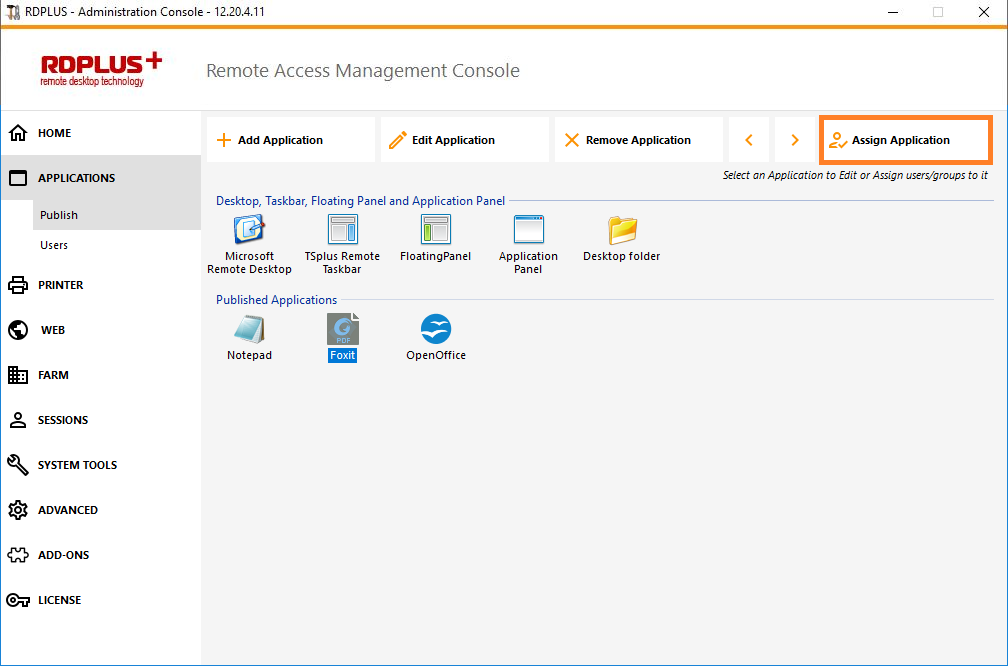
Go to the Applications Tab to add, edit, remove and assign Applications.
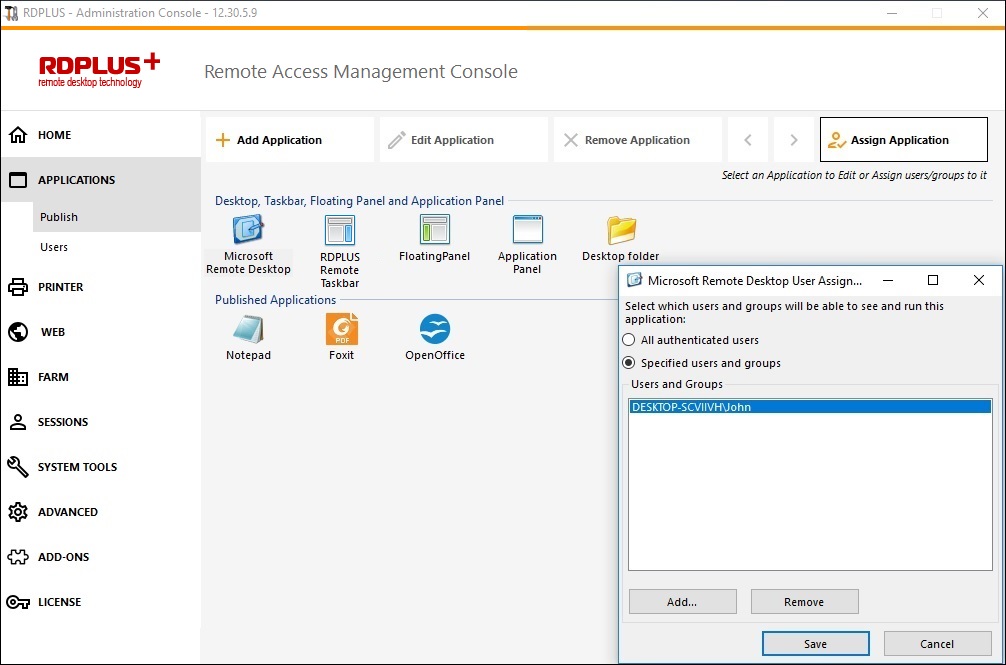
On this example, the administrator has decided that the user ‘John’ will get the RDPlus Taskbar. See this documentation for more information.
Please visit our support pages on our web site where you will find an On-line Guide, video tutorials, a Support Center with an FAQ and a Forum.
ENJOY your use of RDPlus !
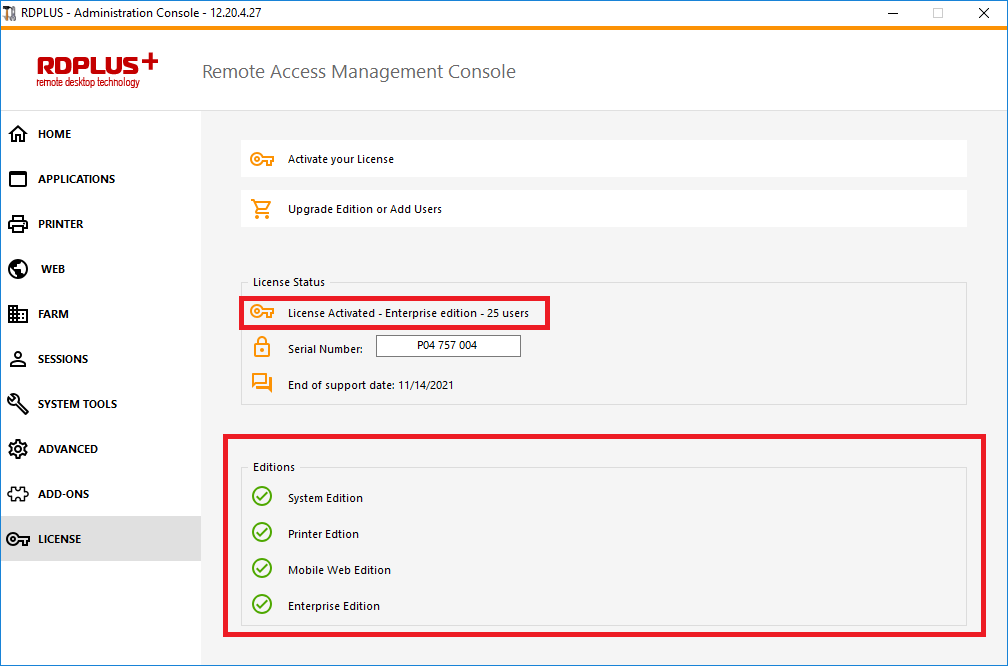
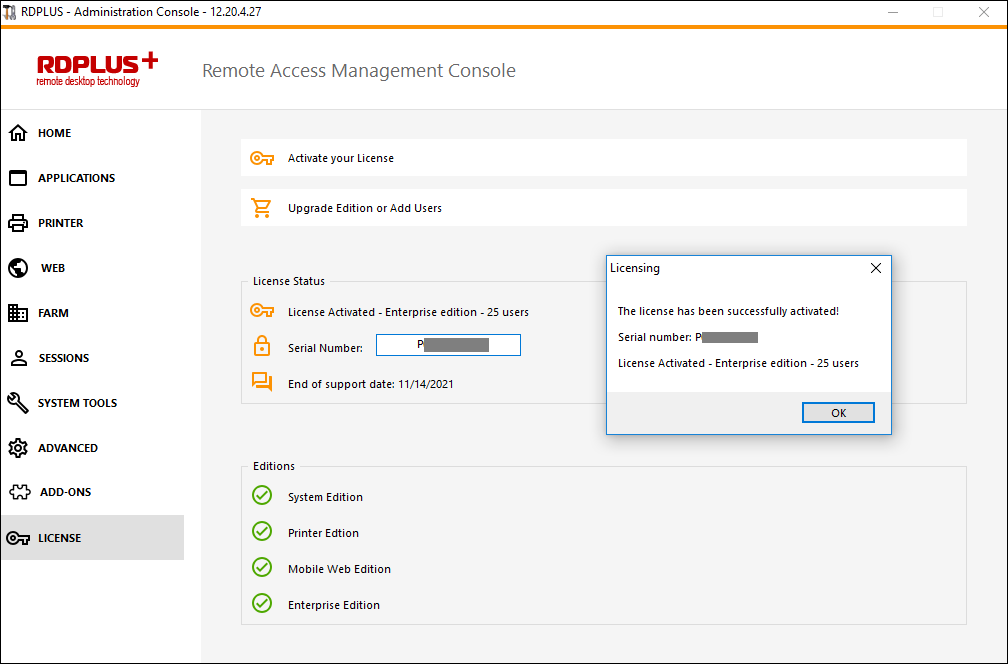
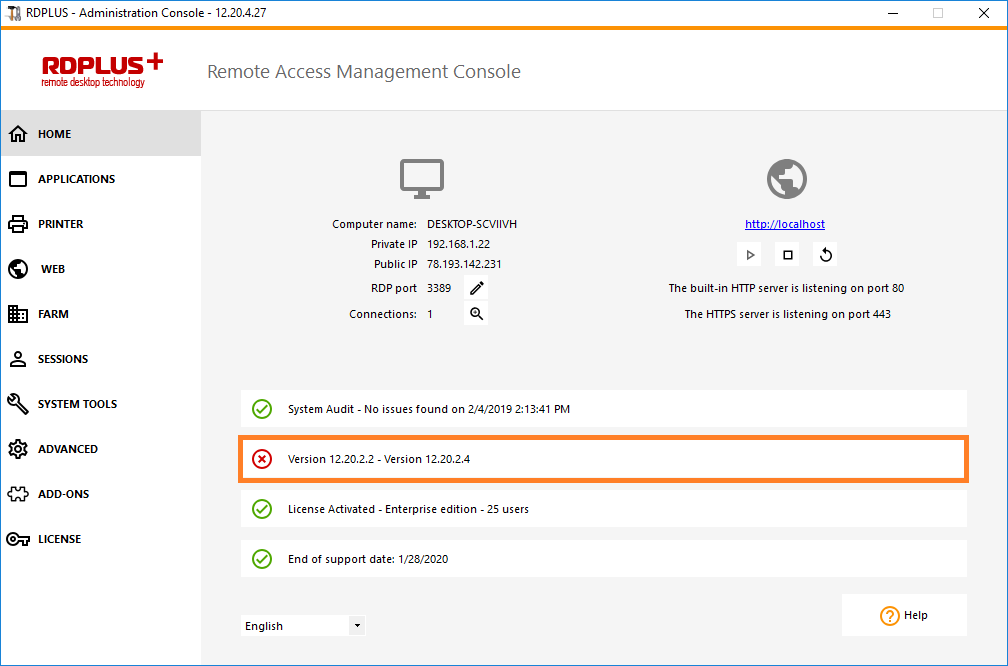
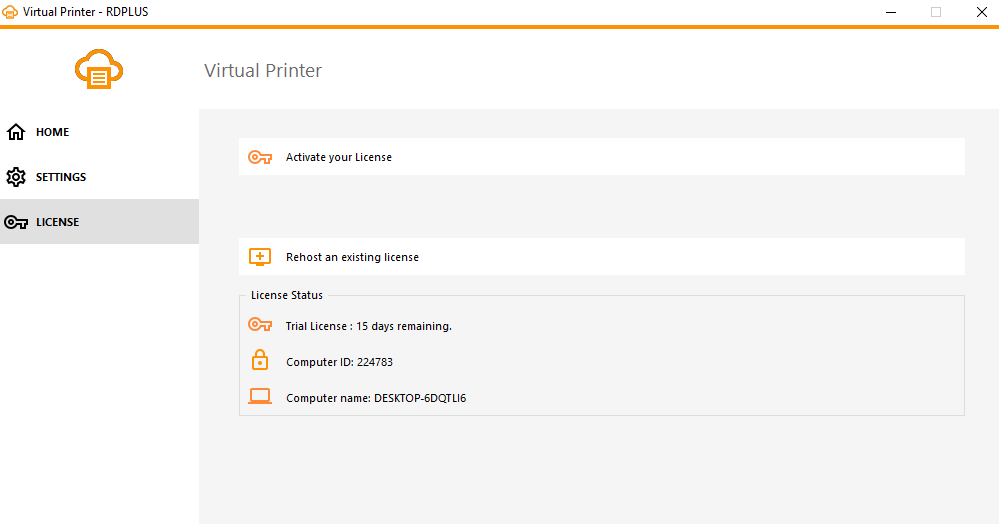
On the License Tile under the Serial Number, you can see the type of License you purchased as well as your number of users next to the number of connections:
RDPlus has merged old System Edition into the Printer one in order to gain more clarity.
The System and Printer Editions still have the same core features:
Dual Screen support, bi-directional Sound, RemoteFX when compatible with Windows version,
Local and Remote connection support,
Workgroup and Active Directory users support,
Device/Disk redirection.
The Printer Edition enables you to print from any location, without having to install any specific driver and allows printer redirection.
The Enterprise Edition includes all of the previous features plus these ones:
Support an unlimited number of servers within each RDPlus Farm,
Thousands of users working concurrently on a scalable Load-Balanced architecture,
Single Enterprise Portal to access all your RDPlus servers,
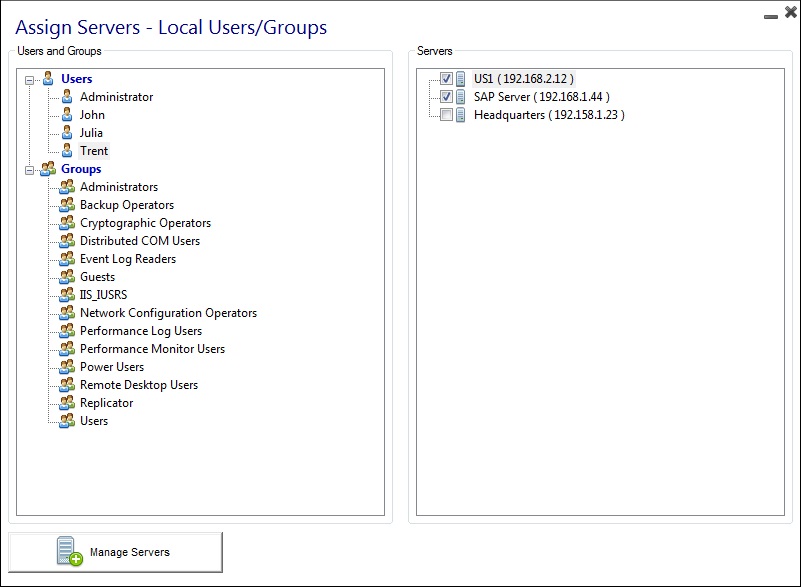
Ability to assign one or several Application Server(s) to users or groups of users,
Load Balancing and Failover support included.
The Possibility to add an extra-layer of security with the RDPlus 2FA Add-On.
Option One
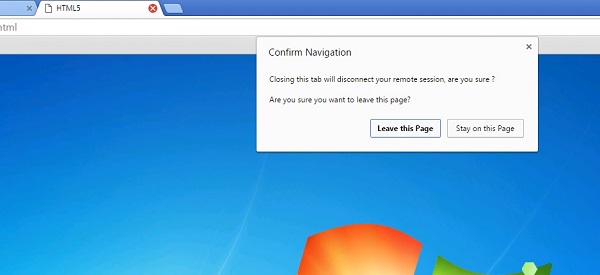
This will appear on Windows startup :
Option Two
Locate the Administrator Tool on your desktop :
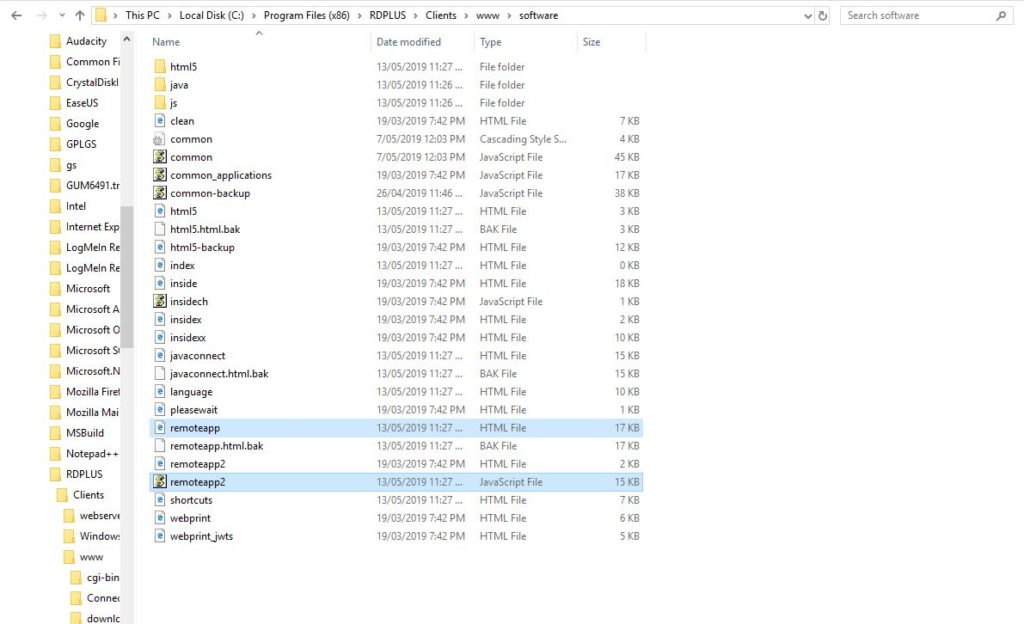
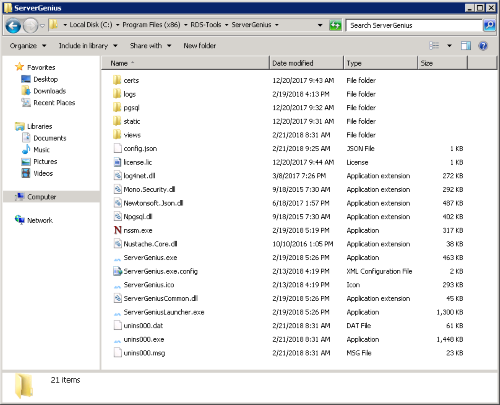
If you cannot find the admin tool shortcut, it should be located in the desktop folder on the administrator account used to download RDPlus. You can also find the RDPlus folder on this path: ‘C:\Program Files (x86)\RDPlus\UserDesktop\files’.
Double-click on it, then click on the license tab.
You can now see the Serial Number :
Activating your license
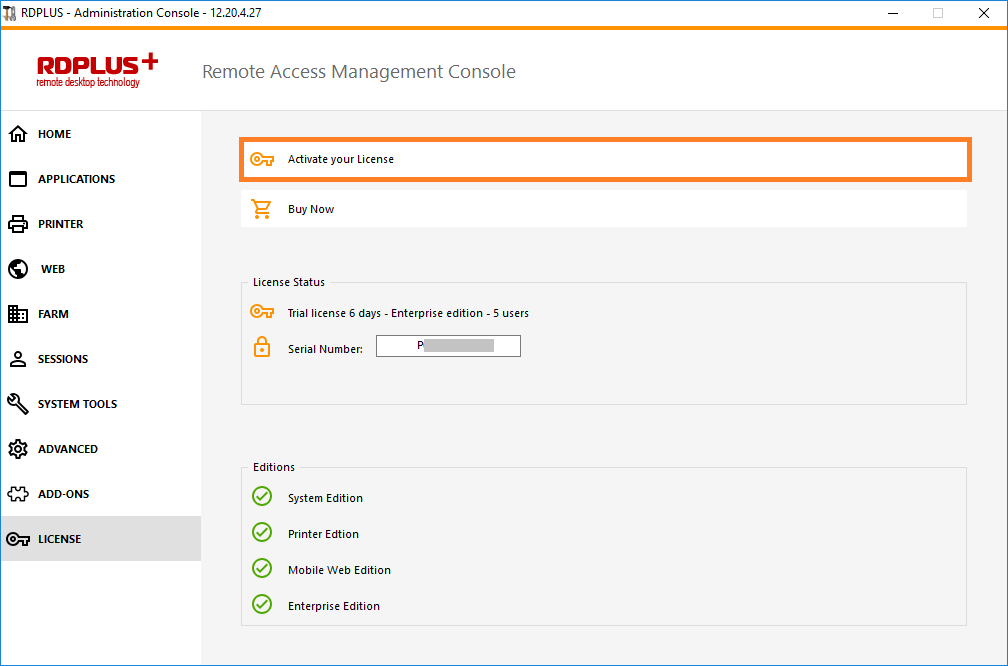
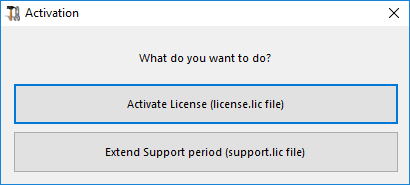
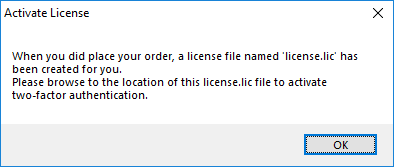
When you order a license, you will get your license.lic file, then, on the Admin Tool, click on the “Activate your license” tile:
Locate your license.lic file, then open it, your license is activated!
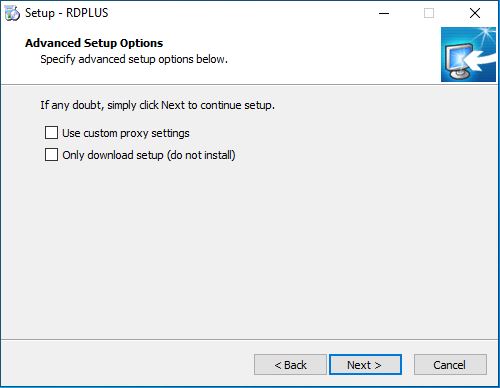
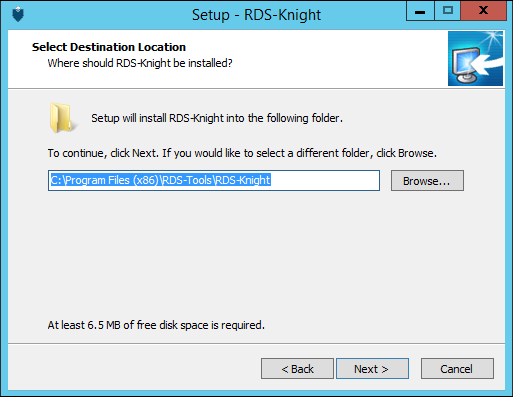
You can then select two custom options by ticking the corresponding boxes :
Use custom proxy settings.
Only download setup, which does not install RDPlus.
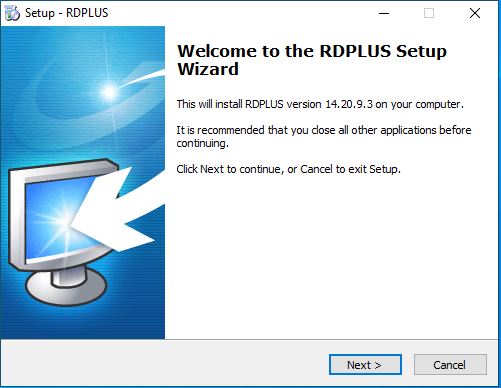
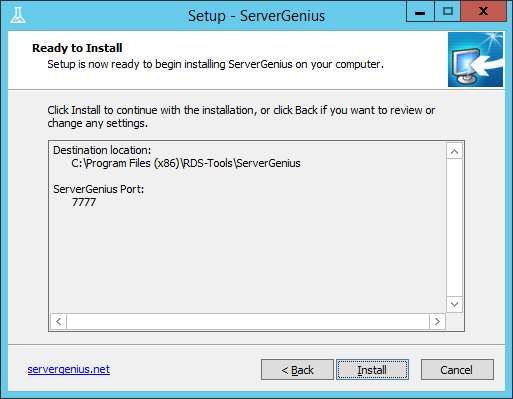
Click on next.
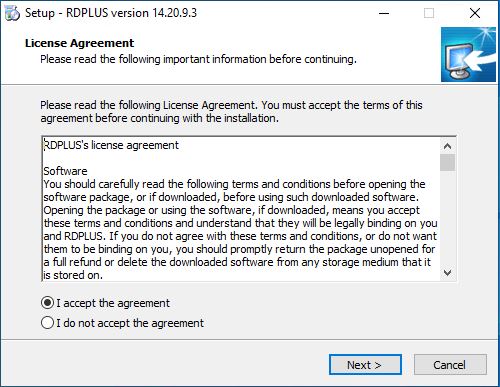
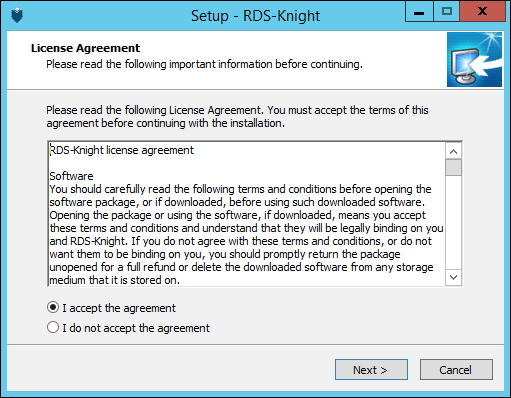
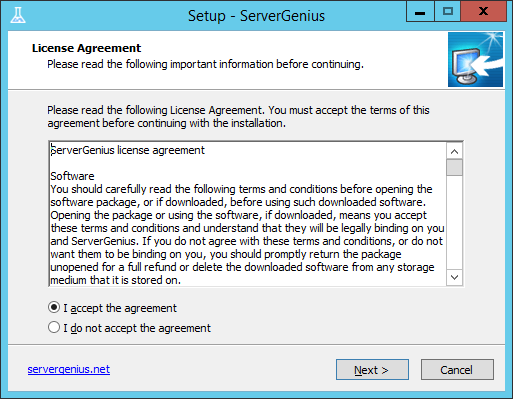
Click on “I accept the agreement”.
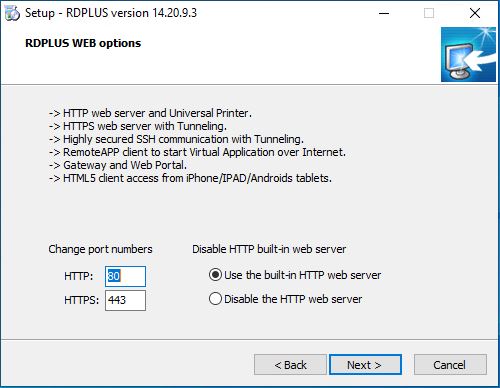
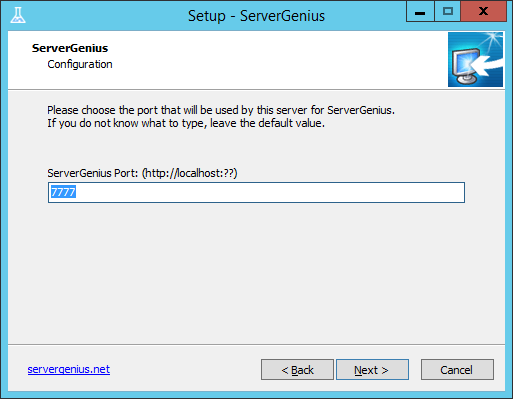
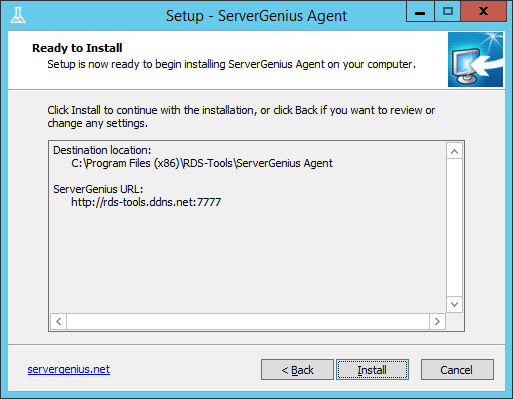
Web servers are listening on ports 80 and 443 by default. We recommend you to accept our RDPlus default installation settings. According to our experience, most of the production issues are due to Windows security features.
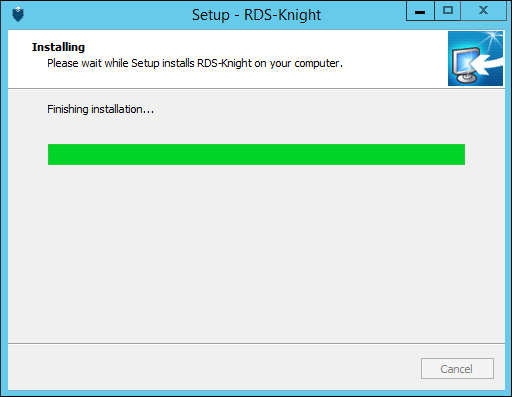
You can still modify these ports if you wish during installation or at any time on the Built-in Web Server Management of the AdminTool. Just make sure that the defined ports are available and that Java is installed on the server.
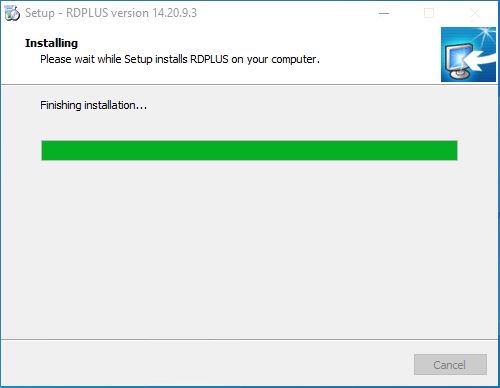
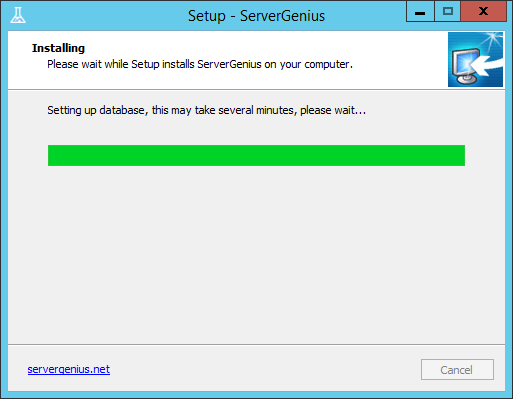
The progress bar appears and allows you to follow the progress of the process:
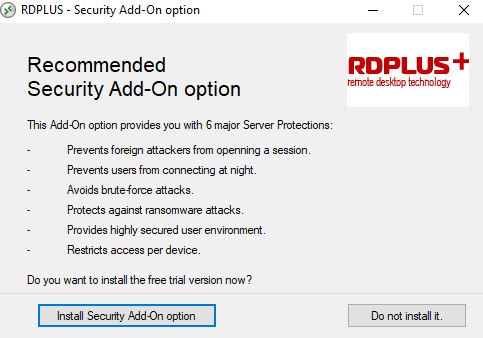
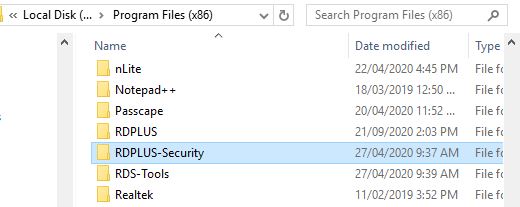
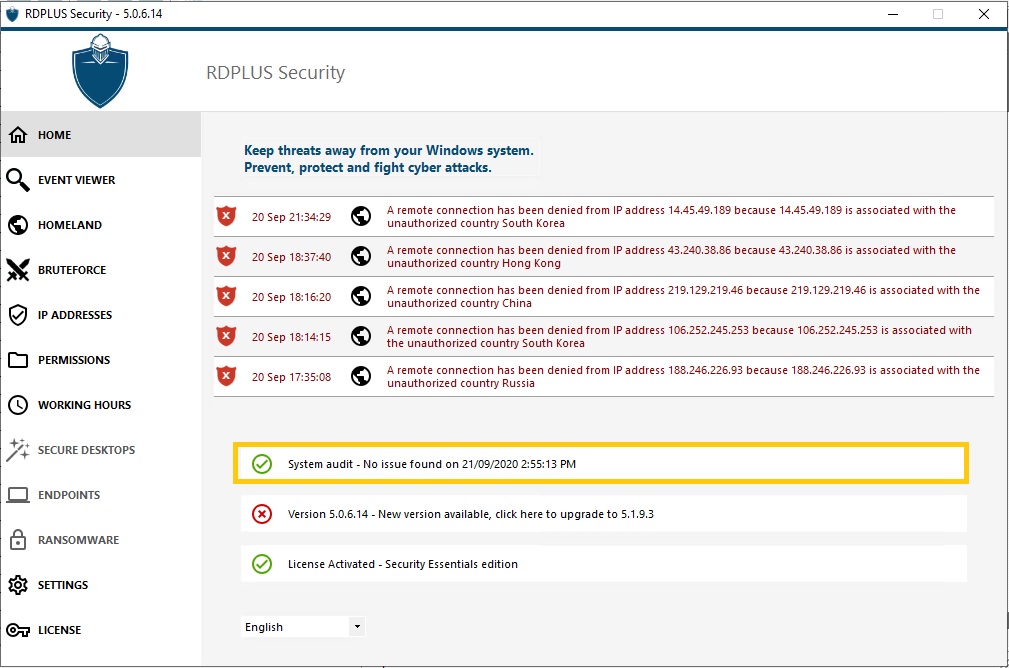
Since RDPlus 11.40 version, you will have the choice to install RDS-Knight, our powerful Security Add-On, in its Ultimate trial version (All Security features free to use for 2 weeks) to your RDPlus system:
For more information about this product, see the page about RDS-Knight Ultimate included features.
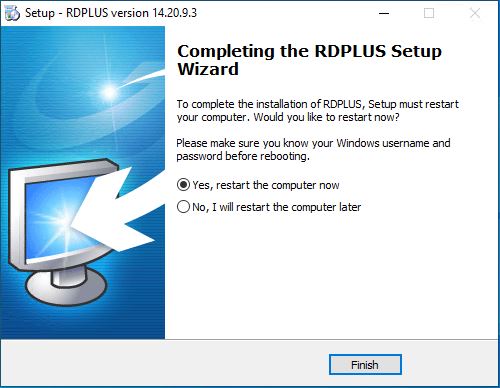
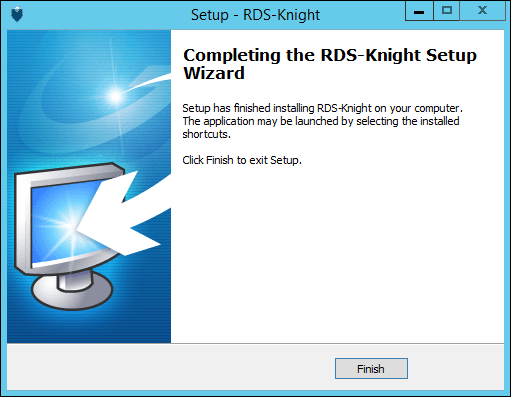
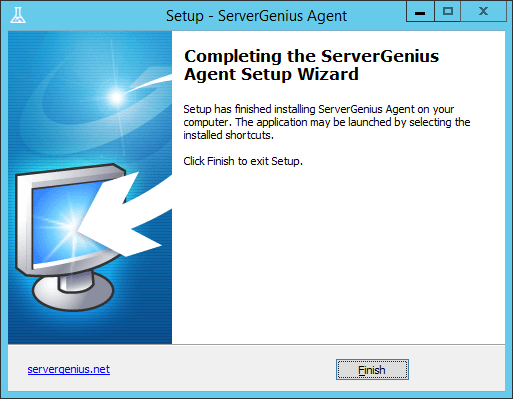
Then the RDPlus logo appears and a window informs you about the completion of the installation.
To use RDPlus, you must reboot your system. The trial period delivers a full product for 15 days and 5 concurrent users.
Overview
Securing any server is a never-ending story where every expert could add another chapter. RDPlus benefits from and is compatible with existing security infrastructure in a company (Active Directory, GPOs, HTTPS servers, SSL or SSL telecommunication systems, VPN, access control with or without ID cards, etc). For customers who want to easily secure their servers, RDPlus offers a set of simple and effective ways to enforce good levels of security.
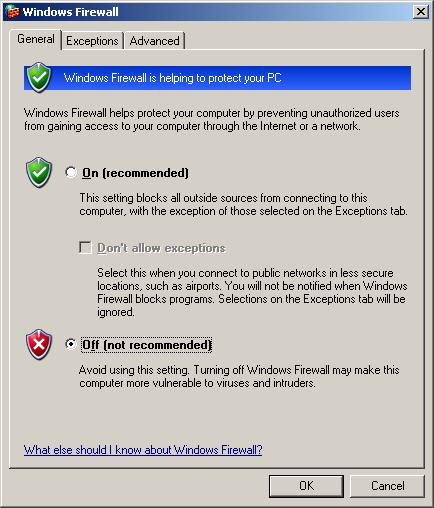
Changing the RDP port number and setting up the firewall
With the AdminTool, you can select a different TCP/IP port number for the RDP service to accept connections on. The default one is 3389. You can choose any arbitrary port, assuming that it is not already used on your network and that you set the same port number on your firewalls and on each RDPlus user access programs.
RDPlus includes a unique port forwarding and tunneling capability: regardless the RDP port that has been set, the RDP will also be available on the HTTP and on the HTTPS port number!
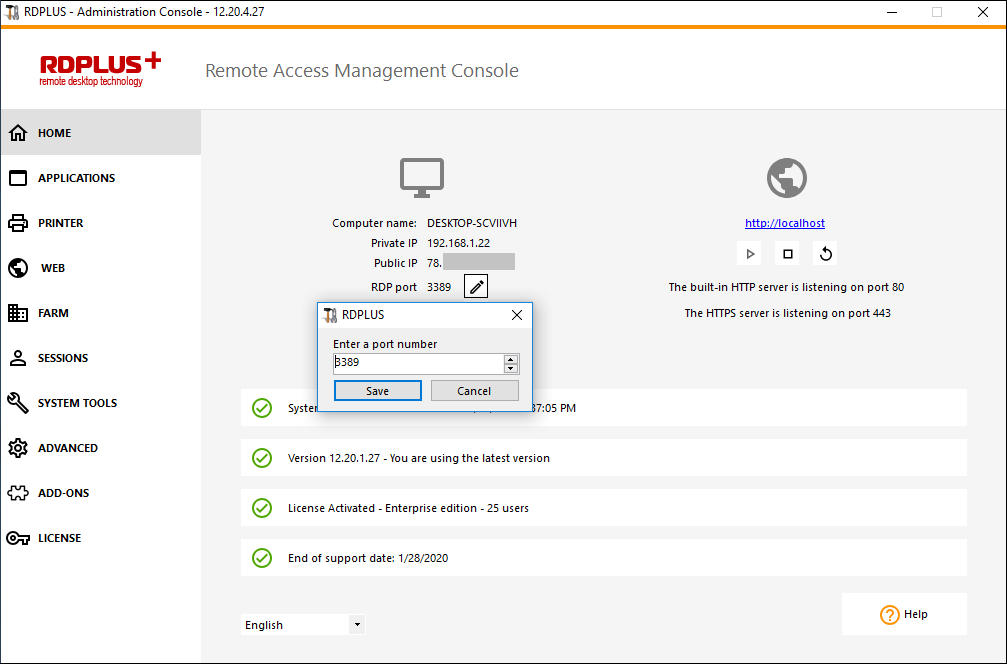
If users want to access your RDPlus server outside from your network, you must ensure all incoming connections on the port chosen are forwarded to the RDPlus server. On the Home tab, click on the pencil button next to the “RDP Port”:
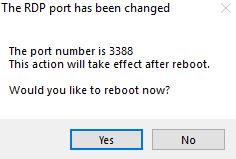
Change the RDP port and save.
Server side security options
The AdminTool allows you to deny access to any user that is not using a RDPlus connection program generated by the administrator. In this case, any user that would attempt to open a session with any Remote Desktop client other than the RDPlus one (assuming he has the correct server address, the port number, a valid logon and a valid password) will be disconnected automatically.
The administrator can decide that only members of the Remote Desktop User group will be allowed to open a session.
The administrator can decide that a password is mandatory to open a session.
Through setting the applicable local Group Policy, the administrator can specify whether to enforce an encryption level for all data sent between the client and the remote computer during a Terminal Services session. If the status is set to Enabled, encryption for all connections to the server is set to the level decided by the administrator. By default, encryption is set to High.
The administrator can also set as a rule that only users with a RDPlus connection client will be able to open a session. Any incoming access with a standard RDP or a web access will be automatically rejected.
Sessions Permissions
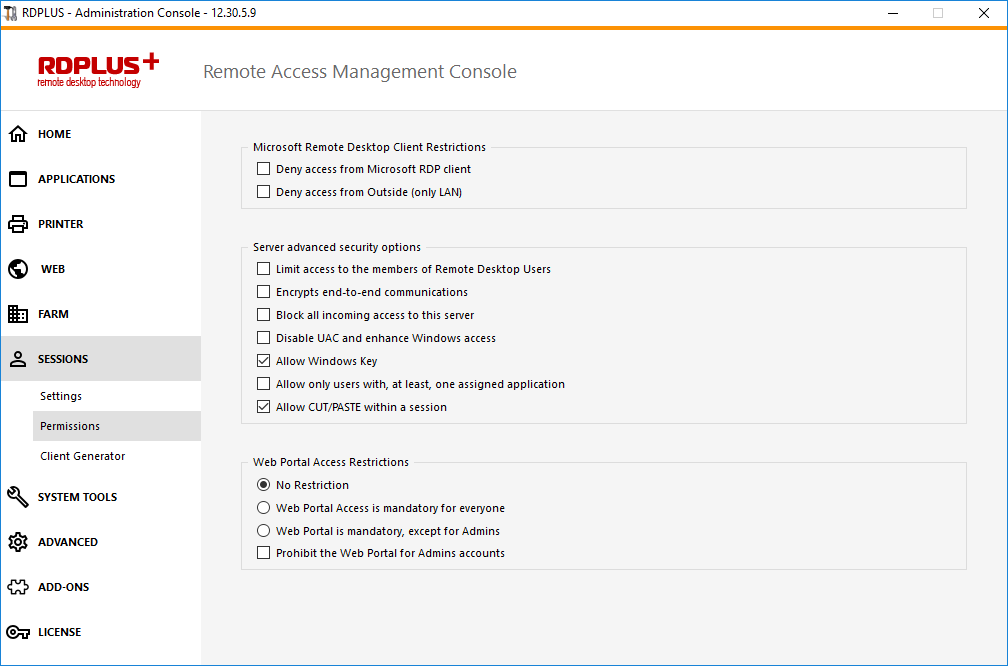
You can find multiple advanced security options if you click on the Sessions – Permissions tab:
Allow access from Microsoft RDP client for everyone: Allows every user to connect using mstsc.exe.
Allow access from Microsoft RDP client for Admins only: Allows only Admins to connect using mstsc.exe.
Deny access from Microsoft RDP client: Prevent anyone to be able to connect using mstsc.exe.
Deny access from Outside: It means that only private IPs from LAN will be able to open a session.
Limit access to the members of Remote Desktop users: This limit applies only to this local group of users (which you can see by clicking on the Users and Groups tile.
Encrypts end-to-end communications: High Encrypts client/server communication using 128-bit encryption. Use this level when the clients accessing the terminal server also support 128-bit encryption.
Block all incoming access to this server: All alive sessions will remain active, while all incoming connections attempts will be blocked. Make sure that you can physically access the console of the server if you check this box. Do not use this option if your server is hosted on a Cloud environment.
Disable UAC and enhance Windows Access: Deactivates the User Accounts Controls, remove all unwanted security pop-ups from Windows. users limitation (messages) while launching applications.
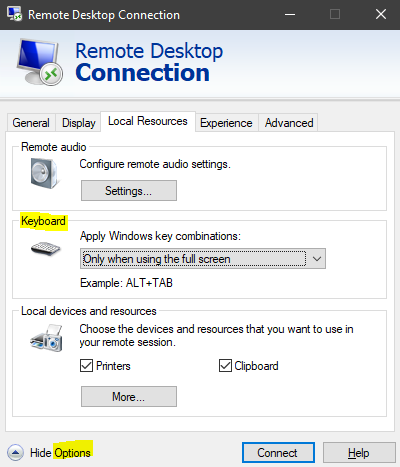
The “Allow Windows Key” box allow the use of the Windows keys and combinations inside a RDPlus session.
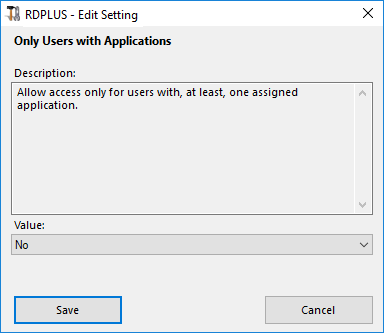
Allow only users with, at least, one assigned application: User with one application and more are allowed to open a session.
Allow CUT/PASTE within a session: unchecking this box will disable the CTRL C/CTRL V commands
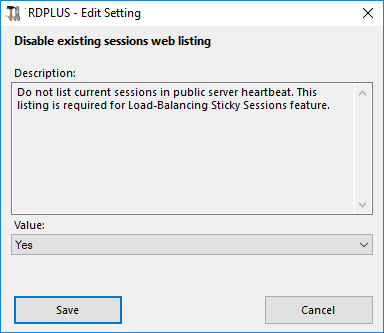
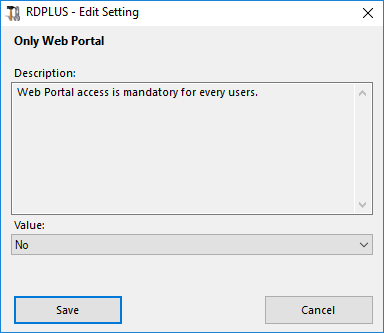
Web Portal Access Restrictions
No Restriction
Web Portal is mandatory for everyone: users can only connect via the Web Portal.
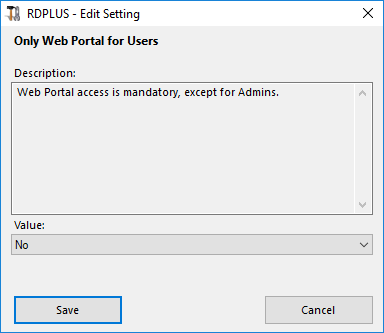
Web Portal is mandatory, except for Admins: users can only connect via the Web Portal, except Administrators.
Prohibit the Web Portal for Admins accounts: Administrators cannot connect via the Web Portal.
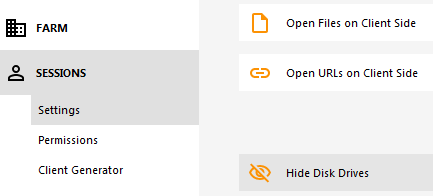
Hiding the server disk drives:
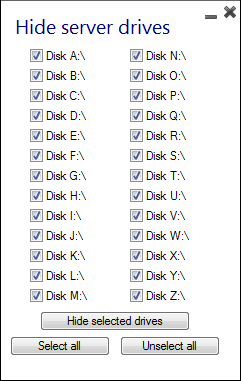
The AdminTool includes a tool that enables hiding the server disk drives to prevent users from accessing folders through My Computer or standard Windows dialog boxes. On the Sessions – Settings tab, click on “Hide Disk drives” :
This tool works globally. This means that even the administrator will not have a normal access to drives after the settings have been applied. On the example below, all drivers have been selected with the “select all” button, which will check all the boxes corresponding to drives that will be hidden to everybody:
Notes: This functionality is powerful and does not disable the access to the disk drives. It just prevents the user to display it.
The tool flags the disks drives as hidden, but it also adds the HIDDEN property to the entire root folders and users list in Document and Settings.
If the administrator wants to see these files he must:
Type the disk drive letter. For example: D:\ which will take you to the D: drive.
Turn on SHOW HIDDEN FILES AND FOLDERS in the folder view properties.
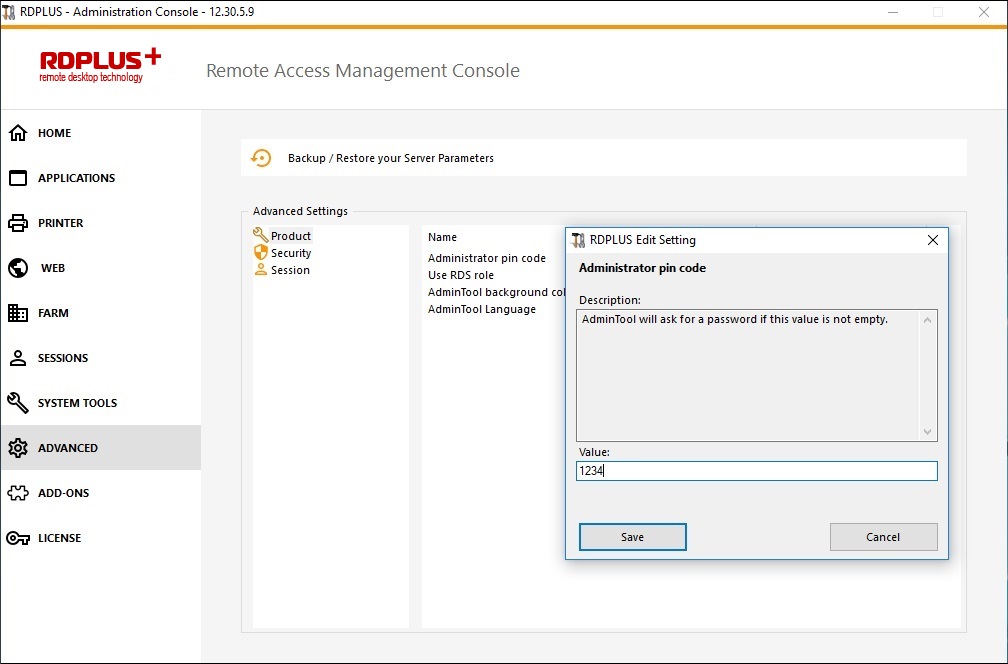
Administrator Pin Code
The Administrator can secure the Administrator Tool access by setting a pin code which will be asked at every start, on the Advanced tab of the AdminTool, under the Product Settings:
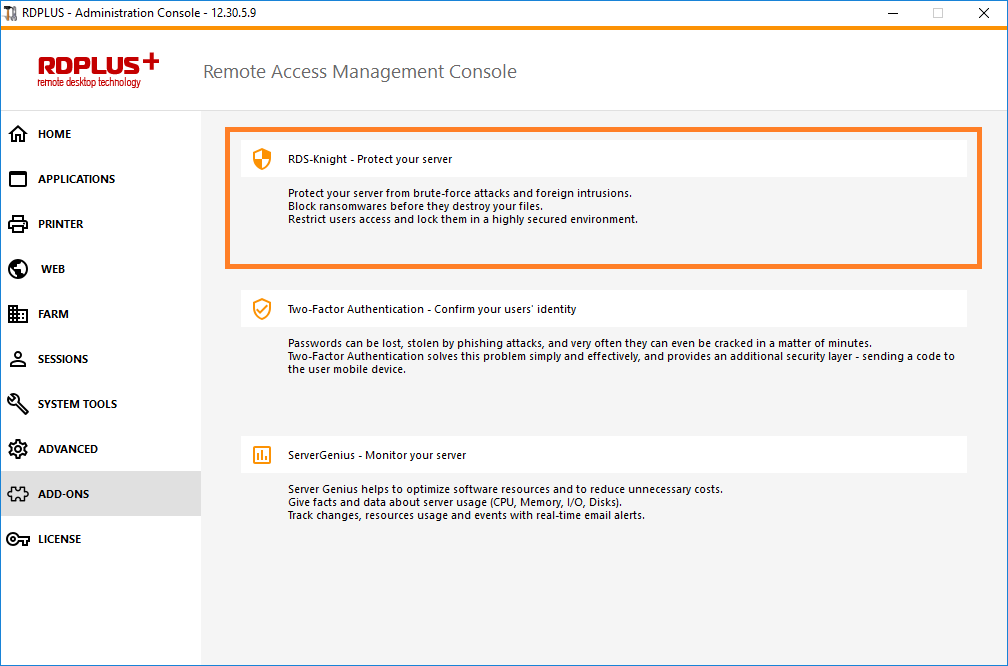
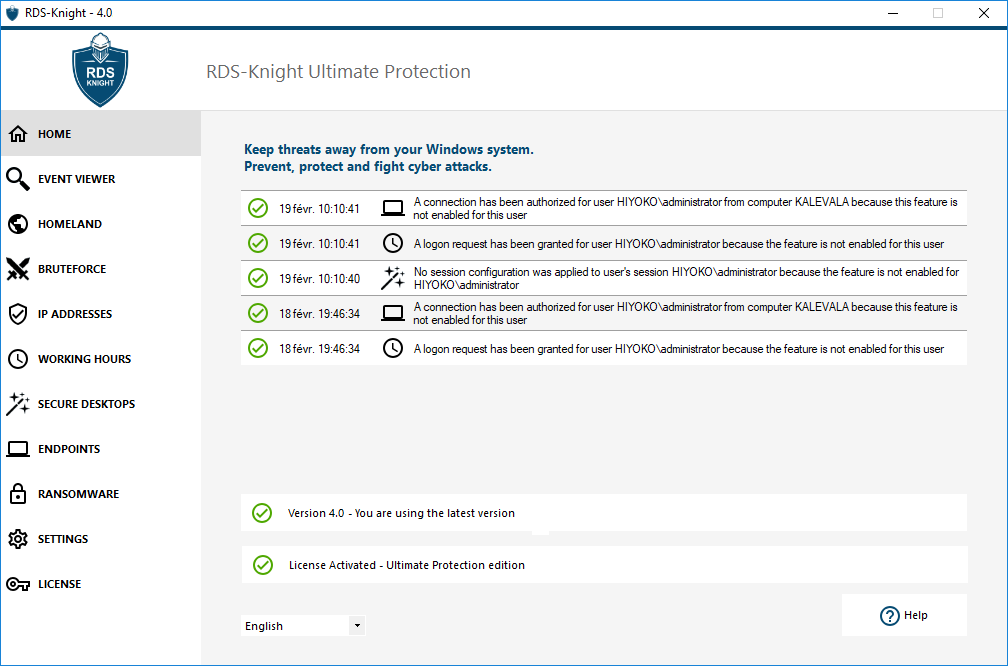
RDS-Knight Ultimate
Since RDPlus 11.40 version, you will find a one-of-a-kind Security Add-on Tool, which you can launch on the Add-Ons:
Which brings powerful features, documented on this page.
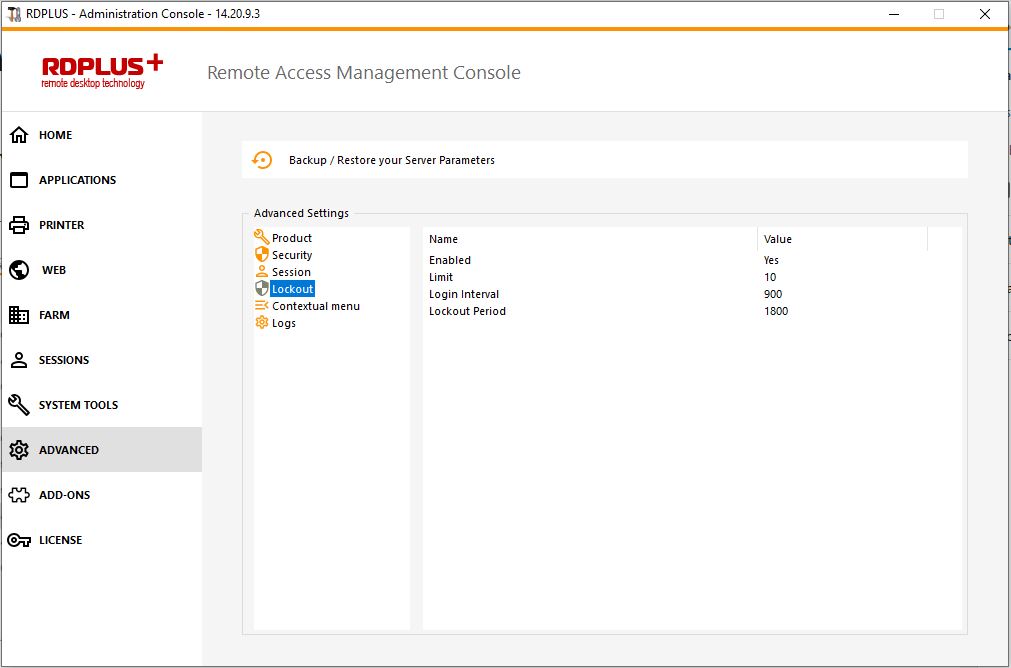
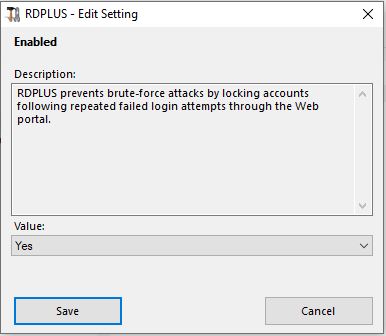
The Brute-Force Attacks Defender role on the Web Portal is described on this page.
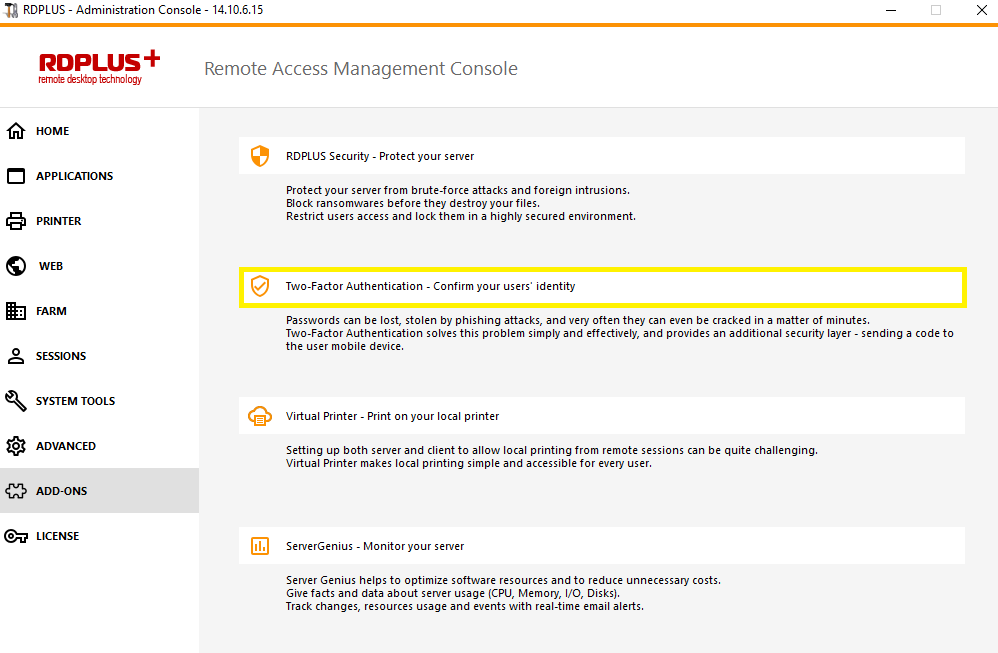
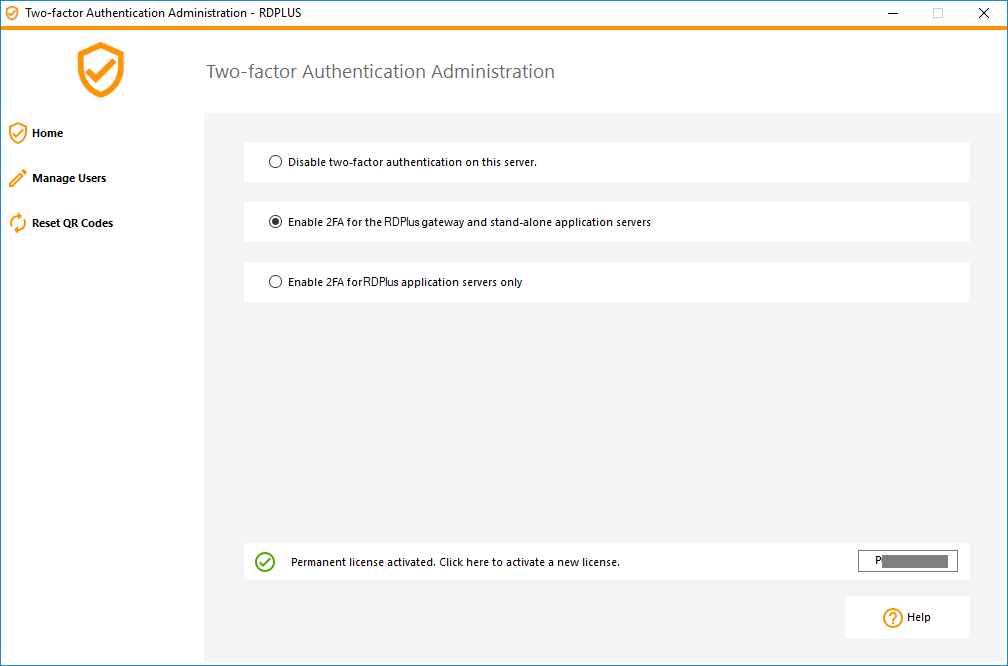
Two Factor Authentication
Since RDPlus 12 Version, you can enable two-factor authentication as an add-on for your RDPlus Web Portal.
More information on this amazing new feature can be found on this page.
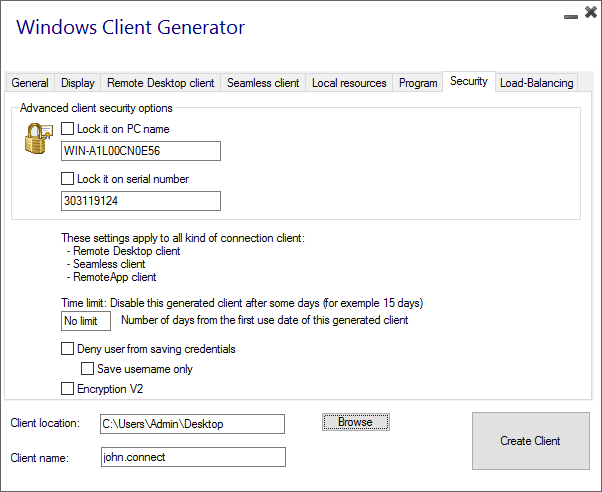
The RDPlus client generator gives the capability, on its Security tab, to lock the RDPlus client to:
A specific PC name. It means this program will not be able to start from any other PC.
A physical drive serial number (PC HDD or USB stick). This is a very easy and powerful way to set a high level of security. The only way to connect is with a specific client, and this specific client can only start on a specific USB stick or PC HDD. Some of our customers are delivering fingerprint-reading USB sticks to each of their users and each generated program is locked to the device serial number. This way, they can restrict access to the client’s program itself, as well as ensuring it cannot be copied off the USB stick and used elsewhere.
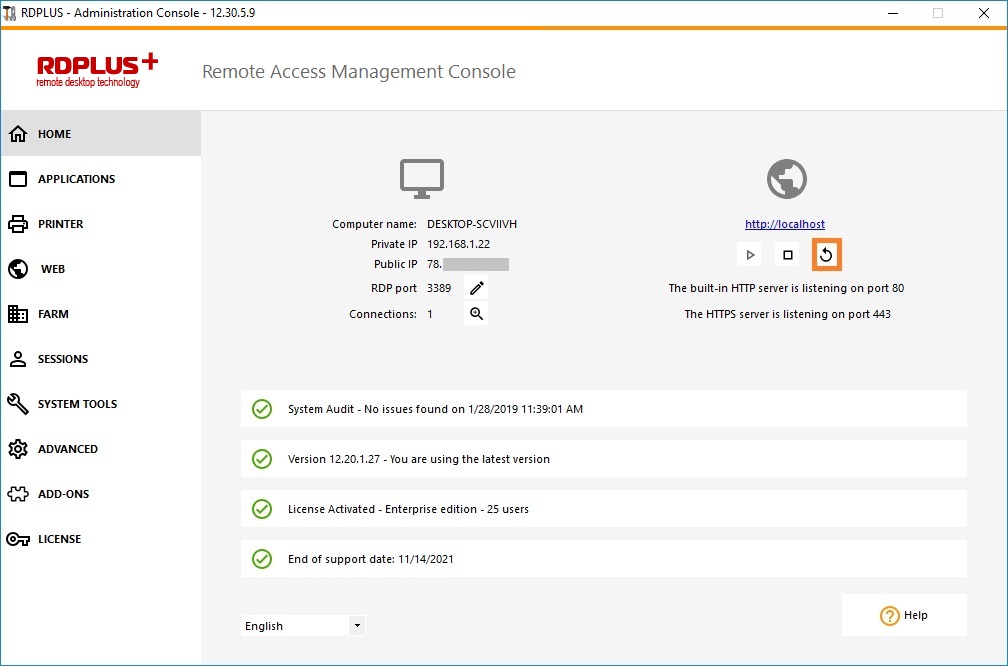
On the Home tab of the AdminTool, you can see all the needed information about your RDPlus server:
Changing the RDP port number and setting up the firewall
With the AdminTool, you can select a different TCP/IP port number for the RDP service to accept connections on. The default one is 3389. You can choose any arbitrary port, assuming that it is not already used on your network and that you set the same port number on your firewalls and on each RDPlus user access programs.
RDPlus includes a unique port forwarding and tunneling capability: regardless the RDP port that has been set, the RDP will also be available on the HTTP and on the HTTPS port number!
If users want to access your RDPlus server outside from your network, you must ensure all incoming connections on the port chosen are forwarded to the RDPlus server.
Management of users and sessions
The session manager is located right below the RDP port:
You can display your server’s task manager, and you have the possibilities to active a remote control, disconnect, logoff or send a message to your users.
You can activate the remote control via a remote session with an admin account on the following Operating Systems:
Windows Server 2008 R2
Windows Server 2012 R2
Windows Server 2016
Windows Server 2019
Windows 7
Windows 8.1
Windows 10 pro and above
On Windows XP, 2003, Vista, and 2008 there is no remote control button. On Windows 2012 and 8 a message appears advising you to update to 2012 R2 or 8.1.
When you activate the remote control for a user’s session, this message appears, indicating the keyboard shortcut to end the session:
On the client side, this message appears to accept the remote control:
You can also send a message to your user:
Message sent on Server Side
Message appearing on Client Side
The Users and Groups tab allows you to add/edit or delete users.
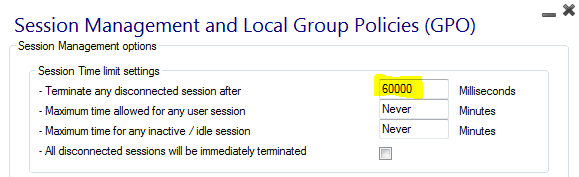
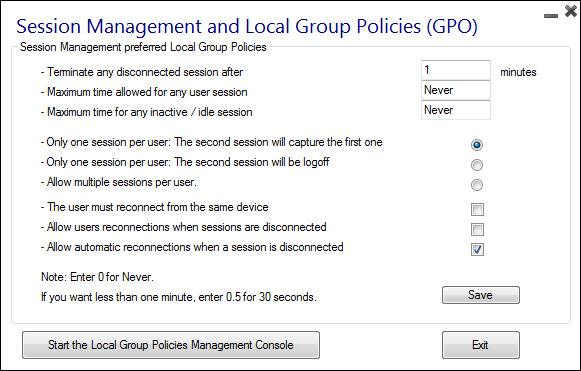
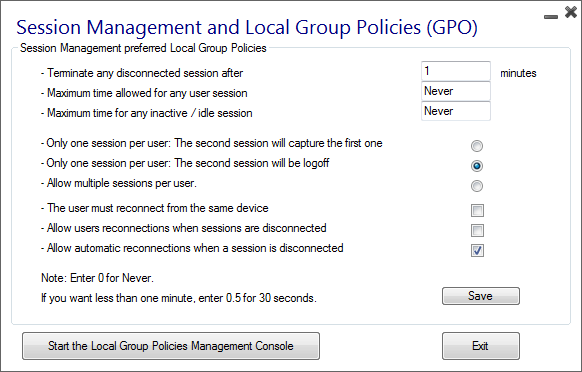
With the Session Management Settings (GPO) tab, you can set various connection settings for each session and user:
Windows Server 2016 introduced a new “Per user service”, which makes services start all processes per users, which slows the users logons time. Since RDPlus 11.70 release, you can disable per user services in order to speed up users logons.
Services and Properties
The Windows Toolkit is an enhanced control panel, summarizing all the Windows Administration tools.
– You can also launch the “Server Properties” tab to have an overview of the control panel.
– You can see all the services on your server and their status on the Services tile.
Session Opening Preference
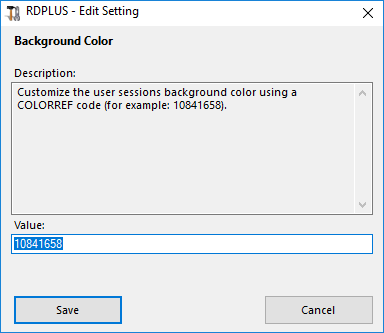
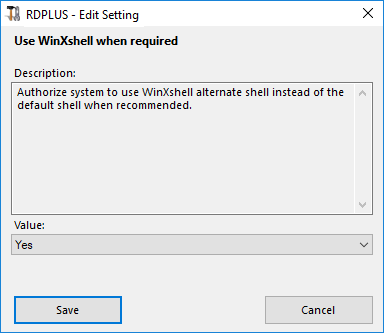
The session opening preference allows you to choose your shell session preference, your logon preferences, the background color of your sessions, add your own logo and rename it to your liking.
By default, on these logon preferences are enabled:
The “Display progress bar during logon“.
“Enable Time Zone Redirection” which enables the client computer to redirect its time zone settings to the Remote Desktop Services session. If you enable this policy setting, clients that are capable of time zone redirection send their time zone information to the server.
You can also set a full Desktop for all your users and get a display the last connected users by ticking the corresponding boxes. You can customize your users sessions by adding a new Background Color, another logo or none and use the session name of your choice.
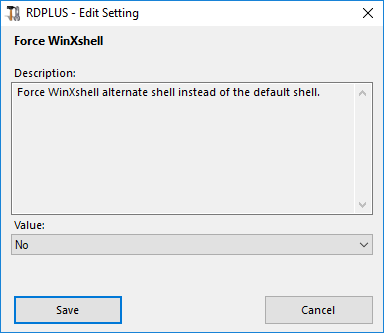
Since RDPlus 11.70 release, you can useRDPlus WinXshell as an alternative to the Windows shell. Following the October 10 Windows Update, administrators allowing their users to start a Remote Desktop saw the Windows shell as an issue. The main problem resides in the session opening/black screen issue when a complete desktop is assigned to multiple users on Windows 10 and Server 2016. It provides features and graphical experience similar to Windows 2016 Windows shell, such as the display of the 2016 Start button and taskbar. It is especially useful if you use Windows 10 or Windows 16 Operating systems, manage 10 users or more and wish to assign them a full desktop.
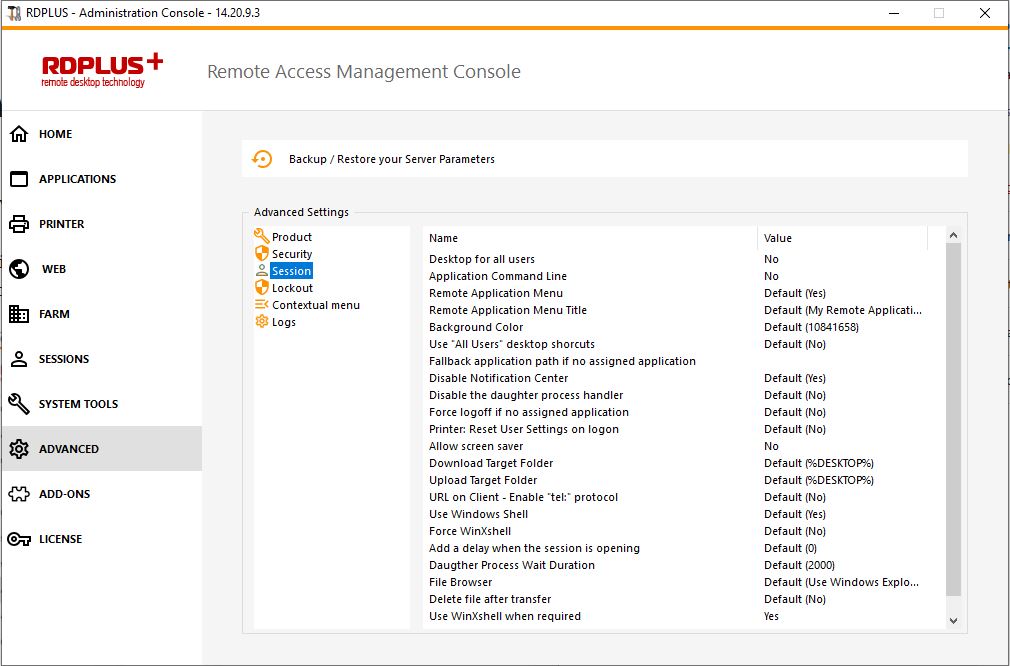
Backup and restore your server parameters
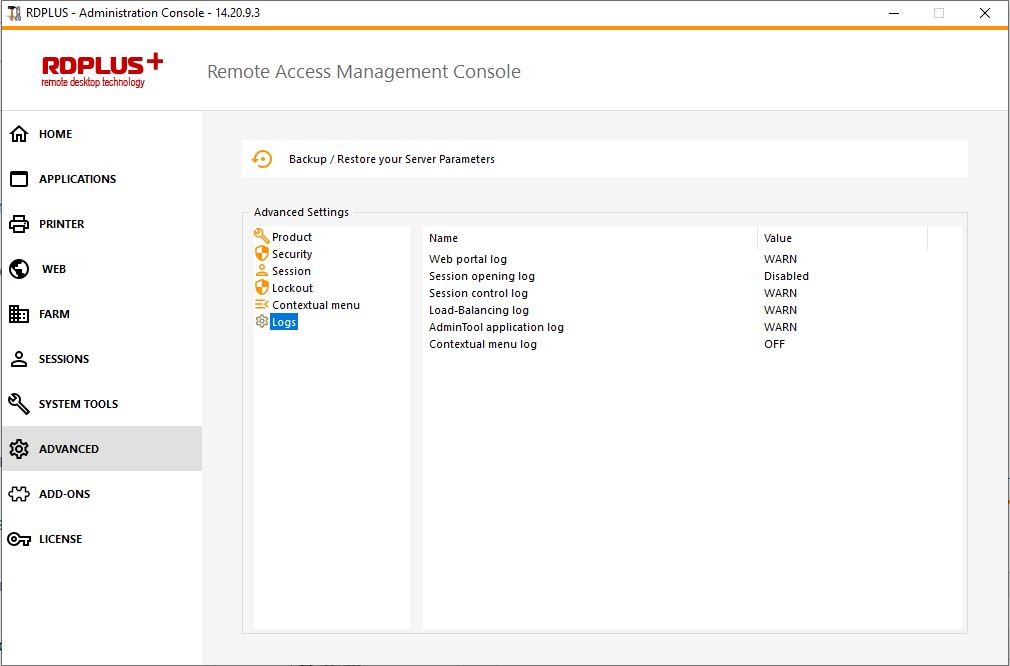
You can backup or restore your server parameters by clicking on the tile of the same name, on the Advanced tab:
Click on the Backup button to make a backup, which will be dated and added to the list of your restore points:
The backup file can be found on the C:\Backupparam folder:
Reboot your server
The “Reboot the server tab” allows you to reboot your server.
Our development team is working on a daily-basis to ensure the stability and compatibility of RDPlus with the latest versions of Microsoft Operating Systems and the latest Updates. We are proud to provide you with new features and enhancements every week.
This is why it is recommended to keep your server up to date. By subscribing to our annual Support and Updates Services, you will have access to the latest Updates and bug fixes.
In order to see which RDPlus version you have and update it:
You can check the status of your RDPlus release on the Home tab of your AdminTool:
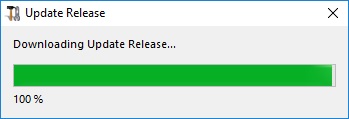
You can then click on it. Since RDPlus 11.50 version, the AdminTool automatically downloads…:
…and applies the Update Release program when requested:
You still can download it via this link: Update Release and apply it manually.
The Update Release program is designed to keep your current RDPlus settings safe. It is not required to reboot after Update; however we do recommend to do so.
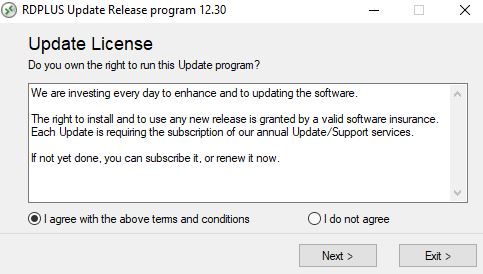
If you have not subscribed yet for RDPlus Update/Support services, or if your subscription has expired, you will not be able to run the Update Release program:
In such case, we advise you to place your order on our Store Page. You will receive back the proper information to download your support.lic file. Activating your Update/Support services is an easy process described here.
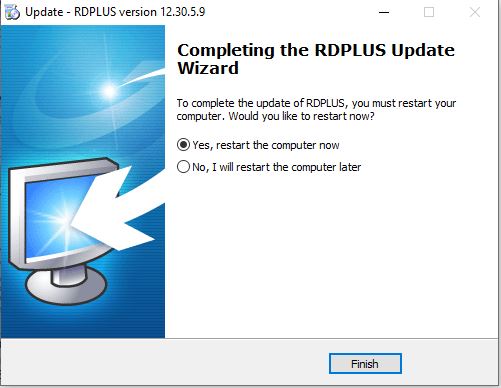
When the update is finished, a reboot is required:
However, you can customize all the system parameters with a powerful Administrator Tool.
To do so, click on the following icon created on your Desktop:
The Administrator Tool will then be displayed:
Locate the Administrator Tool on your desktop :
If you cannot find the admin tool shortcut, it should be located in the desktop folder on the administrator account used to download RDPlus. You can also find the RDPlus folder on this path: ‘C:\\Program Files (x86)\RDPlus\UserDesktop\files’.
Double-click on it, then click on the license tab.
Click on the “Activate your license” tile:
Enter your Activation Key and select products you want to activate.
You may select multiple purchases (License, Updates and Support and/or add-ons), then finish the prompts and your license will be activated!
Application Publishing
Overview
RDPlus supports 4 different kinds of Application Publishing:
RDPlus Taskbar. Any application, folder, shortcuts, documents… copied on the user’s Desktop folder will be published with the RDPlus Remote Taskbar. In this case, the user does not have any access to applications other than those decided by the administrator. Application Control has a much finer grain.
Assigning one, two, three, or more specific applications to a user/group. In this case the user will only see their assigned applications when opening a session.
There is a priority rule to remember: The Microsoft Remote Desktop has the highest priority, then the RDPlus Taskbar, then specific applications. If a user has a specific application assigned and RDPlus taskbar or Microsoft Remote Desktop, they will not see the specific application because they have a lower priority.
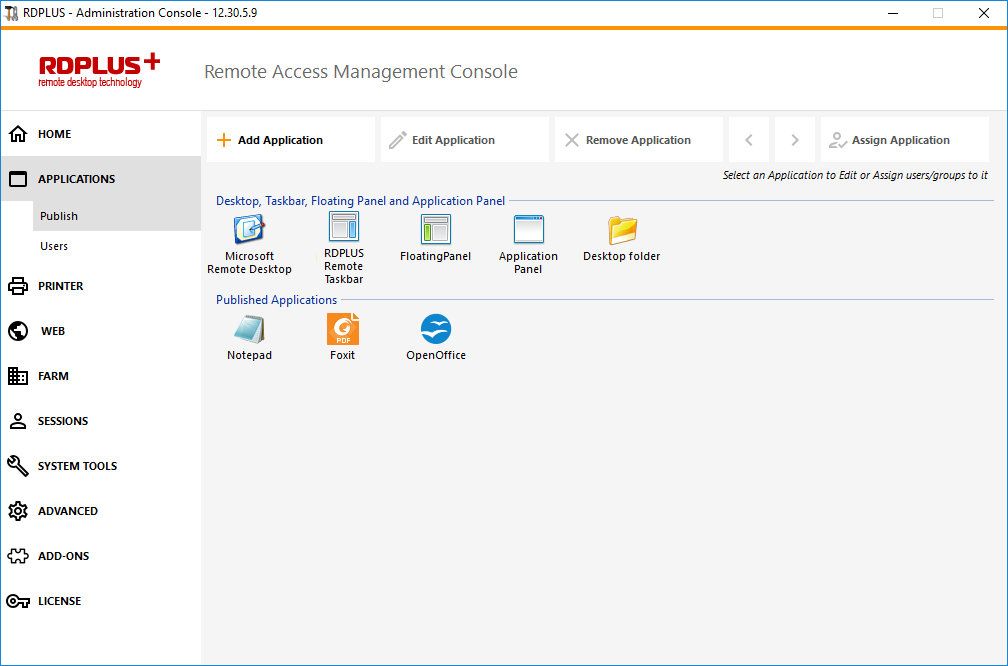
Managing Application using the Admin Tool
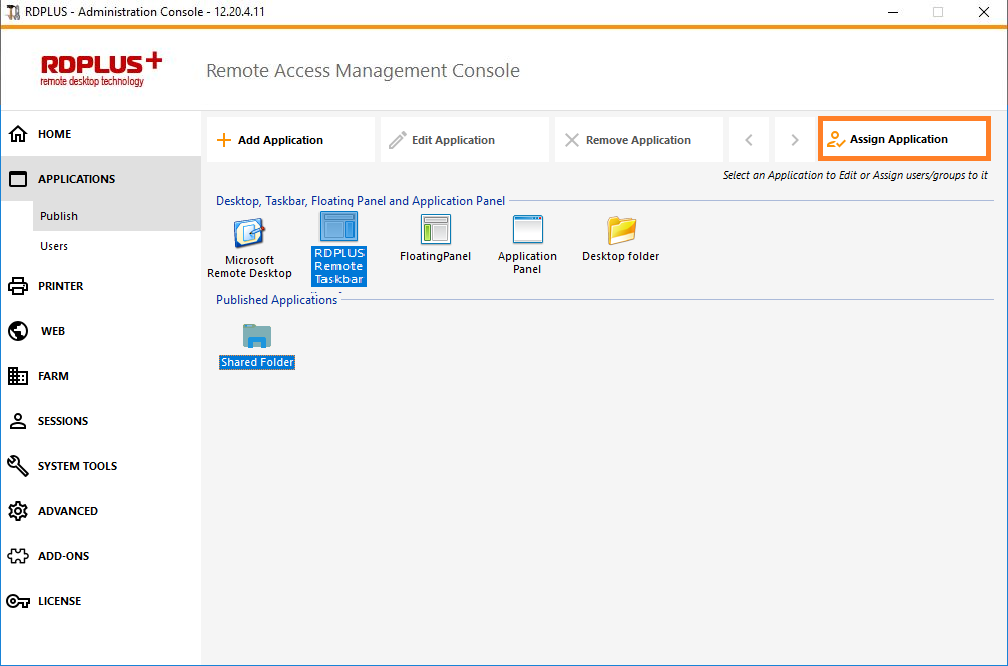
You will add, edit or remove applications using the AdminTool, by clicking on the “Application Publishing tab” on the Applications tile:
Click on the “Add Application” tile in order to publish an app:
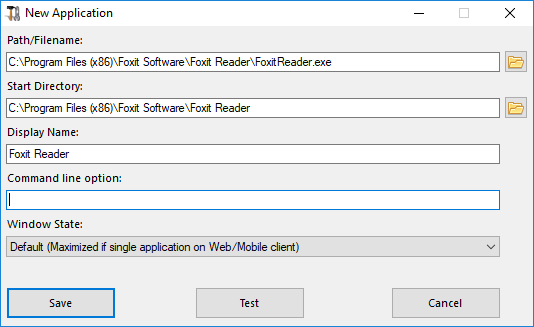
Foxit is published as an example. To publish an application, click on the “Add application” button, then locate the path of the executable of your application by clicking on browse, then set a name for this application in the dedicated field.
You must click on the “Save” button to store any modification.
After declaring a new application, we recommend to use the “Test (start selected)” button to check that the application is functional before assigning it to your users.
You can specify for each application if it will be launched maximized, minimized, assigned to all the users or if it will be hidden after launch.
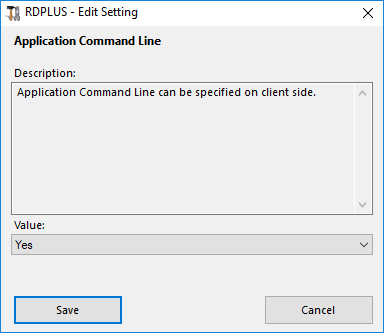
You can add a command line option if you need to add some extra parameters which are usually set in the shortcut properties of the application.
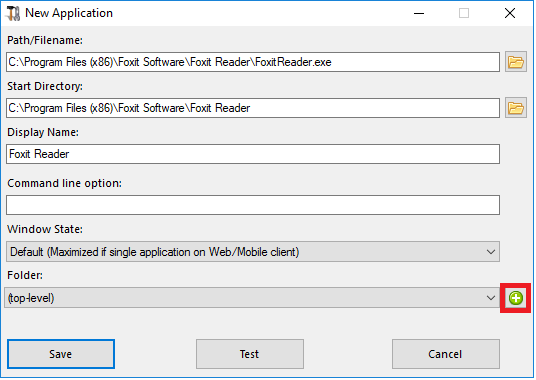
Since RDPlus 12.40 version, you can now create a new folder in which you can publish your applications. (See below for more information) By default, they are published on the top-level folder.
Note: You can change the orders of applications by clicking on the left or right arrows, next to the “Assign Application” button:
Managing Application using the Admin Tool
You can add, edit or remove Applications Folder on the same dashboard. First by publishing an application, then by clicking on the “+” button at the bottom-right under the “Folder” selection:
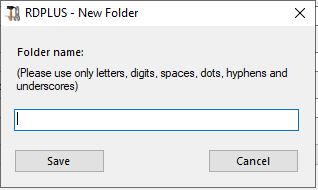
Then enter the name of your new folder:
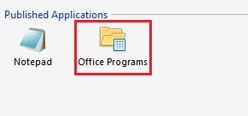
The Folder then appears under your published Applications:
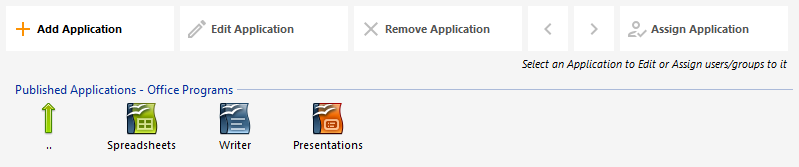
Double-click on it to see, edit or remove each published application:
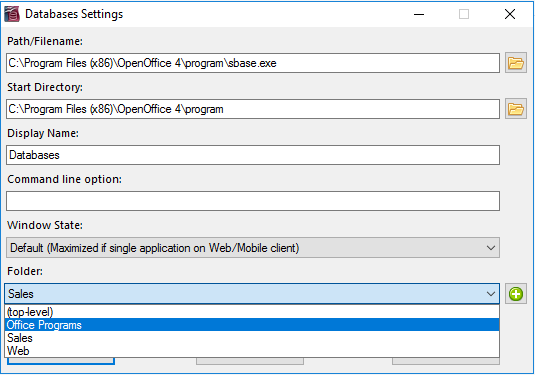
Each time you publish an application, you can select or create the folder in which it will be published:
You can then assign the Folder to users or groups as an application, and publish it, like any other application.
See this documentation for more information on applications assignments.
Important remarks
After installation, the default setting is: Any RDP user will see the complete Microsoft Remote Desktop.
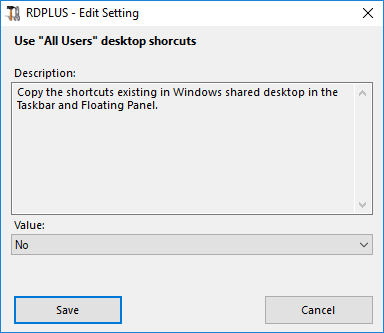
The RDPlus Taskbar publishes all shortcuts copied in the user’s Desktop folder. When selecting the RDPlus Taskbar, you can request to automatically copy any of the shortcuts available in the All Users Desktop folder and/or, to automatically create shortcuts from applications assigned to the users with Application Control.
Overview
Once you have published some applications, you can publish them to one or more users and/or groups. To do so, double-click on the application you wish to assign or click on the application, then on the “Assign Application” tile:
The following window will be displayed. It allows you to assign applications to a selected user or group:
How to Assign an Application to a user (or a group)
You can either assign an application for all authenticated users or to specified users and groups. If you wish to assign an application to a specific user or group, just click on “Add”, then enter the name of the user or group you wish to assign the application: On this example, Foxit will be assigned to the Remote Desktop Users Group. Click on ‘Ok”:
Then on Save:
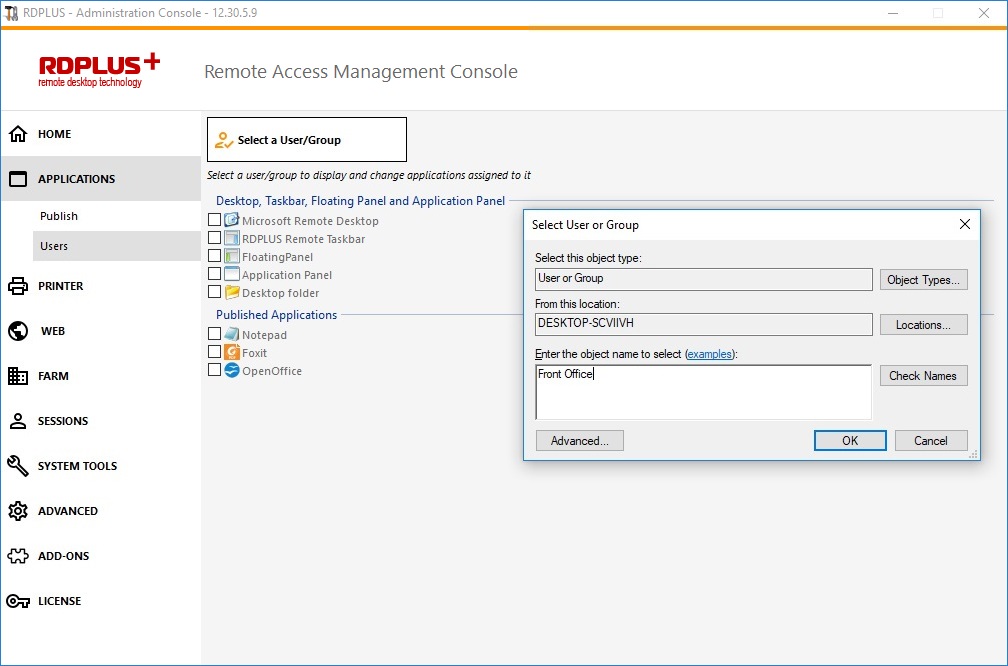
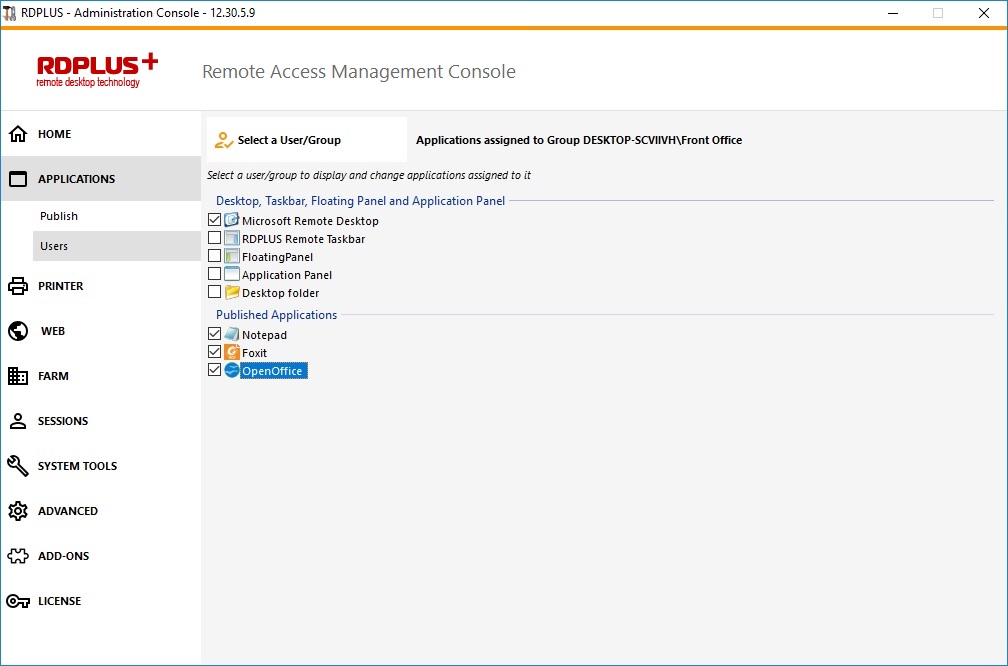
Manage applications per Users/Groups in bulk
The Applications – Users submenu allows you to see which applications are assigned per user or per group, by clicking on the “Select a User/Group” tile, then entering its name:
On this example, you can see that the Microsoft Remote Dekstop, Notepad, Foxit and OpenOffice where all assigned to the group “Front Office”:
Important remarks when using RDPlus Seamless Client
With the RDPlus Seamless Client, the users will not display the Microsoft Remote Desktop windows. The applications can be found on the local desktop as if they were native local applications. Users will only see the applications assigned by the administrator.
If a user has the right to use the default Microsoft Remote Desktop, the Seamless Client will display a background color to avoid having both the Remote and the Local Desktop icons piled on the screen.
The Seamless Client session is held open only when an application is running and being pushed through to the local client. If no application has been assigned to this user, RDPlus will automatically use the RDPlus Taskbar.
If a user has specific applications assigned, they will seamlessly see these applications when the session is opened. When the last application is closed the session ends.
Rules for Microsoft Remote Desktop, RDPlus Remote Taskbar, Floating Panel and Application Panel
You can customize your user’s work environment by assigning one application out of these four: Microsoft Remote Desktop, RDPlus Remote TaskBar, Floating Panel and Application Panel.
If no application is assigned to one user, he will see the Microsoft Remote Desktop which will display the Desktop folder shortcuts.
If one user has several allocations plus the Microsoft Remote Desktop, he will see a remote desktop.
If a user has several applications plus the RDPlus TaskBar, he will see the TaskBar displaying his Desktop folder’ shortcuts.
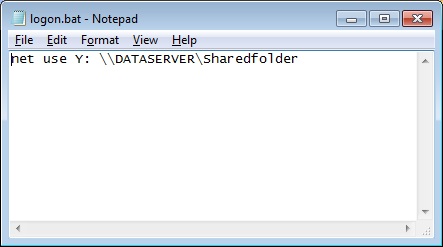
If you want to start a script when the session opens, you must name it LOGON.BAT or LOGON.CMD and copy this script:
In the Application Data folder of All Users if this script applies to all users,
In the Application Data of the user if this script applies to this user.
If you want to start a script on the client side when a session is opening, you just have to name a program STARTUP.EXE and to copy it at the home drive of the user PC (C:\startup.exe).
If you want a program to be started as a service when the RDPlus server reboots you have to name this program STARTUP.EXE and copy it in the folder: C:\Program Files\RDPlus\UserDesktop\Files\
Overview
RDPlus includes a unique method of transferring files:
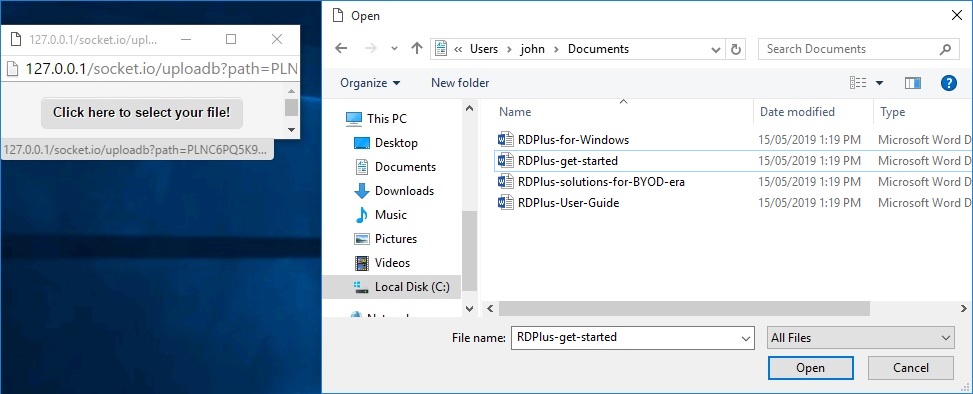
from the local user workstation => to the user Remote Desktop
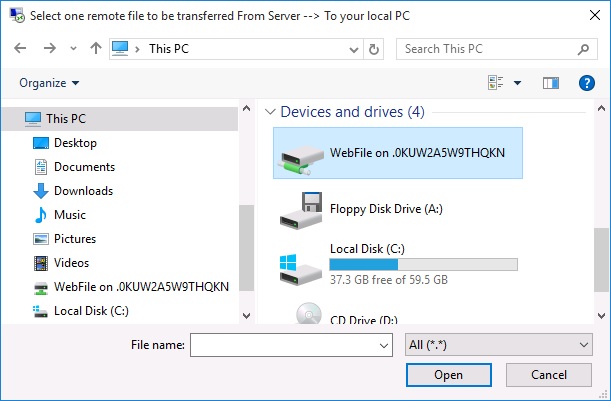
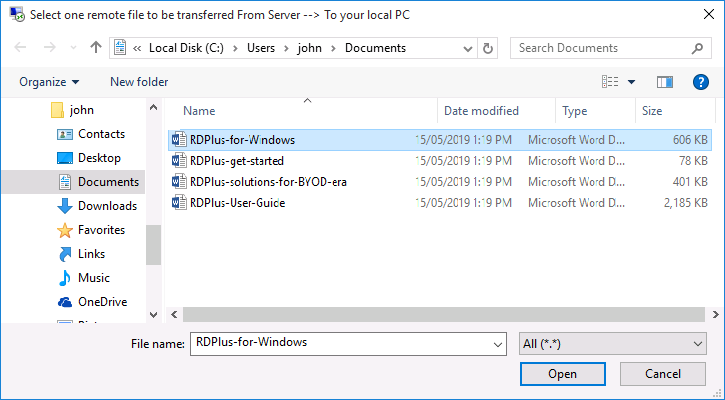
from the RDPlus server => to the local user Desktop
Because the file transfers are based on a Virtual Channel, it is a lot faster than a file copy, and it can be done even when the local user disk drives are not mapped.
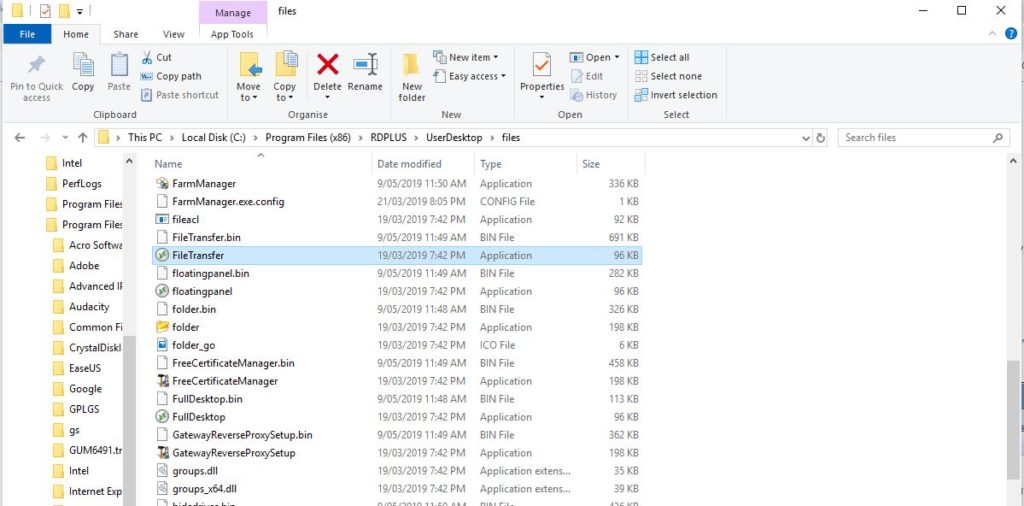
FileTransfer program and Generated Clients
The File Transfer program is located in your RDPlus program folder, under the name “FileTransfer.exe” into the following path: “UserDesktop\files”
Transferring files
Transferring files is very easy.
First, launch the File Transfer (for instance by using RDPlus Floating Panel):
Then navigate to your file using the folders tree:
server’s folders and files are on the left part of the window (server side)
local workstation’s folders and files are on the right part of the window (client side)
Finally, right click on the file that you want to transfer to the other side, and click on “Send to server” (or “Send to client”):
File Transfer works from the local workstation to the server, as well as the other way around (from the server to the local workstation).
Note: When using the file transfer utility from an HTML5 session, you will be able to transfer your files from server to client only. Please prefer the HTML5 Top Menu method, where you can upload files to the server, download to client and manage your file transfer listing.
You can choose to enable the Floating or the Application Panel for your users or groups. These two ways of publishing applications are available for any connection method.
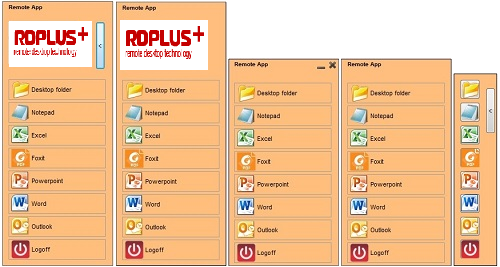
Floating Panel
If activated with the assigned applications, you can see on the middle-left of the user screen the mini drop-down list of applications or floating panel (very much appreciated by RDPlus users):
Assign it as an application:
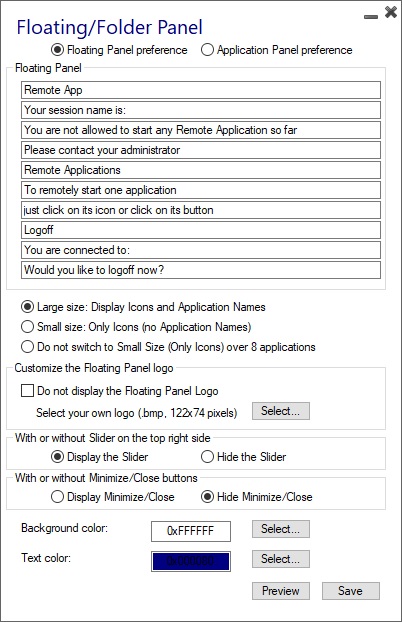
Select the Floating Panel, then click on the “Edit Application” tile you to customize the Floating Panel at your convenience:
These various options can allow you to customize the end user’s experience.
Here are the different Floating Panel display options, where you can set ,
Modify the displayed text,
Choose your preferred size, between Large and small, where you can display only icons,
Add your own Logo,
Customize color for the background and for the text,
Display the slider or not,
Display the Minimize/Close buttons or not,
Display the Logoff icon or not…
Please note that over 8 applications, the Floating Panel automatically switch to small-size. If you still want it to display the Applications names, select “Do not switch to Small Size (Only Icons) over 8 applications.
The Folder Panel is customizable as well and enables to display the assigned applications, the user Desktop folder or one specific folder content in your session with many display options:
You can change the Folder Panel size, position and style (Pop-up or Windows) at your convenience:
Application Panel
The Application Panel gives you the possibility to organize the displayed applications, exactly like on the Web Application Portal, but by simply assigning it to one user or group:
The Administrator can customize it by choosing to display the RDPlus logo or his own logo, display the line header below the logo and the footer, change the color or choose to not display any of it at all by unselecting the corresponding boxes. He can also adjust the number of displayed applications by lines and columns by entering the number of applications displayed per line, as well as the alignment and name of the Application panel.
For example, display six Apps in one column, without logo; or displayed on 2 columns and 3 lines, with the RDPlus logo:
Overview
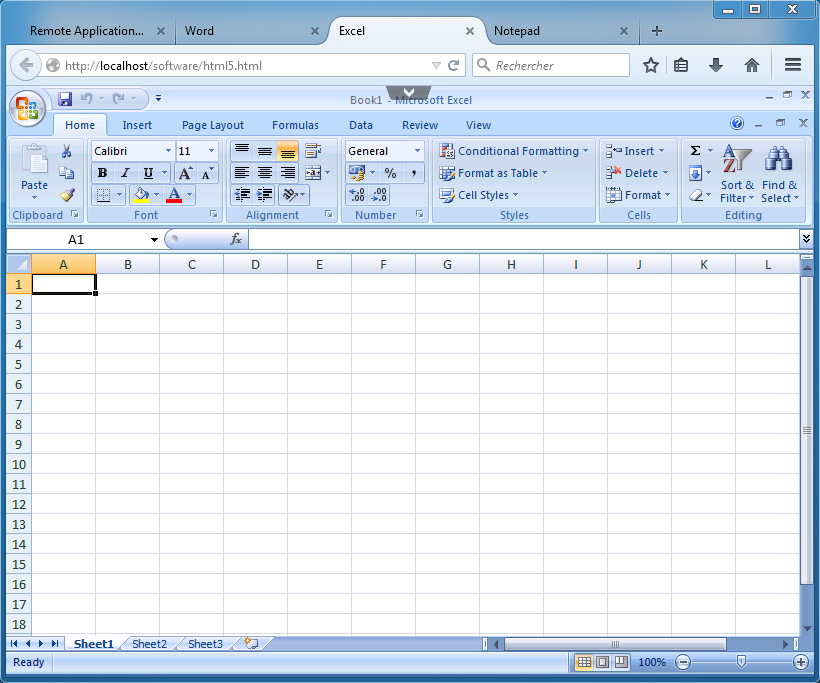
This feature is a powerful one. It allows to open documents located on the server on the client side depending on its file extension.
For instance, you can open a Microsoft Office Word document without having Office installed on your server.
The .docx (or .xlsx) document is automatically uploaded on the user side where the local Office will be used to open it.
If you are hosting your application on a Cloud server and if your application is generating an Excel, Access or Word document, this feature prevents to care about Office licenses on the server.
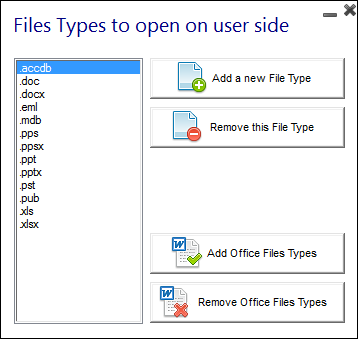
Configuring a File Type to open on the client side
The tile “Open Files on Client Side” is located in the “Sessions – Settings” tab of the AdminTool. Click on it to display the configuration window:
The button “Add a new File Type” allows you to add an extension (such as “.docx” for Microsoft Office Word 2007-2010) to the list.
All the files having an extension in this list will then be opened on client side, provided that you use one of RDPlus connection clients:
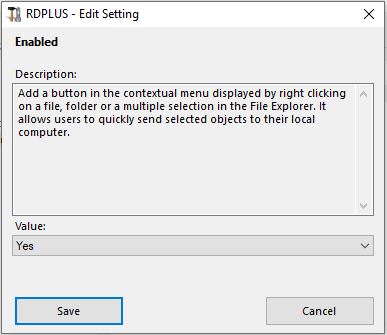
If you have configured a file type to open on client side, and it is not working (i.e. the file is still opened on its own computer), then we advise you to check the “Open With” list in Windows context-menu:
right-click on the file.
click on the “Open With” menu item.
if there is more than one application in this list, click on “Choose default program” and select “OpenOnClient.exe”.
This RDPlus great tool applies its configuration to all users using the computer, however please keep in mind the following rules:
Windows allows each user to change this default opening program with another program of its choice.
Using HTML5 connection client, the file will be downloaded and managed by the local browser. Some browsers treat some file types in specific ways, so browser’s settings should also be checked twice.
These rules explain most of the issues when using the Open On Client feature, that is why we advise you to start by checking the default program:
for the logged user on the server
for the user on the client
for the browser on the client (when using HTML5)
Overview
This feature is a powerful one. It allows to open on the client side every websites links and websites shortcuts located on the server.
For instance, you can open YouTube videos directly on the client, thus saving lots of bandwidth and CPU power on your server.
The web address (URL) is automatically transferred on the user side where the local default browser will be used to open it.
Enabling this Feature on a server
The tile “Open URLs on Client Side” is located in the “Sessions – Settings” tab of the AdminTool. Click on it to display the configuration window:
Http and https protocols boxes are ticked by default. You can also activate tel, sms and mailto protocols by ticking the corresponding boxes. Then click on the “Apply” button, which allows you to activate this feature for all users on the server
In order to fully enable this feature, every user will have to restart its session (logoff then login) before they can use this feature.
All the web links and shortcuts will then be opened on client side, provided that you use one of RDPlus connection clients:
Any generated RDPlus Client (Seamless, RemoteApp or RDP)
Any Windows connection from the RDPlus Web Portal
Warning: this feature is not supported for:
Any RDP client (mstsc for example).
Any HTML5 connection from RDPlus Web Portal.
Windows 8 and 8.1
Starting with Windows 8, Microsoft has forbidden automatic change of user’s default browser. This is why, once the feature is activated on the server, every user will have to choose ‘Url On Client’ when asked for a default browser.
This window will only be displayed the first time a user opens a web link. Unfortunately, this is Microsoft Windows policy and we are not aware of any workaround.
Administrator tools on the server
With the AdminTool, the Administrator can choose between 4 display modes when he assigns applications: The Microsoft Remote Desktop, The Remote Taskbar, The Floating Panel or The Application Panel. The Remote Taskbar, Floating and Application Panels are available for any connection method.
RDPlus Remote Taskbar
When you assign applications to an user, you can enable the RDPlus remote taskbar. The RDPlus Taskbar is extremely useful when a session is run with the Seamless RDPlus connection program. The user can launch remote applications with one click on the RDPlus taskbar and still have the full local Desktop available. You can assign the Remote Taskbar to your users or groups by double-clicking on it or by selecting it, then clicking on the “Assign Application” tile:
The Administrator can easily decide what will be the default Remote Desktop theme the user will see when opening a session. Select the RDPlus Remote Taskbar, then click on “Edit Application”:
Only the Administrator can choose the themes for his users.
He can choose to display the maximized applications in full-screen mode or not to overlap the RDPlus taskbar as well as the Silver or Blue taskbars.
Since RDPlus 12.60 version, the Logoff button can now be hidden.
Minimized buttons position on the taskbar can be changed (on top of the screen, on the bottom, on the right, the left side, or in the center). The administrator can even decide to display it on top of the user screen instead of the default bottom side.
Systray icons can also be hidden by ticking the “Hide the Notification Area” circle.
By editing the users menu, the Administrator can add/suppress applications and functionalities. Customization of the users menu is easy. The content of the users menu (located in Program Files/RDPlus/UserDesktop/mainmenu.mnu) is modifiable by the administrator using Notepad:
Seamless connection program
On the applications tile of the AdminTool the administrator can select 3 different styles of Remote Desktop RDPlus Taskbar. The RDPlus Taskbar is extremely useful when a session is run with the Seamless RDPlus connection program. The user can launch remote applications with one click on the RDPlus taskbar and still have the full local Desktop available.
Right-side Blue theme taskbar
Right-side Silver theme taskbar
On Top taskbar
Overlapping the Windows taskbar with the Seamless connection client
If you want your maximized applications to overlap the Windows taskbar, click on this box, on the Seamless client tab:
Thin-client or any RDP based connection program
With the AdminTool, the Administrator can easily decide what will be the default Remote Desktop theme the user will see when opening a session. He has the choice between 4 different styles of full screen Remote Desktop. The standard Microsoft Remote Desktop can also be used if preferred.
Because these RDPlus Desktops are full screen desktops, the user’s display is entirely filled when a session is opened from dedicated thin-clients, any RDP based client, or accessed from a web page or RDPlus Remote Desktop clients.
There are benefits over a standard Remote Desktop. It enhances the server security (no START button neither full control of the Desktop).
Standard Microsoft Remote Desktop
The user has a complete desktop including Start Button and full control of the desktop
To assign to complete desktop, just assign the Microsoft Remote Desktop application.
In order to change the Desktop themes, you will have to assign the RDPlus Remote Taskbar and choose between the 3 suggested themes:
RDPlus Desktop theme one
RDPlus Desktop theme two
RDPlus logon theme
Customized theme
For each theme, the Administrator can customize it and for example, display the Corporate logo. He can also add his own Desktop wallpaper by selecting one of the Desktop themes and by clicking on the Replace logo/wallpaper button to select your .jpg file, for example:
You can add your own Desktop wallpaper by selecting one of the Desktop themes and by clicking on the Replace logo/wallpaper button to select your .jpg file, for example:
In the past the generated RDPlus Portable client was the usual method for a user to start applications. The 10.50 release introduces an icon in the notification area which gives to each user the list of all of his Remote Applications. Within this application list, the user can select the one he wants to start.
This is a new way for administrators to deliver remote applications (referred to as “RemoteApps“) to their users. Specifically, RemoteApp On Client enables a straightforward publishing process that allows applications installed directly on the server to be provided to users, allows RemoteApp programs to run side-by-side with local programs, and offers integration with a custom “launcher” application to make it simple for users to find and launch RemoteApp programs.
The user Application list will also appear in the Start menu under All Programs in a folder called My Remote Applications. To deploy this new amazing RDPlus capability is simple: The Administrator have generated new connection clients and allowed it with the AdminTool. This guide will explain step by step what will happen when the administrator will enable this new feature and will deliver to his users a new generated connection client.
Example: The user “Laura” is using RDPlus to access her remote application. To do so, she is using a generated client named LauraPortableClient.exe. When she runs it on her PC she gets the following result:
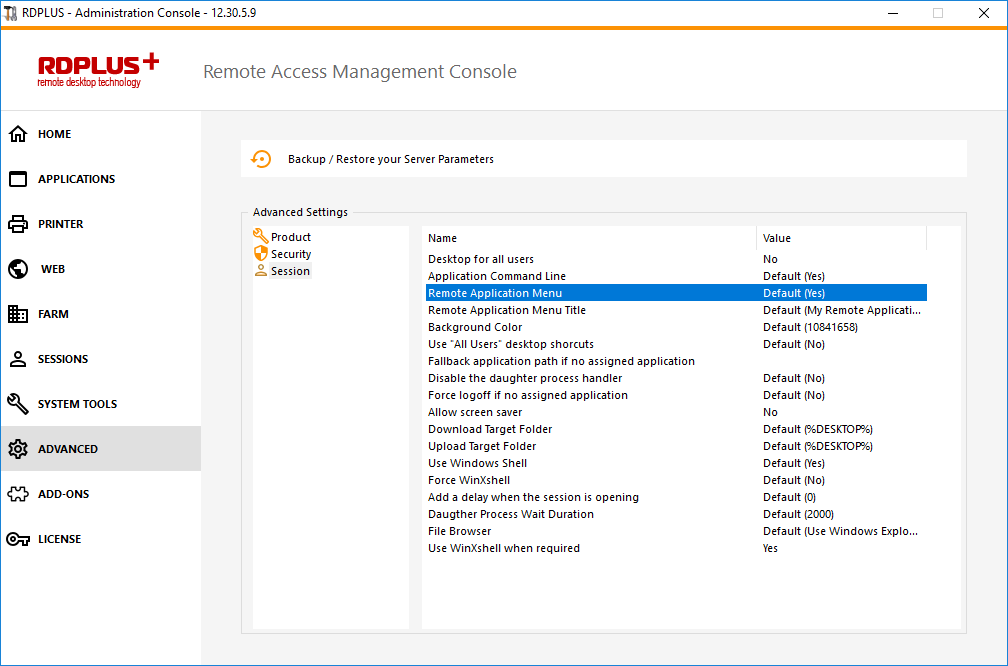
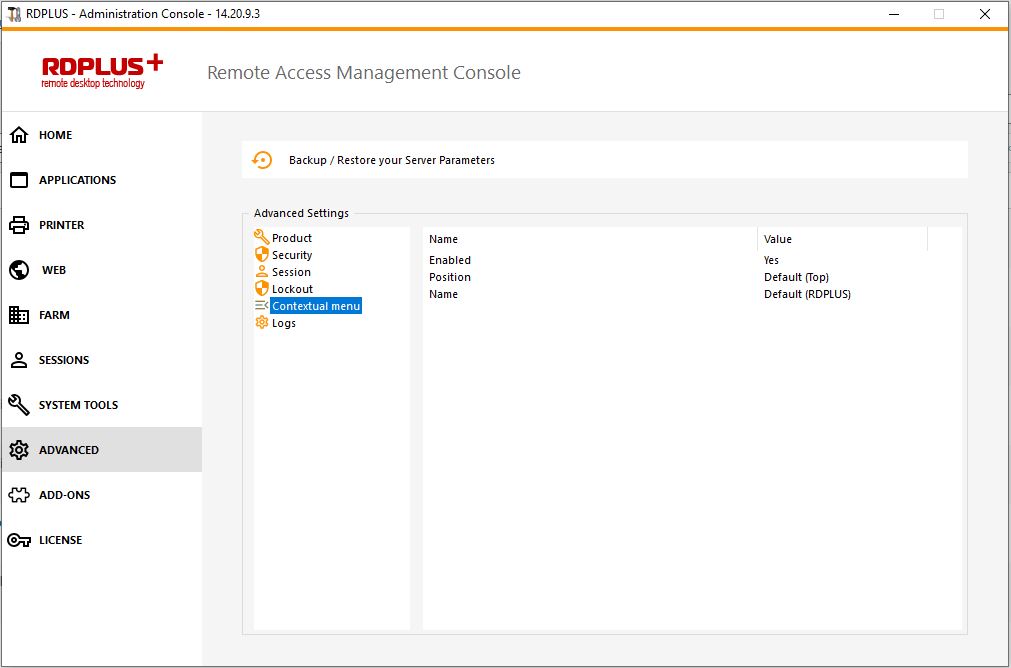
However, the administrator did provide her a new one, created with the RDPlus 10.50 release. She will have to run it at least once to benefit from the new RemoteApp On Client feature. When the administrator is adding/removing application to a user, such change will be set on the server side at the next logon. It means that the current session will not reflect such modification. The Advanced tab of the AdminTool has an option to enable or to disable this RemoteApp On Client feature, by default, it is enabled:
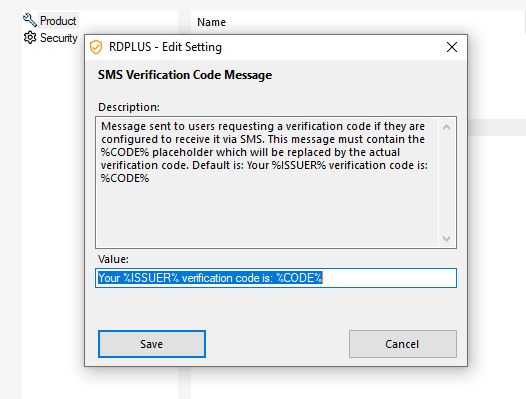
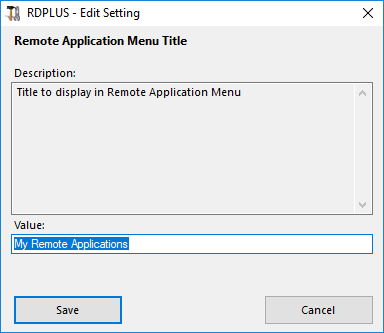
You can change the menu name as you wish, by clicking on the Remote Application Menu Title below, and adding it on the value box:
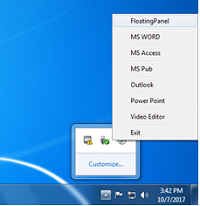
What will happen on her PC when she will run once her new generated client: She will see a new icon in the Notification Area of her local task bar.
My Remote Applications new icon
Application list menu
She will also see a new entry within her Start menu Program list named “My Remote Applications”:
She will now be able to select one of these listed applications and to start it as a RemoteApp. She will not need to use the provided LauraPortableClient.exe generated client. For example, if she selects the Floating Panel, she will get this result:
Technical background behind this new technology.
The new generated client of the 10.50 release is adding several files within C:\Users\%UserName%\RDP6 folder of the local PC’s user profile.
MyRemoteApp.exe and MyRemoteApp.bin are the program codes which are started to create the new icon in the notification area and the new entry in the All Programs list of the Start button.
MyRemoteApp.ini is a file received from the server. It is providing the details of each application which are assigned to this user on the server side. It is updated at each new connection to the server. Usually, it takes 30 secondes after each logon to receive this file from the server. RemoteApp.txt is providing the name of the last generated client started on this PC.
Comments:
If the user has administrator right on his own PC, MyRemoteApp.exe will be started automatically at each reboot and the Start button will be updated too. Else, the administrator must run once the new generated client “As Administrator” to enable the new feature. Doing so he will create the proper registry entries in HKLM. If a user is connecting to only one server, this new system is perfect. However, if he is using several connection clients to open sessions on different servers you should keep in mind that the file MyRemoteApp.ini will be updated with the values of the last connection. It can be confusing for the user and in such deployment case we recommend no to use this new feature.
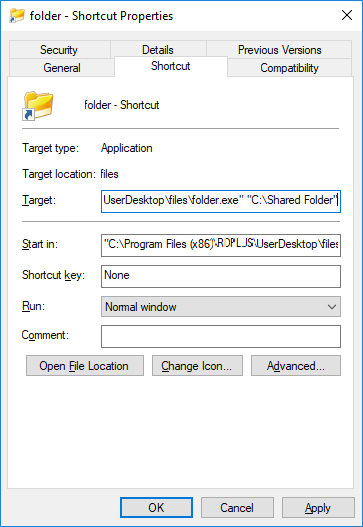
The Folder application will securely display the content of a folder that you will make available for your users. First, create a folder on your server with Applications or documents that you want to share. Open an explorer.exe and locate the folder.exe application in C:\Program Files\rdplus\UserDesktop\files:
Create a shortcut of this file. Edit the properties of this shortcut by right clicking on it. Then modify the target path of the shortcut by entering the path of your applications folder on the “Target” line, after the original target path, for example:
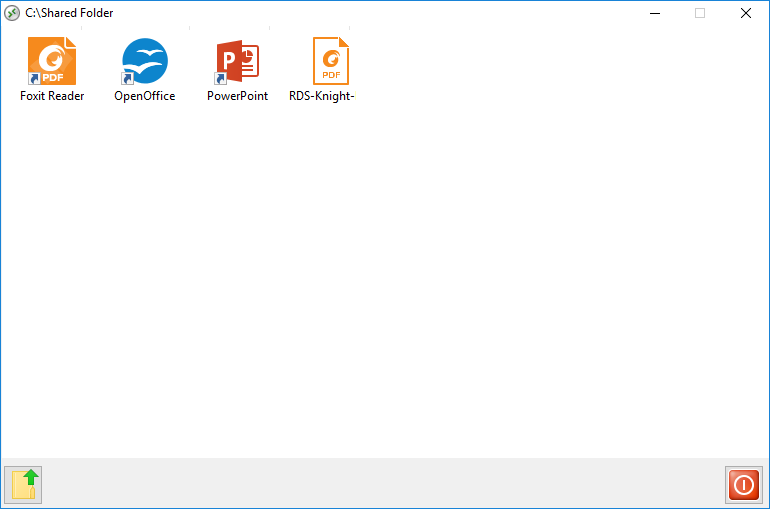
When you open the folder.exe shortcut, it should look like this (with your own documents and applications):
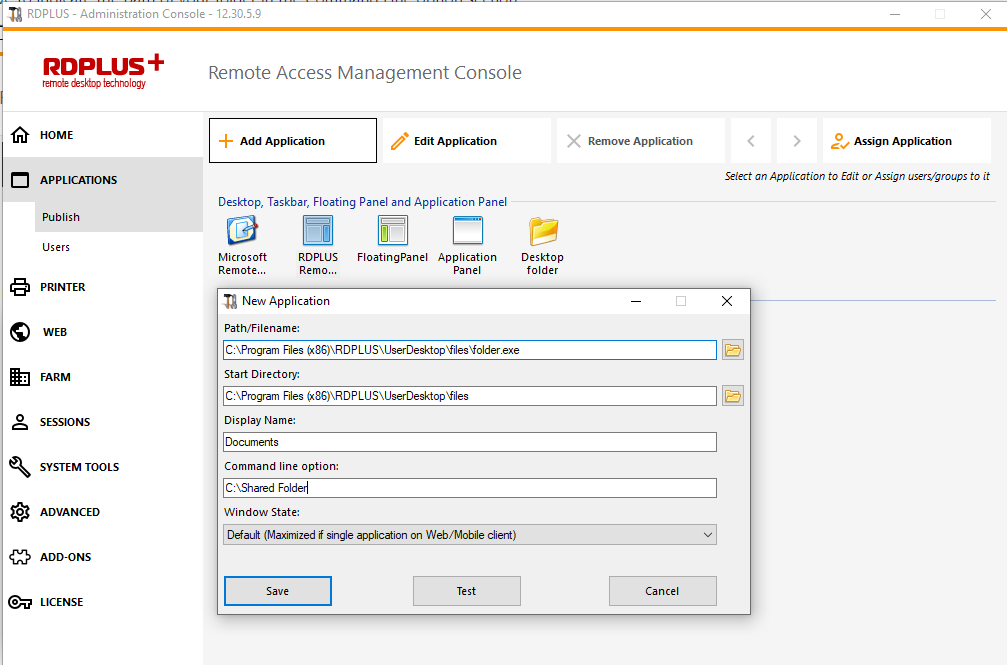
This shortcut can be copied to a user’s profile desktop folder or you can publish the folder.exe for a user as an application. If you do the latest, you will have to indicate the path of your folder in the Command Line option section:
There is an alternative way of sharing a Folder of documents.
Publishing a shared folder as a unique application :
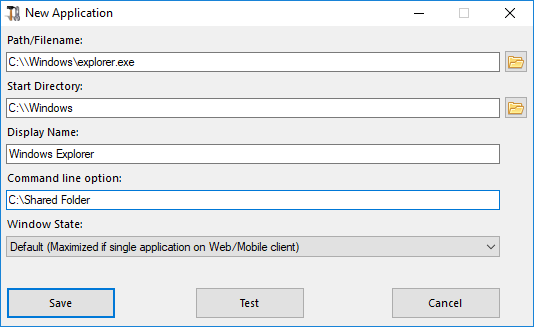
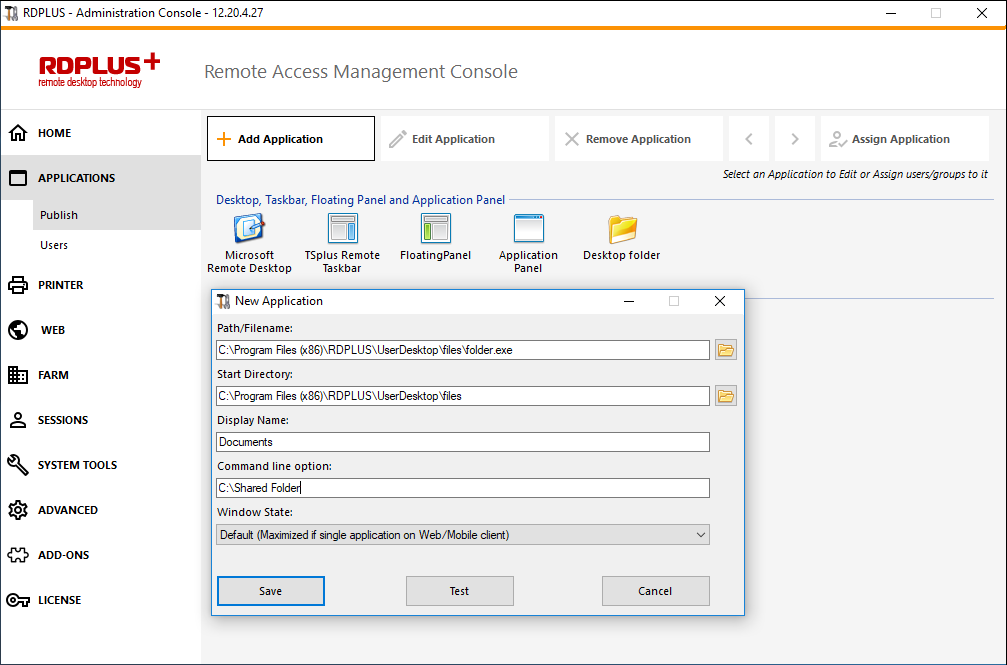
Add a new application. In the display name type in the name of the shared folder or any name you want. Click on the browse button located on the right side of the “Path/Filename” field and locate C:\Windows\explorer.exe. The start directory will be filled in automatically with the path of explorer.exe. In the Command line option field, type in the path of the shared folder, it can be a local folder or a network shared folder using a UNC path (example : \data\shared folder) Fill in the field below with your shared folder information:
Then click on “Save”.
Click on the “Assign application” tab. Check the RDPlus Remote Taskbar and Shared Folder boxes:
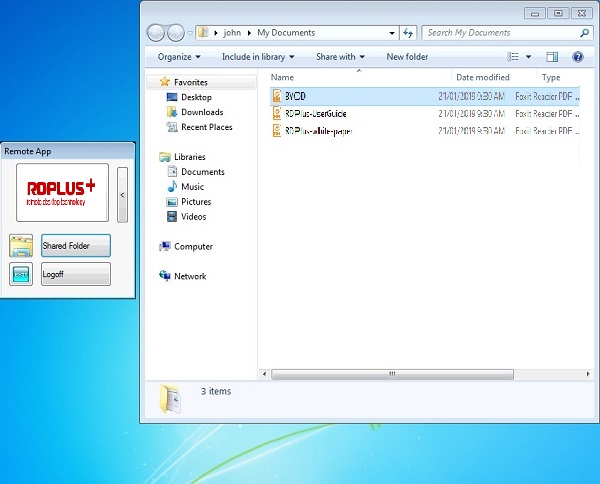
Here is the result, when you open a session with an rdp client, you will see the RDPlus taskbar with the shared folder application:
You can also do this with the floating panel. Open an admin tool and click on the “Assign application” tab. Check the Floating Panel and the Shared Folder boxes.
Here is the result:
The RDPlus Universal Printer allows you to print documents from any PC or mobile device.
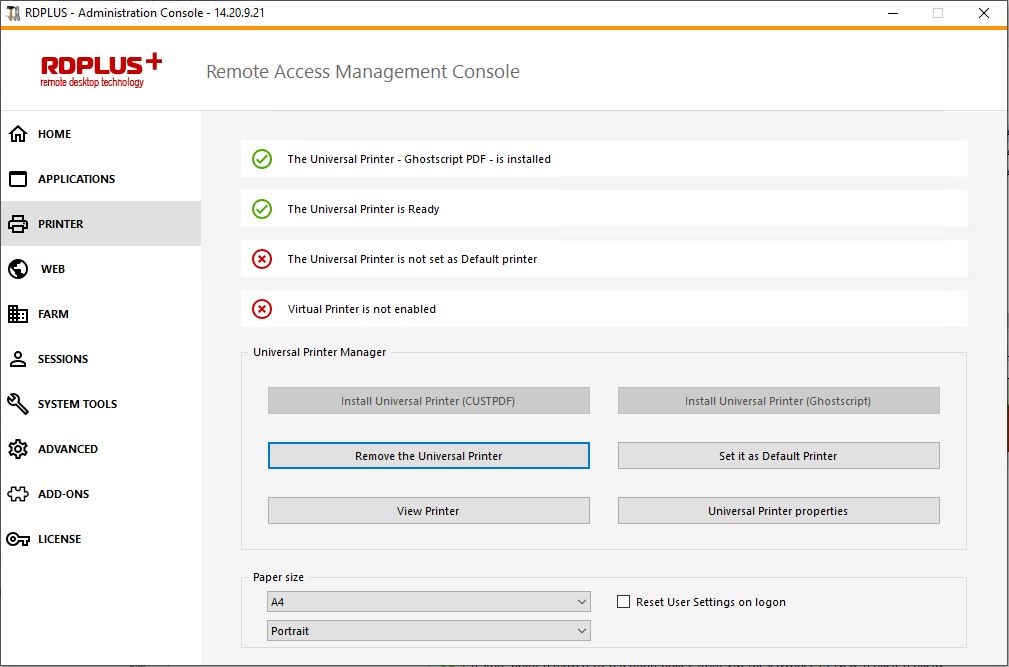
Universal Printer Manager
Since the release of RDPlus version 12, the Universal Printer Manager has its own tab:
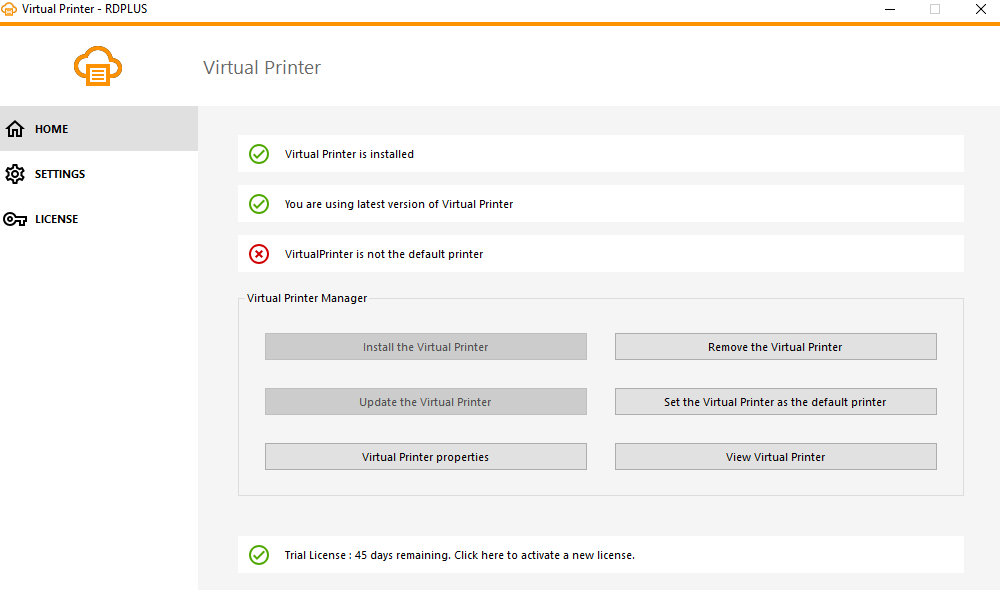
The Universal Printer Manager gathers all the required tools to install, uninstall, display and handle the Universal Printer options. This tool enables administrators to help users with dynamic printing requirements.
Information can be found at the top concerning the current universal printer status: You can check if the newest version, which uses GhostScript, is installed. You can see if the printer is ready. And you can verify that the printer is set to default.
The Buttons below allow you to:
Install the Universal Printer (which uses CUSTPDF), which is the old printer, before RDPlus version 9 .
Install the New Universal Printer (which uses Ghostscript), which is more stable with more printing format support.
Remove the Universal Printer.
Set it as default printer.
View Printer: Opens a window where you can see the status of your printing documents, pause, resume or cancel the print job.. You can also set your printing preferences and properties.
Universal Printer Properties: Opens this window, where you can see all the printing properties. After the General Tab, there are tabs for sharing, ports, advanced, color management, security and device settings.
– Below, you can set the Paper size for printing from A4 to any kind of printing format. (See below for the PostScript Custom Page Size). – You can also choose between 2 printing formats: Portrait and Landscape.
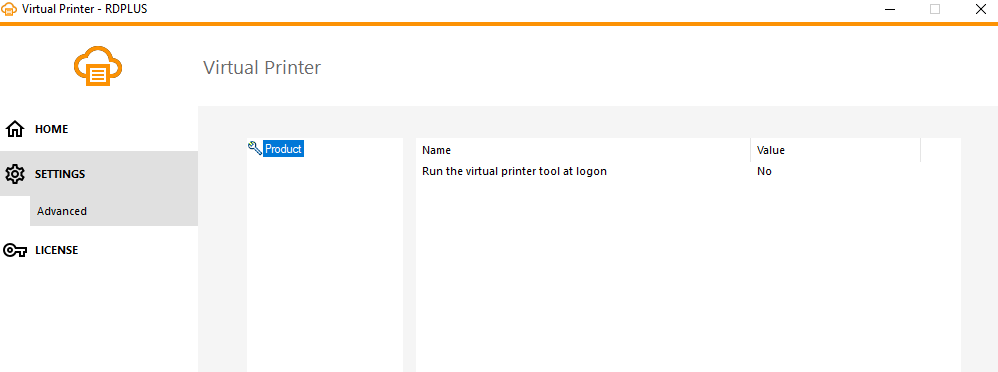
The “Reset User Settings on Logon” box allows to force the default format of the Universal Printer to the one selected in the AdminTool into each user’s new session . If this box is not ticked, during its first session, the user will have the format selected by the AdminTool as default format, but if he chooses another default format, then it is the one which will be kept for its next session.
Printing with the Universal Printer
When selecting this printer, the document to print is automatically converted into a PDF file:
This PDF file is automatically pushed to the local PDF Reader of the user’s workstation. Each print job is opened as soon as it is ready on the user’s local disk, without waiting for the previous Acrobat preview to be closed. The printing process starts only once the PDF is fully created on the client’ side, which guarantees the print job starting without delay.
Local PDF Reader preview: the document will be pushed and the local Acrobat Reader will open with the generated PDF file. The user can print it, or save a copy on his local disk drive.
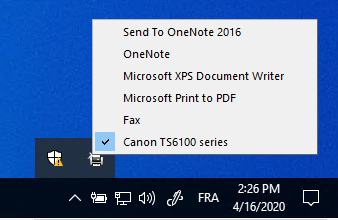
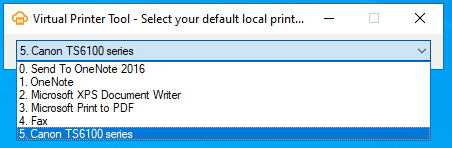
Print on the user’s default printer: the document will be automatically pushed to the default user’s printer (the local printing driver is included into the RDPlus connection client). Key value : This option is to be used for people who have a lot of printing to do per day and use the same printer for this purpose.
Select a local printer: The user can select one of his local printer (the local printing driver is included into the RDPlus connection client).
If you do not have a PDF Reader installed on your machine, we recommend the use of Foxit Reader.
If you wish to print on the default local printer with the system defined PDF reader instead of Sumatra, you can turn the setting “defaultsystem” on, on the generated client parameters, as explained on this documentation.
Customize page format printing
If you want to have a specific page format and your printer is not compatible with printer redirection, you can set the Universal Printer page format by opening the Devices and Printers menu of the Control Panel. Right click on the Universal Printer, then on Printer Properties::
Click on Preferences, then on Advanced:
Go to Ghostscript PDF Advanced Document Settings / Paper Output / Paper size / PostScript Custom Page. Finally, click on Edit Customized Page Size and enter your preferred settings. This is especially helpful with receipt and label printers.
This is commonly used by Remote Desktop users and is equivalent to what you would have with Microsoft Terminal Services. If you plan to use exotic printers, be sure to check the box for printers in the local resources tab of the client generator.
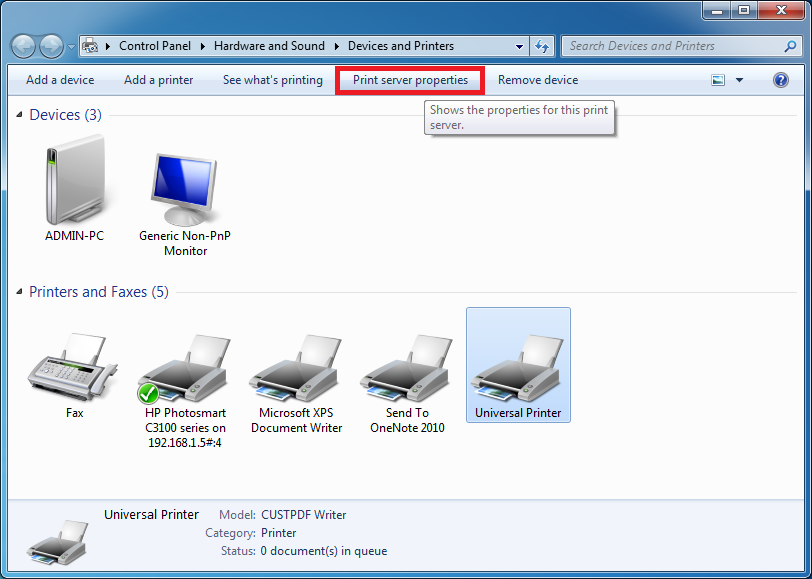
Most of the time it will require that you install the same version of the printer drivers on both the client and the server in order to work properly. This means that if your server is Windows 2008 64 bit and your client computers are running Windows XP 32 bit, you will need to install the 32 bit XP Printer Drivers on the server. Click on the Start Menu, then on Devices and Printers. Click on any printer to display the Print server properties button at the top of the window:
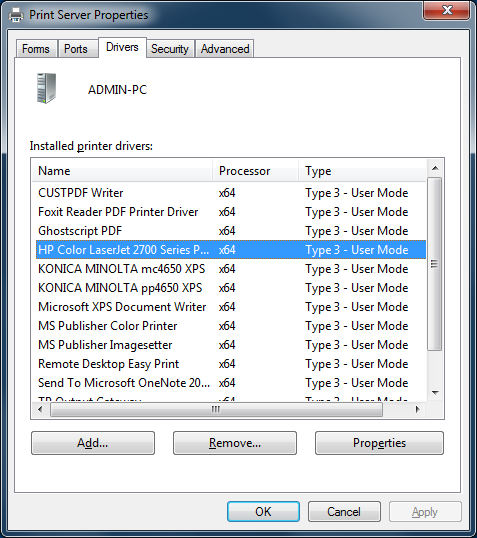
Once in the Print Server Properties, click on the Driver tab to manually add your client driver. (In this case, we are installing the Windows XP 32 bit driver)
You can also directly install your printer drivers using information and drivers from the Printer Manufacturer Website.
It is recommended to check your hardware manual for an installation procedure in a terminal server environment.
If you are using USB printers, make sure you updated the RDP protocol of your client computer to RDP version 6 or above to ensure maximum compatibility with redirected printers.
For the best results, it is recommended not to use USB printers. Compatibility and reliability are improved when using COM or LPT printers. Some exotic printers, such as label or receipt printers, may not be suitable to be redirected in a RDPlus session, you should always check with your hardware manufacturer for compatibility and installation procedures in an RDS or terminal server environment, which is very close to RDPlus in this case.
Your Remote Desktop Server must be available, easy-to-access and safe. That’s why RDPlus utilizes a built-in Web Server which helps you easily manage its status and operations. A Management Console is available in the Administrator Tool. This Management Console enables you to view and configure the status of RDPlus built-in Web Server. When you install RDPlus, web servers are listening on ports 80 and 443 by default. Make sure that the defined ports are available and that Java is installed on the server.
Web Server Components Status
The status of the Web Server main components are displayed on the AdminTool Home dashboard.
Ports Considerations (Local Machine and Firewall / Router)
RDPlus only requires either Port 80 or Port 443 to be opened. Port 3389 can stay closed.
Restart / Stop the Web Server Service
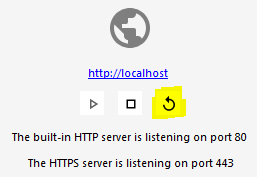
If you see that a service is not running, you may need to restart the Web servers by clicking on the “Restart Web Servers button” which is represented by an arrow on the right, the Web Servers will be restarted and the service should be running again.
If you click on the “Stop Web Servers” button, placed on the middle, the Web servers will be stopped. The HTTP and HTTPS server status will now display in red indicating that the HTTP / HTTPS services are stopped:
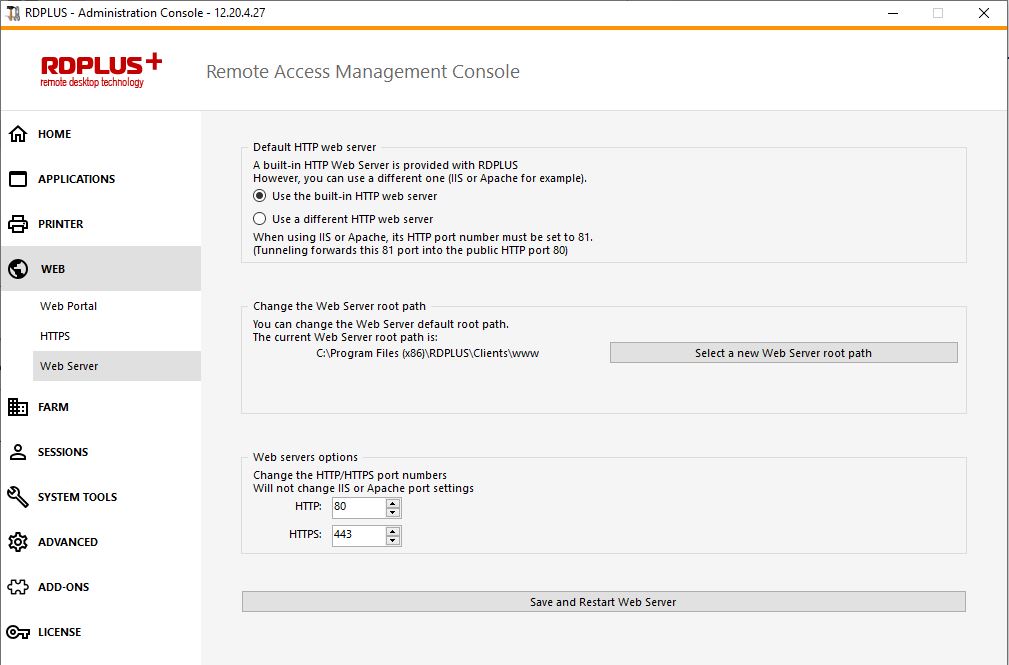
Manage Web Servers
You can change the ports during installation or at any time by clicking on the Web – Web Server tab. On this tab, you can choose to use a different HTTP web server, modify the Web Server root path and the HTTP/HTTPS port numbers. Make sure that these ports are available before changing them: if a conflict occur RDPlus web server will not work. Here is a non-exhaustive list of TCP port that might be used by an application on your server. Once these modifications done, click on save and the AdminTool will restart.
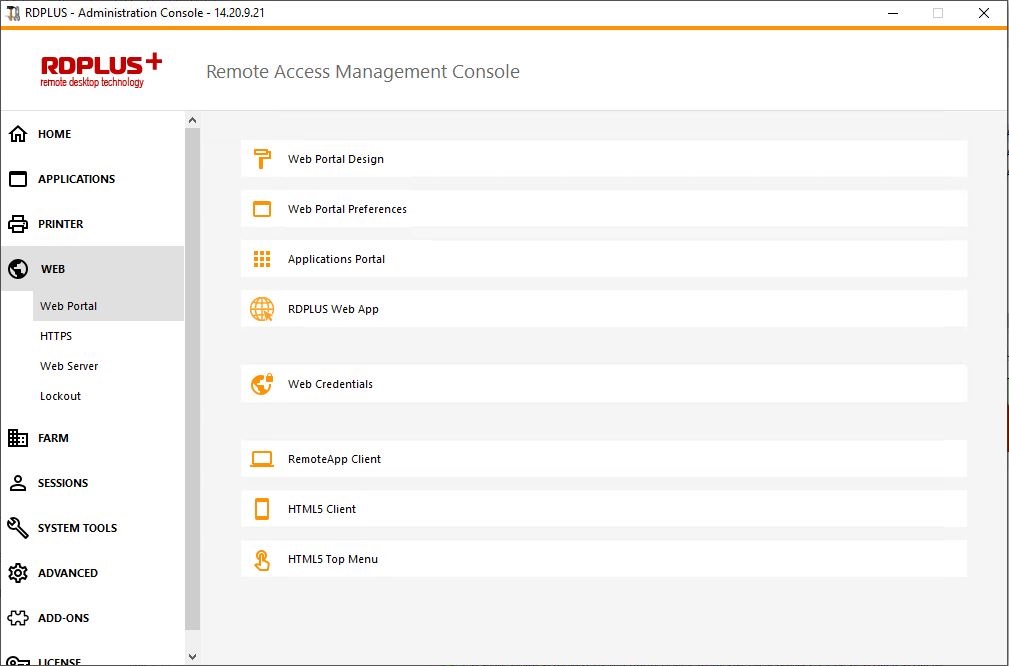
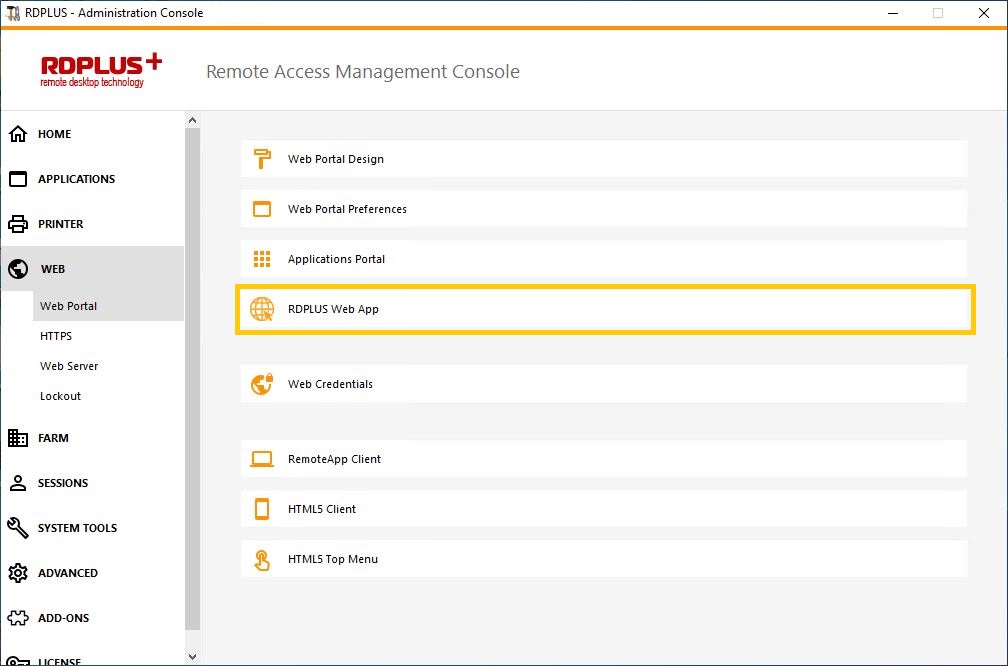
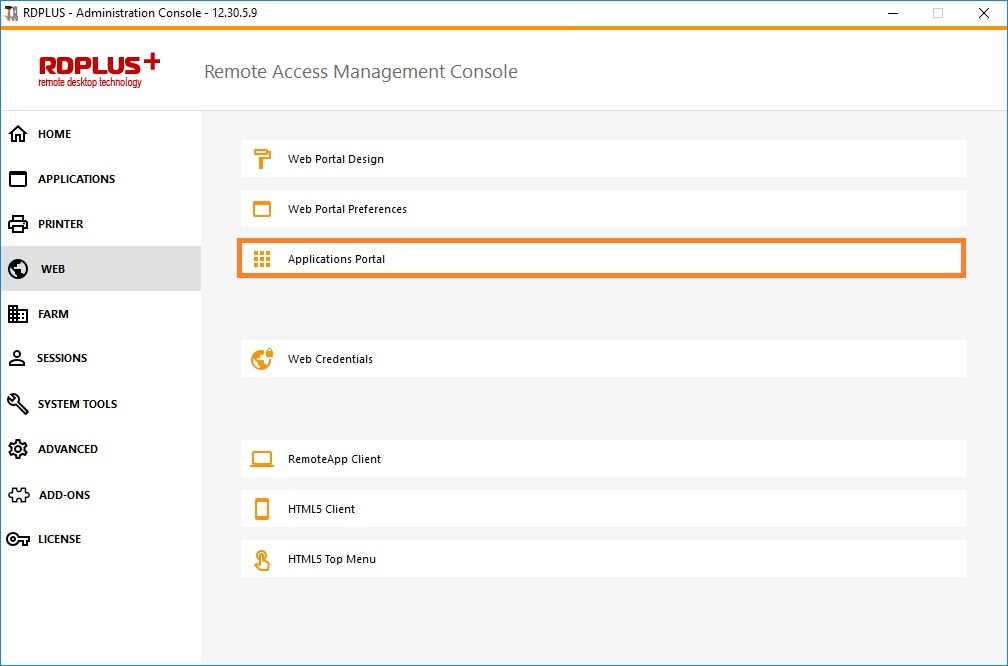
Using the Web Portal Design and the Web portal Preferences, you will be able to create your own customized HTML Web Access pages – and there is no need to be a web developer!
Web Portal Design
With the Web Portal Design tab, you will be able to customize all the display and graphic settings, as well as add your own logo. You have the choice between a collection of 20 photos, or you can add your own. You can also set any color theme with the background color of your choice or you can use one of the classic themes.
Some advanced tips:
You don’t have to click on a “Choose…” button if you already know a color code: just type it in the input.
Be careful with the real size of the pictures: your page could be quite bad-looking if a picture is too big.
Do not hesitate to use the “Preview” button on the bottom, it’s fast and easy!
Saving typed values and Resetting to default ones
When you close this window, all the values you typed and checked are saved.
If you want to reset these values to values by default, click on the “Reset” button on the bottom.
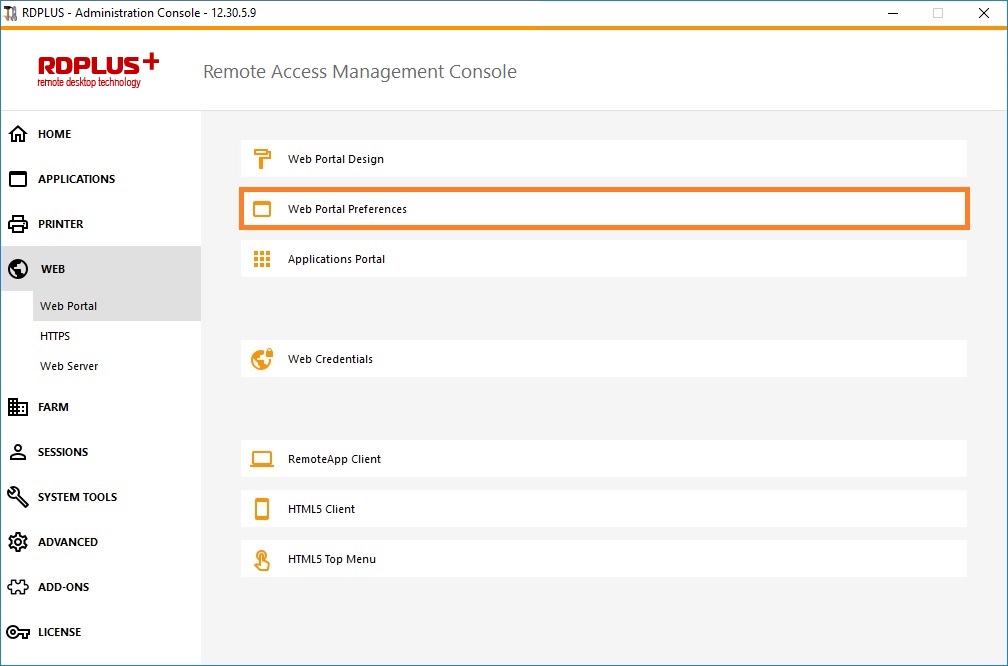
Web Portal Preferences
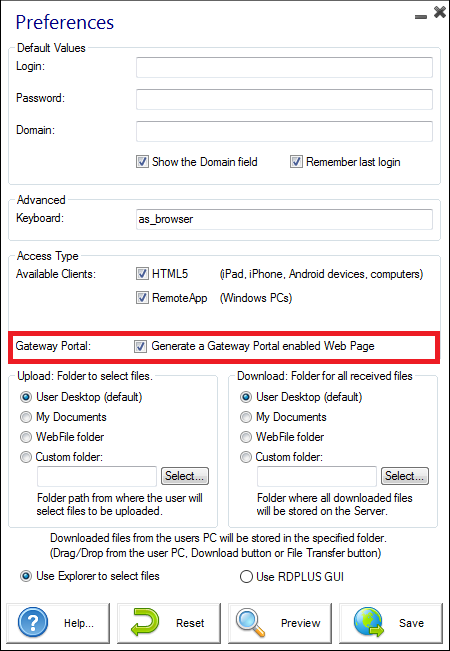
This tile allows you to configure the Web Access page:
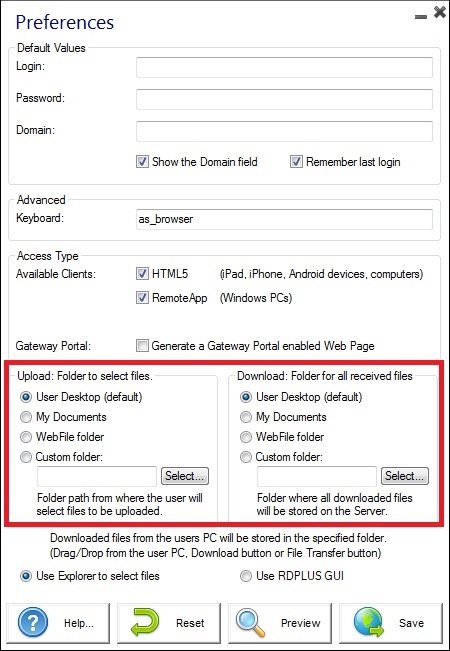
“Default Values“: you can specify a default login, password and domain that will auto-populate the login fields. All of the settings present here are saved in the index.html file, which can be copied and renamed to your preference.
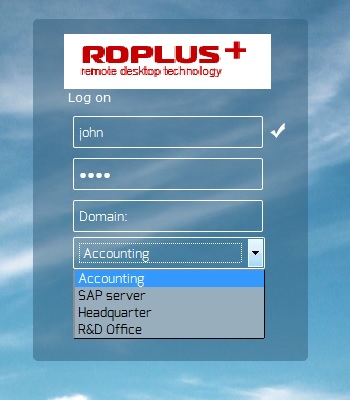
“Show the Domain Field“: when checked, the Domain field is included in the login information request.
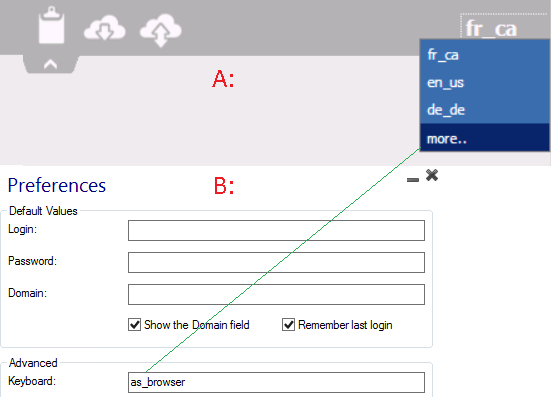
“Keyboard“: only for advanced administrators who have special keyboard requirements.
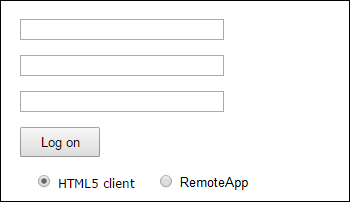
“Available Clients“: choose between 2 types of web connection clients. If both are checked, the user will have the choice.
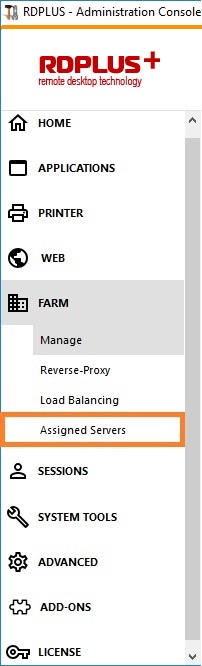
“Gateway Portal“: check it to activate a Gateway Portal enabled page. This feature adds an extra authentication step when you assign a server to a user or group. (More information on the Gateway feature can be found here).
“Upload – Download“: choose source and destination paths for file uploads and downloads.
Web Credentials
The “Web Credentials” section allows you to enable (or disable) the Web Credentials feature.
When using Web Credentials, you might want to allow empty passwords. If you only have Web Credentials with empty passwords, we recommend that you uncheck the “Show Password Field” option, in order to simplify even more the web login page.
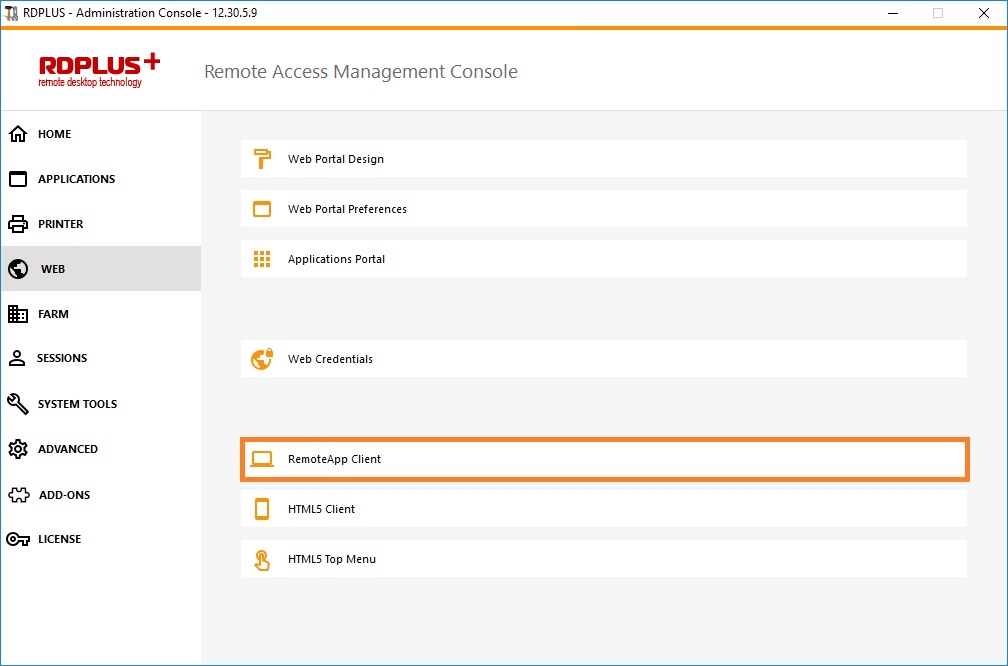
Remote App tile
This tile is for Windows clients specific settings.
You can choose your display between RemoteApp (remote connection without the remote desktop) or Standard RDP. You can also decide if you want documents to be printed on the user default printer, display a local preview or the local printer choice.
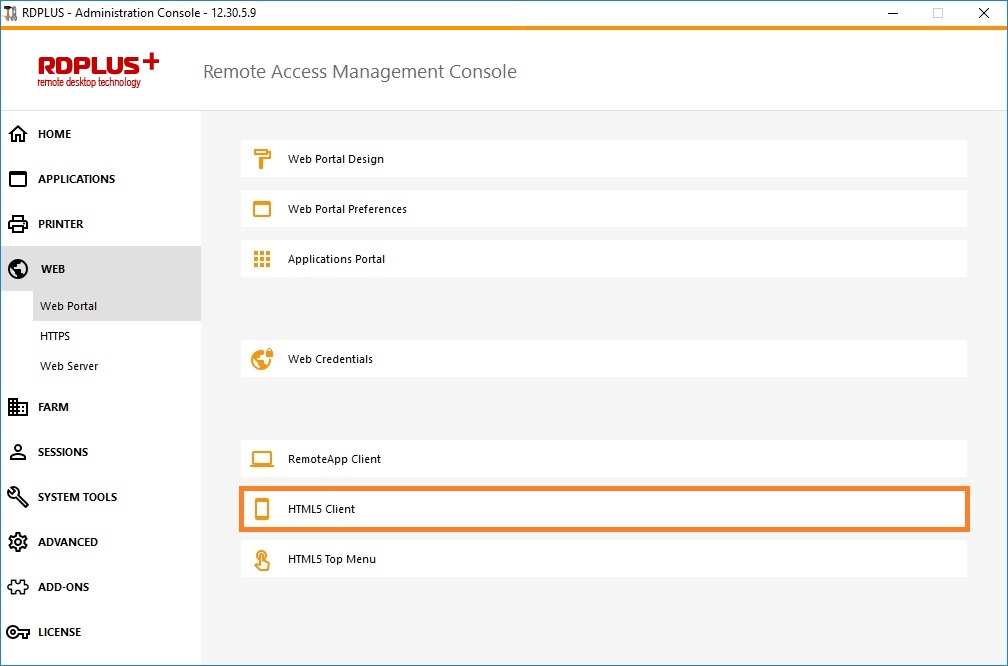
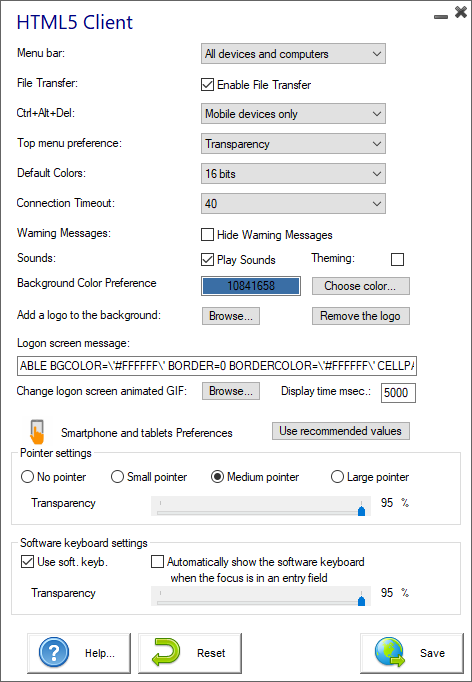
HTML5 client tile
On this tile, you can edit the parameters for the HTML5 client web display. More information on this page.
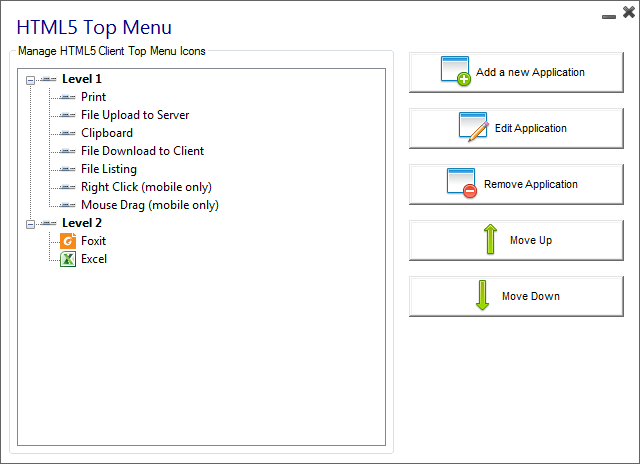
HTML5 Top Menu Tile
This tile enables you to choose the applications to display on level 1 or 2 on the Top Menu of your generated remote web session. You can also edit these applications in order for them to appear on a specific client type : pc, mobile, ios… on or all of them.
Generating the HTML Web Access page
We advise you to try a “Preview” before generating a new HTML Web Access page.
Once you are pleased by the preview, then you can click on the “Publish” button to generate and publish the page to your web server’s root folder.
You will be asked for a page name. If you want to overwrite your default page, use “index”. In this case, the newly published web page will be accessible at: http://your-server.com/index.html
There are many reasons why you would want to change the parameters of your connection client: your RDPlus server IP address changed, you need to add printer’s redirection, to change the universal printer settings or so on…
You first need to create a shortcut of the ConnectLauncher.exe file, located on the RDP6 folder of the user’s profile:
. – Then, right click on it and hit properties. Place your mouse at the end of the “target” field and type in the client’s path followed by “/?”, for example: “C:\Users\John\Desktop\clientname.connect /?”:
Now click OK and double click on the shortcut. A list of switch appears :
Click OK, the list of all the parameters appears in a small window. You can now edit them to match your preferences, you will need to log off and log on again to apply the changes.
Clean the Parameters of a Generated Client
After having launched the client at least once, you can clean the parameters by deleting the client.txt file located in the RDP6 folder:
Change your client’s icon
In order to change the generated client’s icon, just create a shortcut of the client and go to the shortcut’s properties:
Pre-requisites
It can be a good idea to Update RDPlus to be sure that you get the latest RDPlus programs.
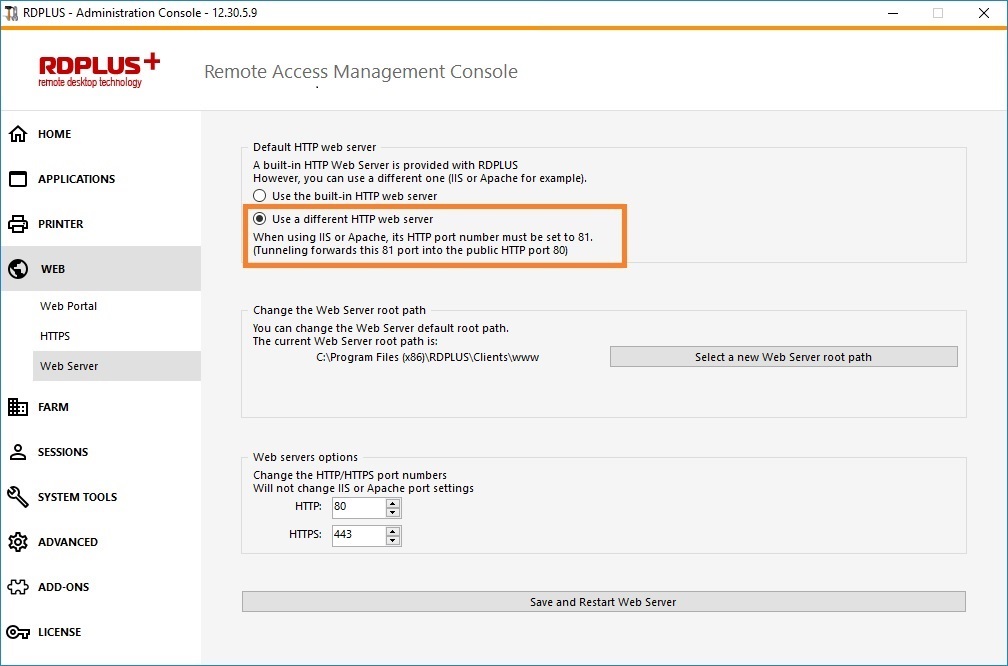
1) Start AdminTool and go to the Web Server Tab
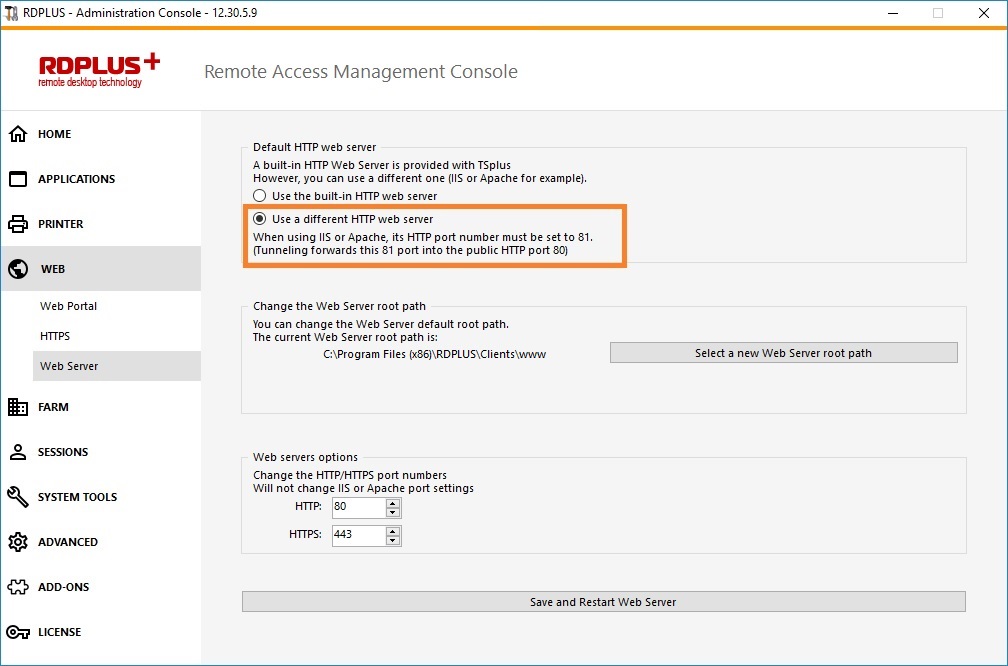
Click On the Manage Web Servers tile, check Use a different HTTP web server because you want to use Apache.
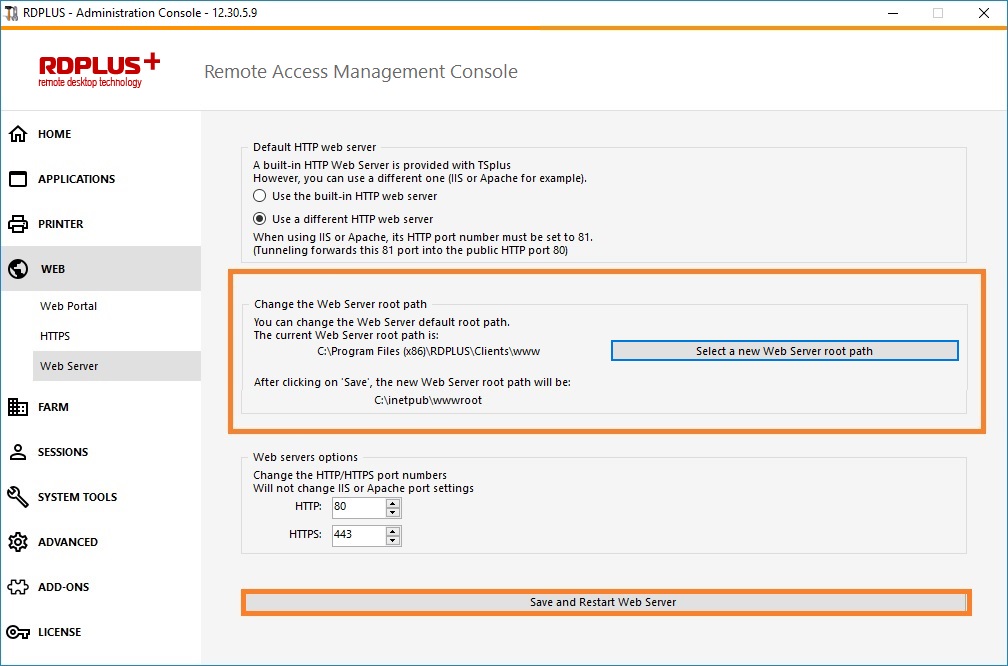
Then, use the button Select a new Web Server root path to tell RDPlus where will be the new web folder root. RDPlus will copy the requested files/folders into this new root folder and, at this point, the RDPlus setting for Apache is near completion. A pop-up will recommend you to change Apache HTTP port to 81:
It’s now time to set up Apache.
2) Setting up Apache
Change the HTTP from 80 to 81.
The specific way of doing this depends on your Apache version and your current Apache settings.
We advise you to backup any Apache settings file before modifying them, so you will have a way to restore them if needed.
Usually you can change Apache listening port by editing the file httpd.conf found in “Apache\conf” directory:
Listen 81
Once it is done, restart the Apache service.
3) Going back to RDPlus Web Servers Management tool
You can set the HTTP and HTTPS ports in RDPlus Web Management tool. We recommend using standard ports, but this feature can be handy when trying to avoid a conflict with an other process.
4) Last steps
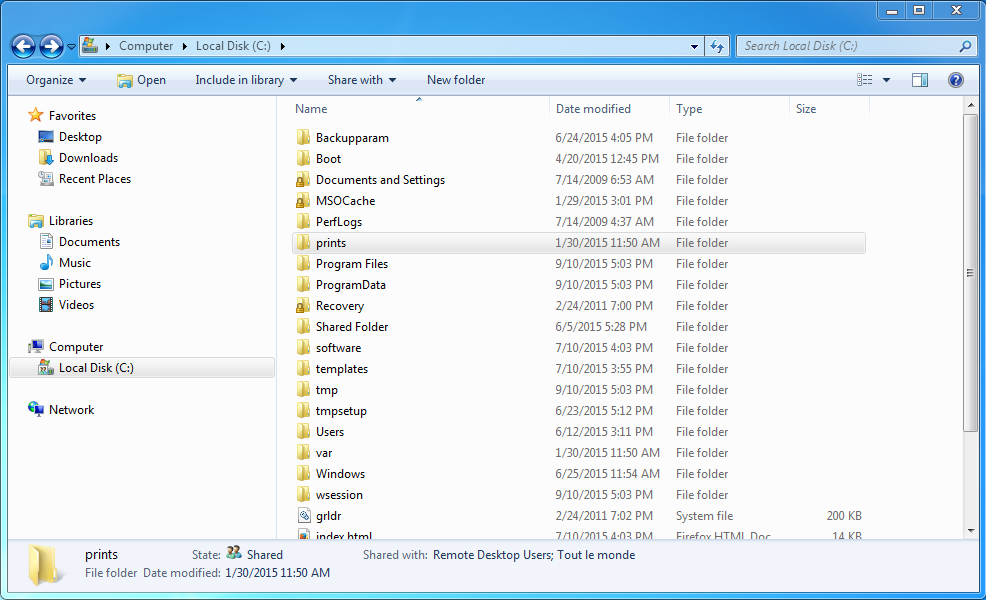
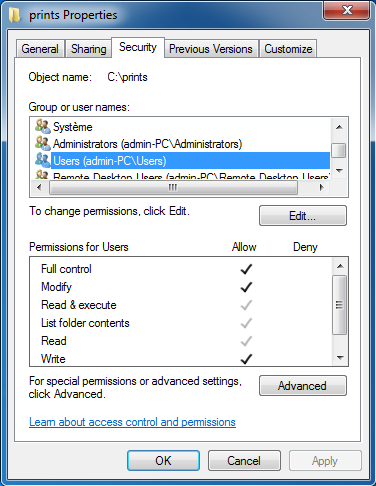
For the Universal Printer, we need to be able to write in the PRINTS folder.
So, verify that Everyone/Users… have full rights on …/prints folder.
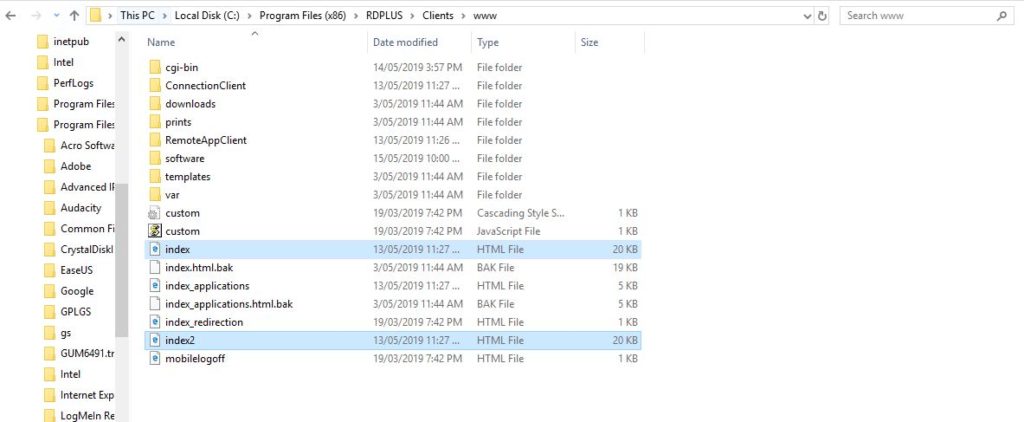
Then select the .html file you wish to use as a Web Access page in:
C:\Program Files (x86)\RDPlus\Clients\www
and copy it as index.html in your web root folder, typically this is the “Apache\htdocs” directory.
5) Specific Settings for RDPlus Gateway Portal, Load Balancing and/or HTML5 file transfer
If you want to use this Apache based system as a RDPlus Gateway Portal and/or use RDPlus Gateway Portal Load Balancing feature and/or use HTML5 file transfer feature, you will need to allow the execution of RDPlus GCI scripts by Apache.
First, you must have the CGI module enabled in Apache.
Edit the file httpd.conf found in “Apache\conf” directory, and search for a line looking like:
;LoadModule cgi_module modules/mod_cgi.so
Remove the “;” to enable the CGI module:
LoadModule cgi_module modules/mod_cgi.so
Then, find a line starting by:
AddHandler cgi-script
And add the .exe extension to authorize .exe files to be handled as CGI programs by Apache:
AddHandler cgi-script .exe
Finally, you must tell Apache that the RDPlus “cgi-bin” folder contains CGI programs. To do so, you must add the following line in the file httpd.conf found in “Apache\conf” directory:
Checking your settings: To validate your settings, please open a web browser on your server and go to http://localhost/cgi-bin/hb.exe. If you get an Apache error page, you have an issue in your Apache configuration. If you get a line of text/numbers, everything is fine!
Pre-requisites
It can be a good idea to Update RDPlus to be sure that you get the latest RDPlus programs.
1) IIS configuration
Install IIS with the following modules : CGI, ISAPI Extensions and ISAPI Filters.
Configuring the IIS Port:
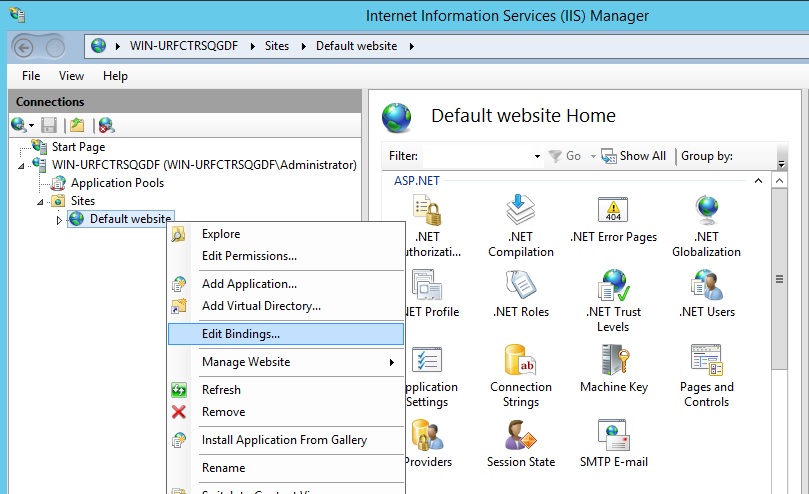
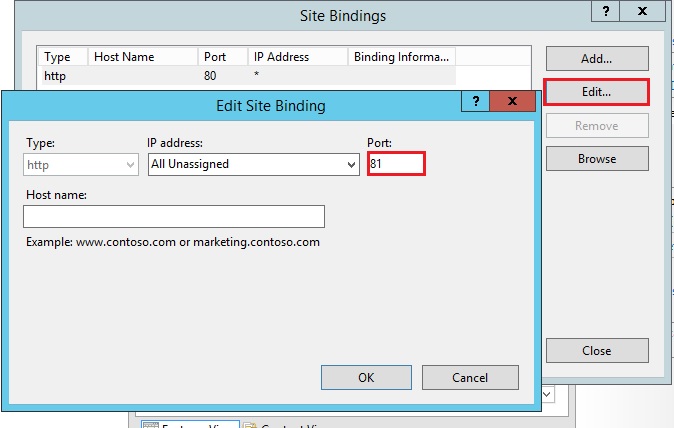
Access the IIS management console, expand the list below your server name, then Expand the “Sites” menu and right click on “Default Web Site” and click on “Edit Bindings”:
Click on “http” and “Edit”. Change the port to 81 and click Ok, and then click Close:
Then, restart the IIS Manager.
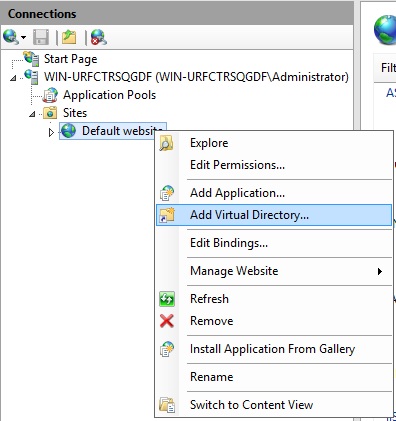
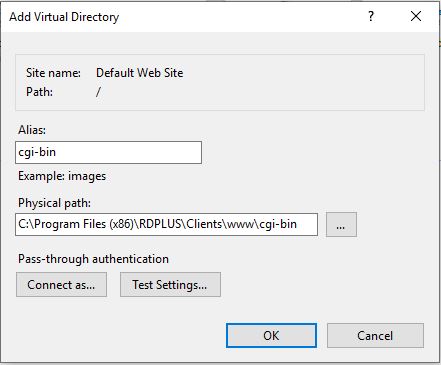
2) Create virtual directory for CGI
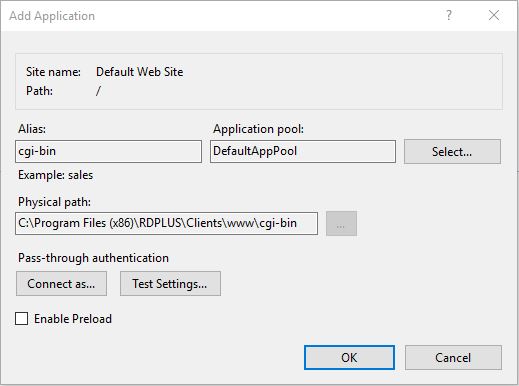
In the left panel menu, expand the menu under your server, then “Sites,” and right-click on your site to add a new “virtual directory”, as shown in the image below:
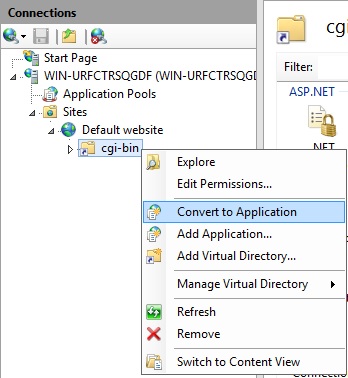
Then click “OK” and you will see that the “cgi-bin” virtual directory has been added to your IIS Web site. Now, right-click this “cgi-bin” virtual directory and click on “Convert to Application”. Click “OK” and accept the default settings.
Then select the “Handler Mappings” icon for this folder on the right side of the Manager window:
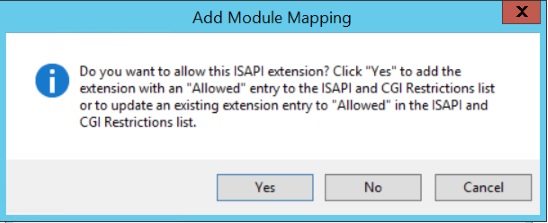
From the list of Handler Mappings, double click on “CGI-exe”. Then, search the hb.exe executable from the Executable property box and click OK.
A prompt for confirmation appears. Click “OK” to allow this ISAPI extension.
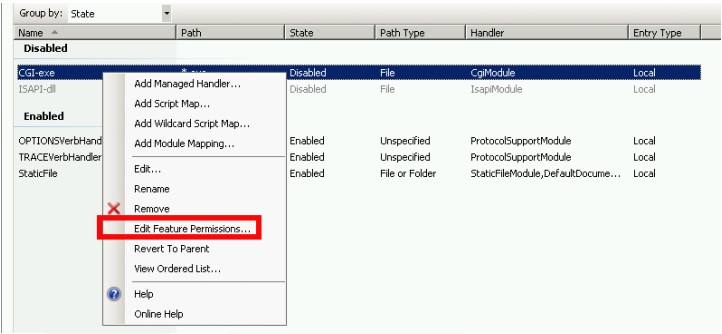
Now click on “Edit Feature Permissions”:
Check the “Execute” checkbox and click OK:
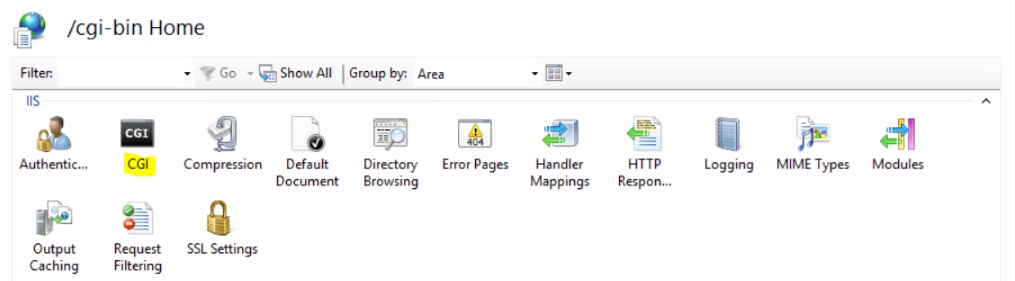
Back to the “CGI-bin” Home, click on “CGI” to open the CGI properties:
Change the value of “Use New Console For Each Invocation” to “True”. Then, click “Apply” to save the changes.
3) Configure CGI extension permission
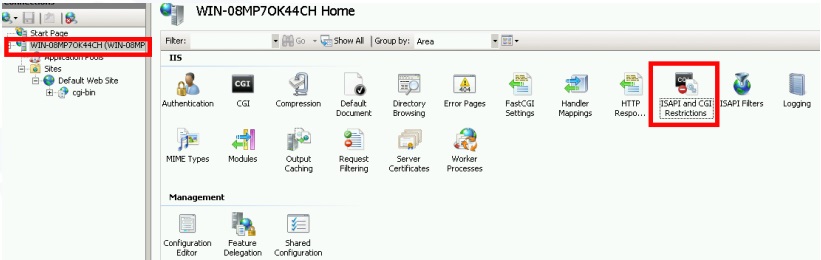
Now, the last step is to allow the CGI extension to run on the server. Click on the “ISAPI and CGI Restrictions” icon. This can be found by clicking on the machine name in the menu on the left side of the window.
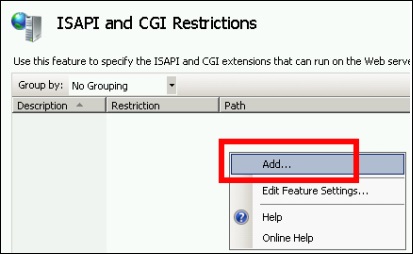
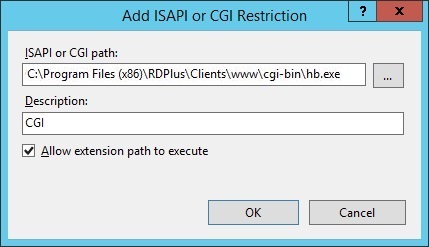
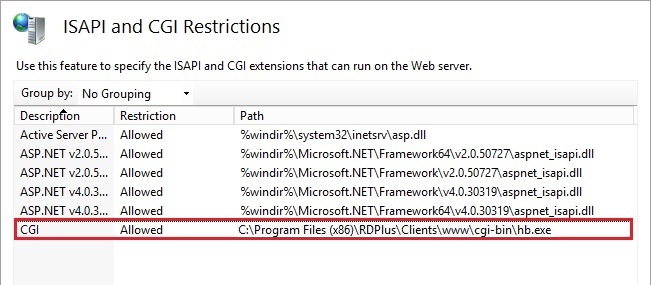
On the “ISAPI and CGI Restrictions” page, click “Add …” on the right side of the window. Now specify the full path to the “hb.exe” file hosted in the RDPlus folder. Be sure to check the “Allow extension path to execute” option, as Illustrate the following images:
4) Add Mime types in IIS
Open a command prompt as an administrator and run the following commands:
%SystemRoot%\system32\inetsrv\appcmd set config /section:staticContent /+[fileExtension=’.dat’,mimeType=’text/plain’]
%SystemRoot%\system32\inetsrv\appcmd set config /section:staticContent /+[fileExtension=’.’,mimeType=’text/plain’]
Restart IIS.
5) Configure IIS Directory Permissions
Give full permission to the group “Everyone” in the directory “C:\inetpub\wwwroot”
6) Configure RDPlus
Go to the Web Server tab of the AdminTool, then choose the “Use a Different HTTP server” option:
Then, in the same window, click on “Select a new Web Server root path”, and put the path of the IIS directory, which should be something like: “C: \ inetpub \ wwwroot”. Now click on “Save and Restart the AdminTool”.
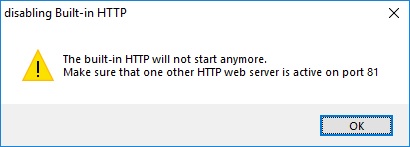
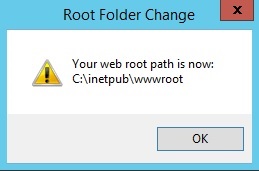
The following messages will appear:
Wait. The Admintool will be closed automatically. Then open the Admintool again and click on the Web tile.
Finally, restart the web servers:
7) Test with local host
Warning: Use a different user account.
If you try with your current user account from your own RDP session to the server, then you will be disconnected and not be able to reconnect.
Overview
RDPlus creates by default an icon for the Portable Client Generator:
It can also be accessed on the Server’s tile of the AdminTool:
It enables you to create 3 types of connection clients which can be copied to the users’ Desktop or onto a USB stick for portable use.
Note: Connection Clients are not compatible with Mac computers.
Since RDPlus 11.40 release, the client generator has been redesigned to be numerically signed and to avoid false/positive antiviruses reactions. Instead of a “.exe” program, the new Client Generator is creating a flat encrypted file with the extension “.connect”:
Pre-requisite on Client Side
On client side, each user will have to run a signed program named “Setup-ConnectionClient.exe” as a pre-requisite. This program is available on your server, in the RDPlus program folder: RDPlus\Clients\WindowsClient:
Detailed Overview
Click on a tab to go to the corresponding information:
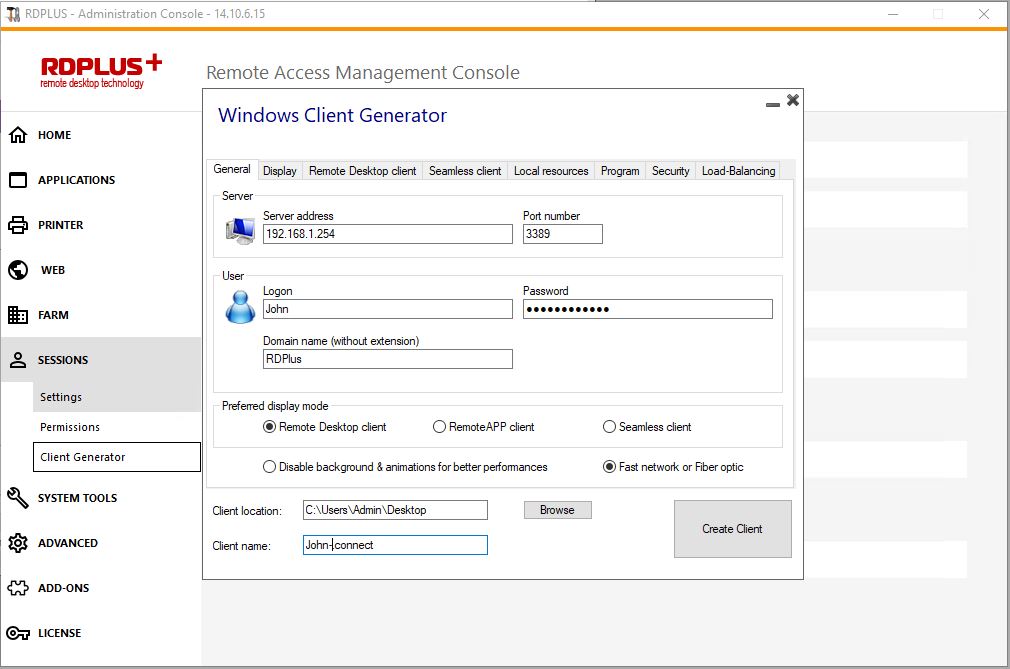
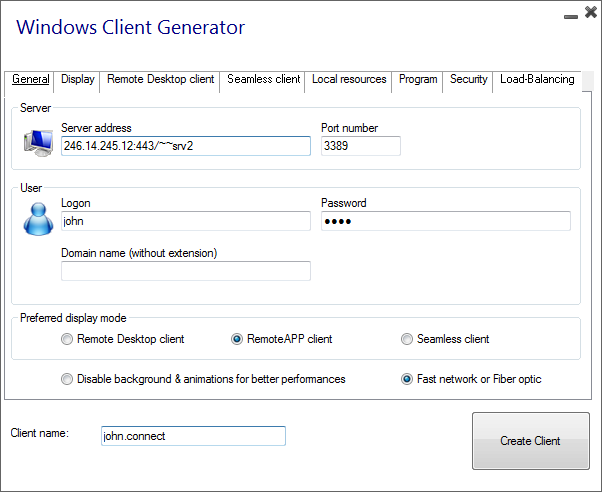
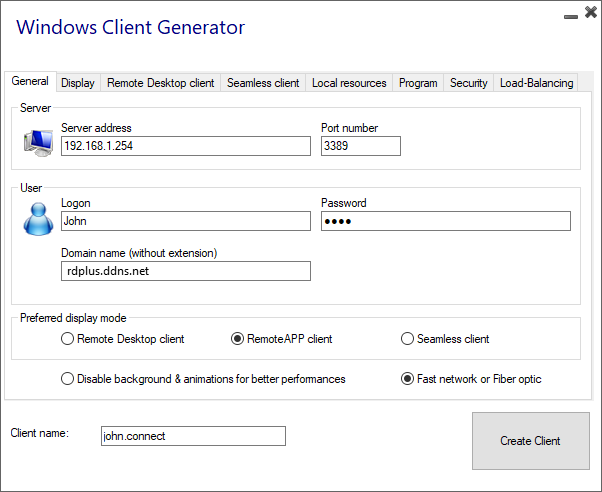
Main window – General Settings
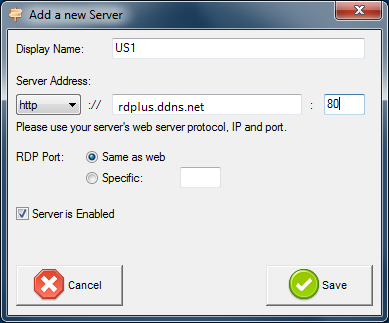
When you launch the client generator, the first tab displayed is the general tab, Here you will find all of the essential connection settings that you need to get you started.
Server Address: Enter the IP address of the server you would like the client to connect to.
Port Number: Enter the server port number. The default is 3389.
Username and Password: If you enter a username and password, the client program will not ask the user to retype it at each session. To reset this logon/password saving, you must create and edit a shortcut of the Remote Desktop Client and add the -reset on switch at the end of the target field.
Credentials
If you don’t want to save credentials, enter “nosavecredential” in the logon field of the Portable Client Generator.
If you don’t want to display the logon window with the user name, password and domain name, simply enter “nopassword” on the password field.
If you want to enable autologon, enter *SSO in the username field, the client program will just ask for username and password during the very first connection. It will save this information on the user’s workstation so that the user doesn’t have to identify himself ever again.
If you want the current local user’s name to be displayed as a logon for the session, enter **, or %USERNAME% in the logon field.
Domain name: Enter a domain name if any.
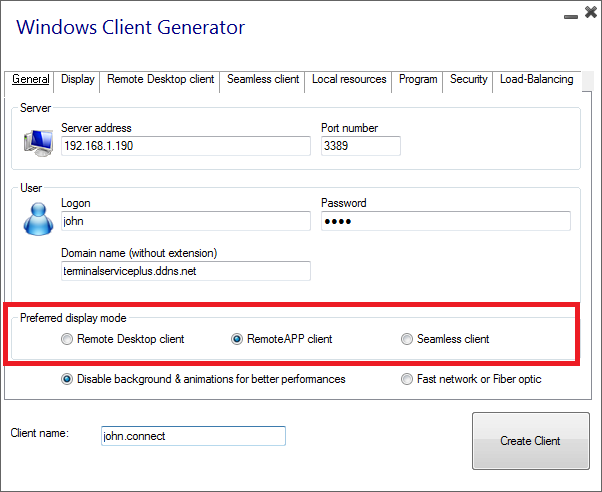
Preferred Display Mode: You can choose your preferred Display Mode from the following options:
The Classic Remote Desktop, displaying your remote session environment.
The Microsoft RemoteApp connection client, to display your remote applications as if they were installed locally. It has a better graphic performance over minimized applications.
The Seamless Client, which works the same as RemoteApp, but for older versions of Windows such as Windows XP and 2003.
RDPlus Seamless vs Microsoft RemoteApp
Microsoft RemoteApp is a Microsoft feature which requires Windows 7 Enterprise or Ultimate and above.
All users PCs must have at least a RDP6 client. Unlike the Seamless client, the RemoteApp connection client does not depend on the transparency color settings. You can change the RemoteApp client display and Printing preferences on the Web tab of the Admintool. Minimized applications can be directly found inside the Windows taskbar, like local applications.
RDPlus Seamless delivers a similar user experience and is available on any Windows host system.
Based on one transparency color selected by the Administrator, the Microsoft Remote Desktop is not displayed anymore and the user will just see his published applications.
The Seamless color can be modified and must be the same when using the AdminTool and the Portable Client Generator.
More information on these types of clients can be found here.
Network speed: You can choose between two options depending on your network speed:
Disable background display & graphic animations for low speed networks.
Enable background display and graphic animations for fiber optic or fast network.
Client name: You can name your client as you wish.
Client location: Define the location of your generated client.
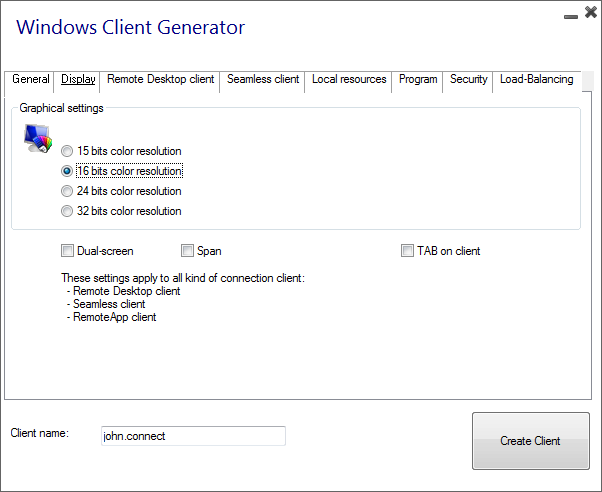
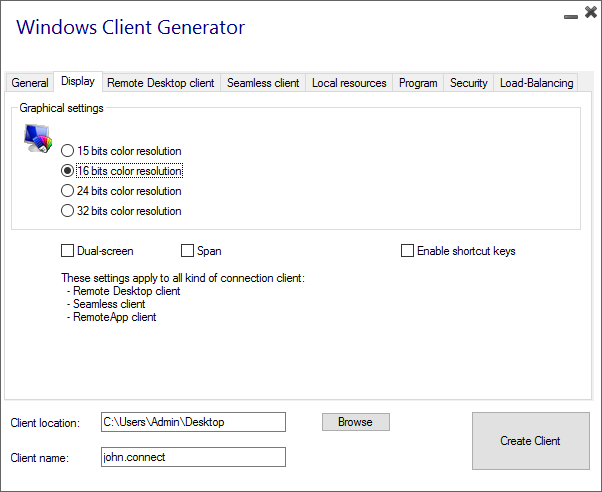
Display
On this tab, you can change the color and the session screen resolution. You can also adapt your session for dual-screens, with or without span. The span option allows you to stretch your session across both screens. You can allow the use of the TAB key in the session.
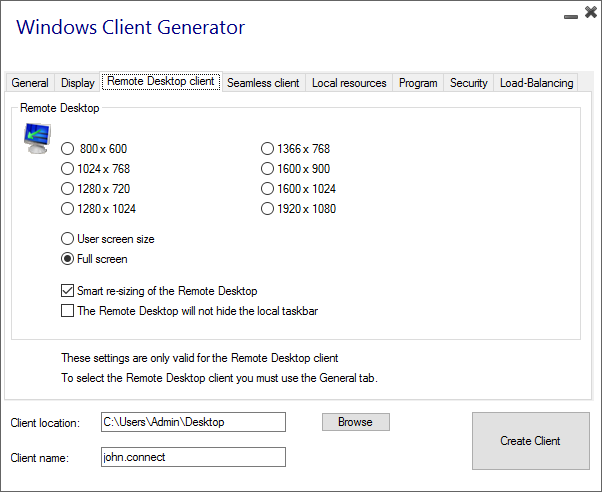
Remote Desktop Client features
On this tab, you can choose which resolution you want to enable for the user:
You can check the boxes to enable smart-sizing of the Remote Desktop, and if you want the Remote Desktop not to hide or overlap the local taskbar.
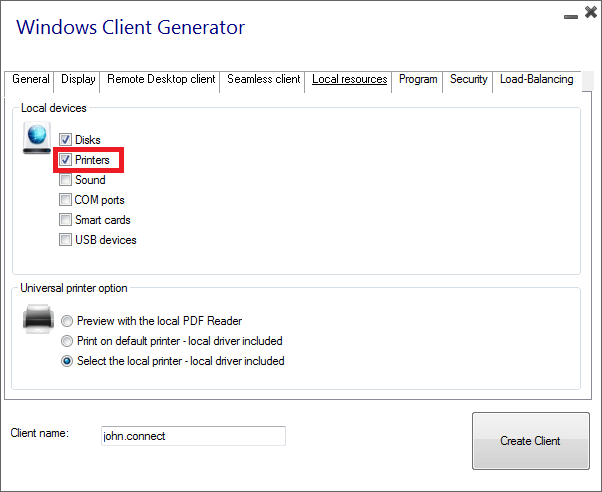
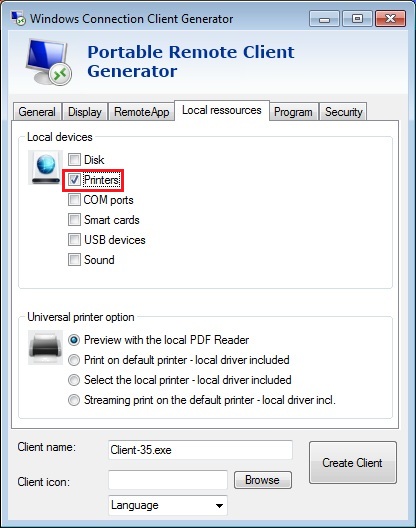
Local Resources
The local resources tab gathers all the devices that you may redirect in your remote session.
The editable field next to the disks box allows to specify which disks are available in the remote session. You just have to separate each letter of disk (C :, E: …) by a comma. When the disks box is ticked and no disk is specified, all the disks are included in the remote session.
Printers correspond to LPT ports, and COM Ports correspond to Serial Ports. Since RDPlus 11.50 version, these local devices are selected by default.
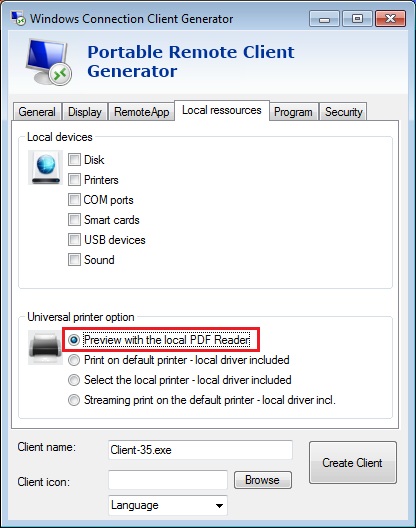
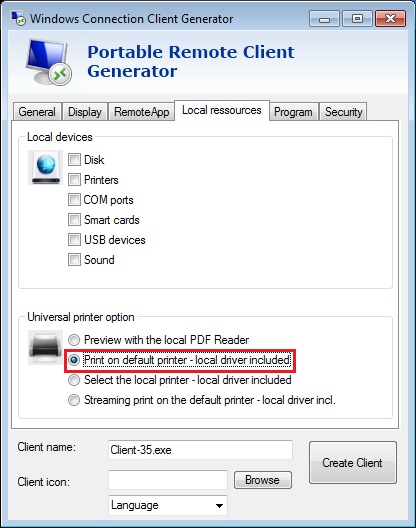
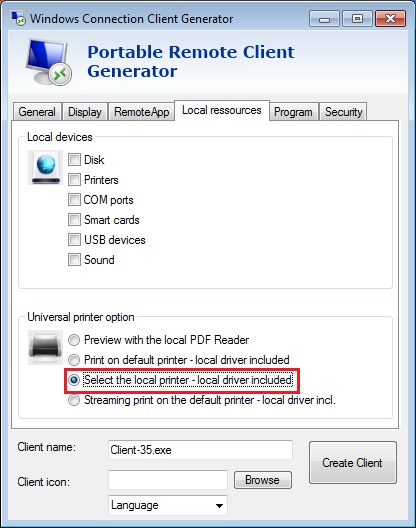
Below, you can choose your option for printing, with the universal printer:
Local PDF Reader preview: The document will be rendered as a PDF and the local Acrobat Reader will open the file. The user can print it, or save a copy on his local disk drive.
Print on the user’s default printer: the document will be automatically pushed to the user’s default printer (the local print driver is included in the RDPlus connection client).
Select a local printer: The user can select one of his local printers (the local print driver is included in the RDPlus connection client).
If you do not have a PDF Reader installed on your machine, we recommend the use of Foxit Reader.
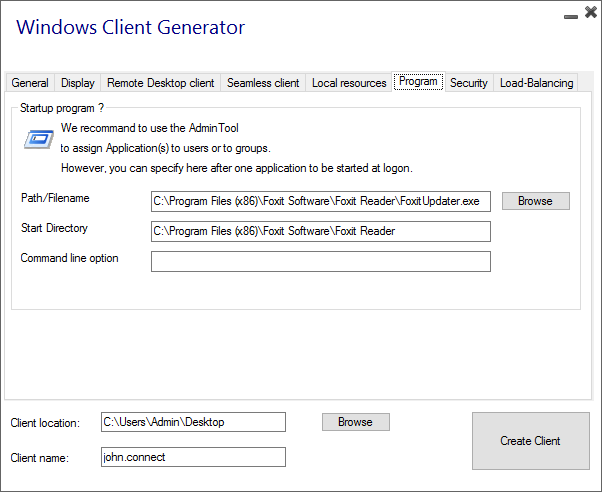
Program
You can set a startup application via the Portable Client Generator, and specify its path, directory and parameters, since the 11.30 release. However, we recommend you to use the AdminTool to assign the desired applications.
Program
Security
RDPlus offers two extra layers of physical security to keep your users’ connections safe. The connection can be locked to the ID of a USB key, locked to a computer name, or you can use both layers of security simultaneously.
If locked to a USB key, the user can initiate a connection from any qualifying windows computer by inserting the USB key and using the connection program placed there by the administrator.
If locked to a computer name, the user can only successfully connect from the computer whose name has been registered with the server for that user’s portable client connection. If both security options are used, the user is limited to connecting from their specific device and only if the correct pre-configured USB key is in place.
In order to lock a connection client onto a USB key you can do so by copying the client generator located in : C:\Program Files (x86)\RDPlus\Clients\WindowsClient Now double click on the client generator and check the lock on serial number box located on the security tab. Once it is done, you can delete the client generator from the USB key. The newly generated connection client will be placed on the desktop, don’t forget to copy it back to the USB key! You can delete the client generator that you copied on the USB key afterwards.
You can define the time limit from the first use date of a generated client by entering the value on the time limit box. (which is by default set to “no limit”).
Boxes below enable you to:
Not display the ability to save credentials for a generated client.
Save username only.
Use Encryption V2.
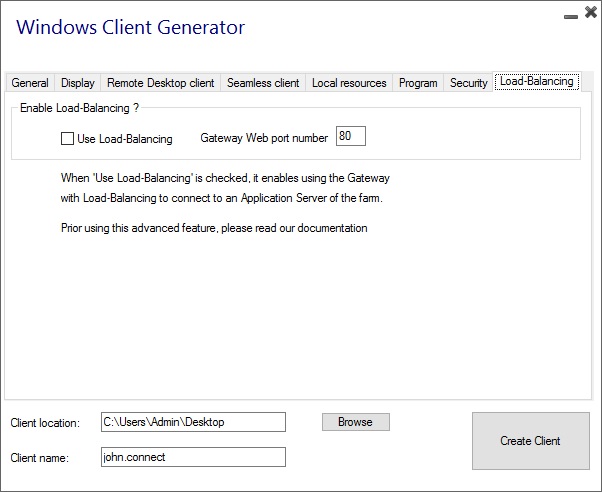
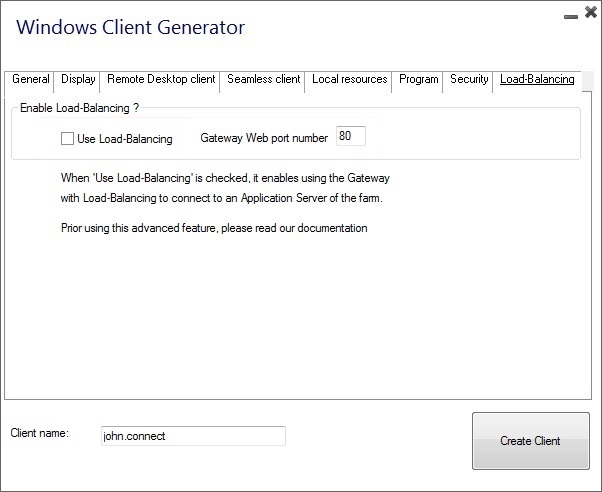
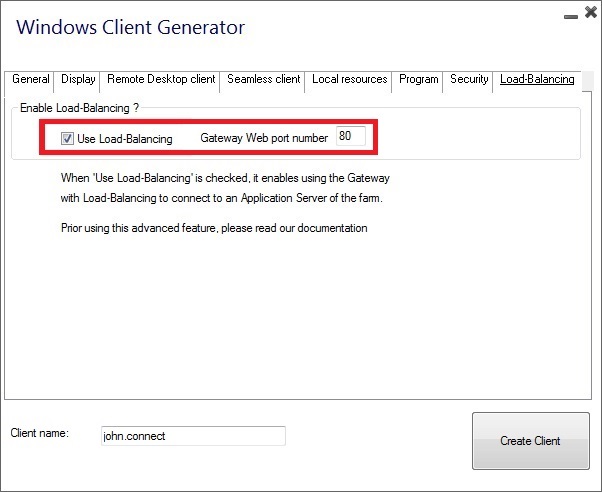
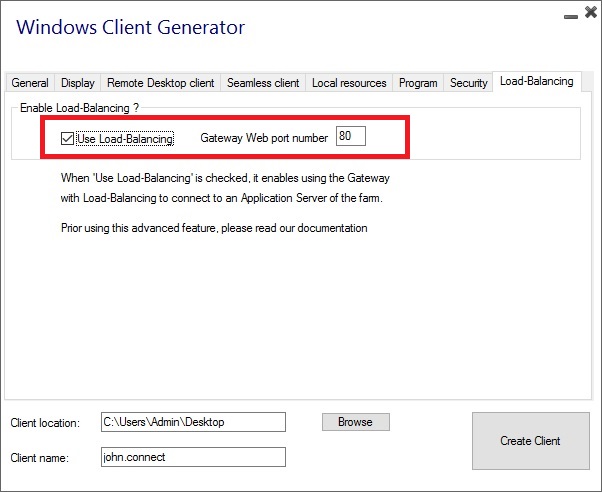
Load-Balancing
You can also enable the Load Balancing to connect to one server of your farm. Do not check the “Use Load-Balancing” box if you did not activate the Load-Balancing feature on your server. You will need to enter the Gateway Web port, which should be the same as the default web port used on all the servers of your farm.
On client side, each user will have to run a signed program named “Setup-ConnectionClient.exe” as a pre-requisite. This program is available on your server, in the RDPlus program folder: C:\Program Files (x86)\RDPlus\Clients\WindowsClient:
It is also available in C:\Program Files (x86)\RDPlus\Clients\www\ConnectionClient, so your users can just run the program once on your web server address: http://xxxxxxxxxxx/ConnectionClient/Setup-ConnectionClient.exe
Note: Since RDPlus 12.40, The Client Setup Program and the RemoteApp client setup have been merged and can be deployed with one single setup – so if you download the Connection Client Setup, there will be no need to download the RemoteApp Client one.
RDPlus Web App is a Progressive Web App (PWA) that leverages modern browser APIs to deliver a seamless remote access experience without cumbersome software installation or complicated connection clients. Designed to utilize industry standard HTML5 display and communication protocols, The RDPlus Web App appears as a native connection solution, no matter what type of device you use.
Benefits
The new RDPlus WebApp offers improved performance and value using the following improvements over legacy applications and connection clients:
Faster load times due to the small software footprint.
Lower data usage – RDPlus Web App leverages common browser based traffic management to minimize data usage.
Seamless user experience – from login display to application rendering, the RDPlus WebApp offers the user the appearance of native application use.
No more browser tabs or lost sessions due to too many open browser windows. The RDPlus Web App behavior offers the same multitasking options as any other top level application.
Installation – PC
Navigate to your corporate RDPlus Web Portal using your preferred common web browser (HTTPS configuration required).
Click on the + button located on the right side of the navigation bar. When prompted, click on ‘Install’.
The installation only takes a second. It will create an icon on your desktop:
And the web app will open immediately upon completion:
Installation – Android Mobile Device
Navigate to your corporate RDPlus Web Portal using your preferred common mobile web browser. HTTPS protocol is required on the RDPlus server.
The Web Portal will offer the option to add the RDPlus Web App to your home screen, by clicking on the “Add RDPlus Web App to Home Screen” :
Or by clicking on the 3 dots menu on the top right of the window and clicking on “Add to Home Screen”
Tap on the ‘Add’ button and the process is complete:
The RDPlus Web App will now be accessible directly from the home screen of your mobile device.
Installation – Apple iOS Mobiles
The Web App installation process on iOS is similar to the Android process. Just navigate to the RDPlus Web Portal using Safari Web Browser. Click on the Share button:
Then click on “Add to Homescreen”.
Note: Chrome browser doesn’t support the Web App feature on iOS.
Management
You can manage the Web App, by going to the RDPlus Admin Tool Web – Web Portal section and clicking on RDPlus Web App tile:
The Web App is enabled by default, but you can disable it. It is possible to modify the Shortcut name, background and theme colors as well as the icon of RDPlus Web App:
Just click on “Save” to record your modifications.
You can choose between 3 display modes on the general tab of the client generator:
RemoteApp connection client
Unlike the Seamless client, the RemoteApp connection client does not depend on the transparency color settings. This allows for perfect application display as well as native Windows behavior.
On the Client side, the installation of RDP6 or above is required.
On the Server side, RDPlus must be installed on a machine running Windows 7 to Windows Server 2019. Note: RemoteApp is not supported on Windows 10 1803 et 1809 Home Windows 2019 Essentials Editions.
You can change the RemoteApp client display and Printing preferences on the Web tab of the Admintool:
Minimized applications can be found directly inside the Windows taskbar, like a local application. In this example, Firefox and Paint are launched locally; Notepad, Word and Foxit are launched remotely.
Seamless connection client
The Seamless connection client works on every Operating System, regardless of the version on the client or on the server side. When connecting remotely in seamless mode, you can access your applications as if they were installed locally on your computer. A transparency color can be set manually to insure your application will appear perfectly. You can choose from green, blue, or pink.
The Seamless Client is based on one transparency color selected by the Administrator. Since the Remote Desktop background color is painted with the selected transparent color, the Microsoft Remote Desktop is not displayed anymore and the user will just see his published applications.
Warning: Installation default is green and should work fine with most applications. We offer you the choice between 3 transparency colors: Pink, Green and Blue. Of course, the server and the connection clients must use the same color. Some elements on an application can also not be visible anymore because of the transparency color.
For both the Seamless and the Remoteapp connection clients, you can choose to publish one unique application to be launched seamlessly at the user’s logon. You can also publish applications with the RDPlus Remote Taskbar, the Floating Panel or the Application Panel.
Overview
RDPlus Web Application Portal provides a single, flexible solution that can streamline application and desktop deployment and life-cycle management to reduce IT costs. By centrally managing and web delivering on-demand applications, IT can improve the success rate of application deployment providing role-based management, application control, security and users support.
RDPlus Web Application Portal virtualizes and transforms Windows apps and desktops into a secure on-demand service.
With Web Application Portal, you will be able to publish Microsoft Windows applications (business applications, Office applications…) to the web.
As in Citrix, your users can access their applications directly from the Internet, simply by clicking on the application icon in the Portal web page, directly inside their own Internet browser.
Managing your Web Applications
The Web Application Portal feature is fully integrated with RDPlus. It means that all the applications published by RDPlus Applications Publishing feature can be used in the Web Applications Portal.
In the Admin Tool, open the “Web” tab and click on the “Applications Portal” tile.
To generate a web access page with the Web Applications Portal feature activated, check the “Enable Applications Portal” checkbox. You can customize your web access page to your liking, then click on “Publish” to publish this new web access page.
Note: You can change the box and the box border colors only for the Classic themes which can be changed on the Web Portal Design tile.
Using the Web Applications Portal
On this example we have published the new web access page with the default name “index”.
To access it, open a web browser and go to http://yourservername/ (in this example we use http://localhost , directly from the server itself).
The first web page displayed is the standard RDPlus web logon page:
Once logged in, a new web page is displayed, this is the Web Applications Portal:
As you can see, the user gets an icon for every published application that he has access to. The user can now click on one or more icon, in order to remotely open the matching application in a new tab:
Web-Lockout
Since RDPlus 11.40 release, brute-force attacks on the Web Portal are now blocked when users enter wrong credentials. After 10 attempts during a period of 15 minutes, the Web Portal will prohibit the user to logon for 30 minutes (customizable on the Advanced – Lockout tab of the AdminTool) :
These are the default settings which are customizable on the hb.exe.config file located on the RDPlus folder: RDPlus\Clients\www\cgi-bin\hb.exe.config in the “appSettings” paragraph.
You can check all blocked connections and logs by users on the Lockout feature of RDPlus:
This functionality is visible and active after the first Web Portal connection.
In a Farm / Gateway configuration, the Applications must be published and assigned on every server of the farm at the moment.
In terms of RDPlus licensing, a user can open several applications at the same time without counting for more than 1 user.
Overview
RDPlus Web Credentials is a state-of-the-art unique feature, which allows users to connect with just an e-mail address or a pin-code.
With Web Credentials, you can secure your server’s access with the e-mail address of a user, or with a simple pin-code generated by your business application. One of the great benefits of this feature is that these credentials (e-mail or pin-code) are pure web credentials : the user will not know the Windows user account he is currently using, and he does not need to know a real Windows login/password to connect to his application!
With Web Credentials, you will be able to define custom pure web credentials and match them to any existing Windows / Active Directory user account. The user will then be able to connect using these custom credentials, instead of the Windows / Active Directory ones.
Managing your Web Credentials
In the Admin Tool, open the “Web” tab and click on the “Web Credentials” tile.
The Web Credentials Manager will open and display this window:
You can now create a new Web Credential by matching a custom login and (optional) password with an existing Windows / Active Directory user account, as shown below:
Since RDPlus 9.50 version, you can also decide the maximum number of concurrent sessions for a user.
You can also edit and remove an existing Web Credential, thus changing or disabling any custom credentials you configured.
Alternatively, you can create web credentials via a command line:

- On the Windows Start Menu, on the execute field, type in: 'cmd.exe' (or in Programs/Accessories > 'Windows Power Shell')
- Then, in order to go to the right folder, type: cd "C:\Program Files (x86)\RDPlus\UserDesktop\files", then press Enter to
  validate
- To add a new Web Credential, type: WebCredentials.exe /add your_web_login your_web_password your_windows_login
  your_windows_password
- To add a blank credential, type two double quotes: "" to indicate a blank text.
- To delete a web credential, type: WebCredentials.exe /remove your_web_login
Important Notes
Please note the following limitations:
‘[‘, ‘]’ and ‘°’ characters are not supported on the password fields.
In a Farm / Gateway configuration with load-balancing mode, the Web Credentials must be defined on every server of the farm at the moment.
Overview
Since RDPlus version 12.50, a new “Send to Client” menu can be enabled under the Advanced > Contextual Menu tab to easily send files to client workstation. This feature works with all connections methods.
By default, this feature is disabled. Select the “Yes” value then click on “Save”, in order to enable it :
You can also change its position. By default, it will show on top:
This is a right-click contextual menu. Just select the desired folder or files, right-click on it, select the “RDPlus” tab and simply click on “Download”:
You will find your download into the Webfile folder and into the “Downloads” folder of your web browser.
Overview
On this tab, you can configure RDPlus Logs settings.
By default RDPlus doesn’t create logs, to avoid performance issues.
Logs exist to find more easily the origin of the errors encountered on RDPlus and you can enable them by doing so:
go to C:\wsession
create the folder ‘Trace’. Logs will automatically be created there, per user.
You will need to activate the log generation in the AdminTool > Advanced > Logs
There are 5 types of logs:
The Web Portal log,
The Session Opening log,
The Session control log,
The Load-Balancing log and
The AdminTool application (interface) log.
Log levels correspond to different components, our support team will tell you what value to put according to the problem encountered.
Here are the different log file names and locations:
Web Portal log: “C:\Program Files (x86)\RDPlus\Clients\www\cgi-bin\hb.log”
Session Opening log: “C:\wsession\trace”
Session control log: “C:\Program Files (x86)\RDPlus\UserDesktop\files\APSC.log”
On this tab, you can enable/disable and configure RDPlus Lockout settings.
Enable/Disable Lockout Feature
The Lockout Feature is enabled by default. You can disable it by changing the value from “Yes” to “No” value on this window, then click on save.
Limit
The Lockout Limit defines the number of allowed failed login attempts from the Web portal before the account is locked out (default is 10). You can modify this value by entering the desired value into the corresponding field and click on save.
Interval
The Lockout Interval specifies an interval of time between failed login attempts. If a failed login attempt occurs after the Interval defined, then the counter of failed login attempts is reset for the relevant user (in seconds, default is 900 seconds). You can modify this value by entering the desired value into the corresponding field and click on save.
Period
The Lockout Period specifies the duration an account is locked out and unable to login (in seconds, default is 1800 seconds). The period of time a user is locked out is the greatest value between LockoutPeriod and LockoutInterval settings. Therefore, when changing LockoutPeriod’s value, one should update the LockoutInterval setting with a smaller value to ensure a relevant behavior. You can modify this value by entering the desired value into the corresponding field and click on save.
Overview
TLS/SSL, the security behind HTTPS, can use several different algorithms to secure, encrypt and authenticate a connection.
The choice of the algorithm to use is decided by an agreement between the server and the client, depending on which algorithms are available on each side.
A cipher suite is a named combination of authentication, encryption, message authentication and key exchange algorithms.
RDPlus server can handle a lot of different ciphers suites. Some of them are more secure than others, but some old/legacy browsers might require relatively weak algorithms to connect.
This is the reason why RDPlus let you choose the ciphers suites you want to enable. Of course, RDPlus also has an easy setting to disable the weakest algorithms, thus enhancing your connections security.
HTTPS Protocols and Ciphers Selection
To see RDPlus Ciphers Selection, open RDPlus AdminTool, click on the “Web – HTTPS” tab, where you will see HTTPS Protocols and Ciphers:
Enabling/Disabling a Cipher Suite
You can easily enable a cipher suite by checking its checkbox and disable a cipher suite by unchecking it.
When your selection is done, click on “Save”.
This will save your selection and reload the new configuration in RDPlus built-in web server. Your new ciphers suites selection is instantly applied for every new connection to your server.
Recommended Ciphers Suites Selection
We recommend to most administrators to use our recommended ciphers suites selection, by simply clicking on the “Disable weak parameters” button and then on the “Save” button.
This action will disable all ciphers suites which are currently known to be weak.
You can check with SSL Labs Online Testing Tool: without those weak ciphers suites you should get the maximum grade: A!
Overview
Starting with version 9.20,RDPlus provides an easy to use feature to generate of a free and valid HTTPS certificate.
In 3 mouse clicks you will get a secured valid certificate, renewed automatically, and configured automatically into RDPlus built-in web server.
This feature uses Let’s Encrypt to provide a free and secure HTTPS certificate for your HTTPS connections.
Prerequisites
Please ensure that your RDPlus server meet these requirements before using the Free Certificate Manager:
You must use RDPlus built-in web server listening on port 80 for HTTP. This is required by Let’s Encrypt domain ownership validation process.
Your server’s domain name must be accessible from the public Internet. This is required as well to validate that you are the real owner of the domain.
You must run this program on the Gateway server or a Standalone server, not an Application server(except if your Application Server is accessible from the public Internet and has a public domain name).
It is not possible to get a certificate for an IP address, be it public or private. It is not possible to get a certificate for an internal domain name (i.e. a domain which only resolves inside your private network).
Free Certificate Manager GUI
To open RDPlus Free Certificate Manager GUI, open RDPlus AdminTool, click on the “Web – HTTPS” tab, then click on “Generate a free valid HTTPS certificate” as shown in the screenshot below:
The Free Certificate Manager GUI will open and remind you about the prerequisites, as shown in the screenshot below:
Please read carefully and check that your server meet all the requirements, then click on the “Next” button.
Step 1: Enter your Email
As shown in the screenshot below, you only need to enter a valid email address.
This email will not be used to spam you. Actually it will not even be sent to RDPlus or any third party, except the certificate issuer: Let’s Encrypt.
They will only contact you if needed, according to their Terms Of Service.
Enter a valid email, then click on the “Next” button.
Step 2: Accept the Terms Of Service
As shown in the screenshot below, you will be able to open Let’s Encrypt Terms Of Service by clicking on the big button.
To accept these Terms Of Service and continue, check the checkbox and click on the “Next” button.
Step 3: Enter the server’s Domain Name
As shown in the screenshot below, you only need to enter your server’s public domain name.
This is the public Internet accessible Domain Name, something like gateway.your-company.com. You can also enter another domain name or a subdomain name, separated with a comma. Example: “server1.example.com,www.server1example.com”
As explained in the GUI, do not add a protocol prefix and/or a port suffix, just enter the clean domain name(s).
The certificate will be generated for this domain name, and it will only be valid on a web page hosted at this domain name. If your users connect to your Web Portal using https://server1.example.com:1234, then you must enter “server1.example.com”.
Enjoy your Certificate!
RDPlus Free Certificate Manager will now use all the data to connect with Let’s Encrypt, validate that you really own the domain name you typed, and get the matching valid certificate.
Once the program receives the certificate, it will automatically handle all the required file format conversions and softly reload RDPlus built-in web server in order to apply the new certificate to every new connection. The web server is not restarted and no connection is stopped.
Certificate Renewal
Let’s Encrypt certificates are valid for 90 days.
RDPlus will automatically renew the certificate every 60 days for safety. A check is done at every reboot of the Windows server, and then every 24 hours.
You can manually renew your certificate by opening the Free Certificate Manager tool. It will display the domain name of the certificate and its expiration date.
To manually renew your certificate, just click on the “Next” button.
The “Reset Domain” button on this window deletes the SSL certificate and reconfigure the Web Server to its original state before using the Certificate Manager.
Best Practices
If no error occurs, RDPlus will renew the certificate automatically every 60 days. We recommend that you check every 60-70 days that your certificate has been automatically renewed.
We also recommend that you backup at least every month the following folder and its sub-folders:
This log file (and maybe the other log files in the same folder) should help our support team to investigate and to better understand the issue.
If you want to restore a previously used certificate, go to the folder:
C:\Program Files (x86)\RDPlus\Clients\webserver
It will contain every “cert.jks” files used. These are the “key store” files and we never delete them, we only rename them with the date and time of their disabling.
Error Codes
Error 801: Free Certificate Manager was not able to register your Let’s Encrypt account. Check your Internet connection. Check that your email is not already registered at Let’s Encrypt. Try again with another email.
Error 802 & Error 803: Free Certificate Manager could not retrieve Let’s Encrypt Terms Of Service URL address. This is a non blocking error: you can still continue and accept Let’s Encrypt Terms Of Service – be sure to read them from your browser first of course.
Error 804: Free Certificate Manager was not able to validate your agreement to Let’s Encrypt Terms Of Service with Let’s Encrypt servers. Check you Internet connection. Try again.
Error 805 & Error 806: Free Certificate Manager was not able to validate that you own the domain you entered during certificate creation (Error 805) or certificate renewal (Error 806). Check again all the prerequisites. Check your Internet connection. Check that your web server is listening on port 80. Check that you do not use a third-party web server such as IIS or Apache. Check that your domain name is accessible from the public Internet.
HTTPS Certificate Command Line
Preparing the Certificate Configuration File
Inside the “C:\Program Files (x86)\RDplus\UserDesktop\files\cert” folder, create a file named “FreeCertificateManager.ini” if it does not already exist. Make sure your text editor and/or Windows file explorer does not add an ending “.txt” extension.
Edit the file and write or update it so it has the following format, then save it:
The “FreeCertificateManager.ini” file must exist and use the expected format
Your RDplus Remote Access server must be up and running
Your RDplus Remote Access Web Portal must be available with protocol
HTTP on port 80 from the internet public network, as RDplus HTTPS certificate provider will use that to validate the server domain name
Renewing the Certificate
Once the certificate is configured and created, RDplus Remote Access will automatically renew it every two months to make sure it never expires.
Add your own certificate
If you already have a valid HTTPS certificate you can add it to your web server, or feel free to generate a CSR via your cert provider or using a free tool such as SSLTrust and have a new cert issued specifically for RDPlus.
Open RDPlus AdminTool, click on the “Web” tab, go to the “HTTPS” menu and then click on “Add my HTTPS certificate” as shown in the screenshot below:
A window will open where you can select your certificate:
Your certificate file must use the “.pfx” format.
If your certificate is protected by a password, you can enter it in the corresponding field.
Click on the “Add my certificate” button to add your certificate.
Please note that you will need to renew your certificate manually.
RDPlus Lockout monitors failed Web Login attempts on your RDPlus server. RDPlus Advanced Security will show a Lockout Event, after any Web Portal failed attempt like the example below:
“A failed login attempt was detected from Web Portal for user … 1 Failed login attempt were detected for this user since…”
Brute-Force Attacks Defense
The brute-force attack defender enables you to protect your public server from hackers, network scanners and brute-force robots that try to guess your Administrator login and password. Using current logins and password dictionaries, they will automatically try to login to your server hundreds to thousands times every minute. Learn more about this feature on this page.
On the Web Portal
Brute-force attacks on the Web Portal are blocked when users enter wrong credentials. After 10 attempts during a period of 10 minutes, the Web Portal will prohibit the user to logon for 20 minutes:
These are the default settings which are customizable on the BruteForce Tab of RDPlus Advanced Security.
You can check all blocked connections and logs on the IP Addresses tile of RDPlus Security Ultimate Protection:
This functionality is visible and active after the first Web Portal connection.
Two-factor authentication adds an extra layer of security and prevents access to your users’ session even if someone knows their password. A combination of two different factors is used to achieve a greater level of security:
1) something they know, a password. 2) something they have, a device – such as a smartphone – with an authentication app installed.
Each time a user sign in to its remote session it will need its password and a verification code available from its mobile phone. Once configured, the authenticator app will display a verification code to allow him or her to log in any time. It works even if its device is offline.
Two-factor authentication is available for RDPlus Web portal only. This authentication mode does not support login through Remote Desktop client. Since 2FA authentication only works with the Web portal with HTML5 and RemoteApp connections. RDP connections are denied for 2FA enabled users.
Activating the Two-factor Authentication Add-On (Activation Key)
The Two-Factor Authentication feature can be found on the Add-On tab of the AdminTool:
It is available as a 30-day trial for 10 users. To activate your license, open the license tile of the add-on, then click on Activate your License and enter your Activation Key.
Select the product you wish to activate and then you will be prompted with a pop-up confirming that your license has been activated!
Activating the Two-factor Authentication Add-On (Legacy)
The Two-Factor Authentication feature can be found on the Add-On tab of the AdminTool:
It is available as a 30-day trial for 10 users. To activate your license, copy the serial number you can find on this tile:
Then, connect to our online store and purchase a license.
You will get your license.lic file, then, click on the “Activate your license” tile:
Enable Two-factor Authentication
Perform the following steps to enable two-factor authentication for your RDPlus server or deployment. If your RDPlus deployment is configured to use multiple servers, perform this task on the RDPlus server exposed as the single point of entry for users or having the reverse proxy role.
1) Open the two-factor authentication administration application. The two-factor authentication status and the license status are displayed:
By default, 2FA is enabled for the RDPlus gateway and stand-alone application servers.
You can enable it for RDPlus application servers only, by entering the authentication server URL:
Or disable it:
Add Users and Groups
Once two-factor authentication is enabled, you can configure users for two-factor authentication.
1) From the two-factor authentication administration application, click on the Manage Users menu.
2) Then, click on Add to select users and/or groups of users. The Select Users or Groups box opens.
3) Add as many users and groups as required and then click OK. The users and groups are added to the list and enabled for two-factor authentication.
Remove Users and Groups
1) To disable two-factor authentication for a user or a group, from the two-factor authentication administration application, click on the Manage Users menu.
2) Select the user or the group and then click on Remove. A confirmation message is displayed.
3) Click Yes. The user or the group is removed from its list and won’t connect using two-factor authentication anymore.
Reset QR codes
In the event of the loss of the authenticating device for a user, or if the user needs to display the secret QR code again, you must reset the user authentication settings.
1) From the two-factor authentication administration application, click on the Reset Users menu.
2) Select one or multiple users and then click on Reset. A confirmation message is displayed.
3) Click Yes. The selected users will be presented a new QR code at the next login and will have to scan it in their device’s authentication app.
Enroll User for Two-factor Authentication
Once a user has been enabled for using two-factor authentication, an activation message will be displayed at his next successful logon from the RDPlus Web portal.
In order to complete the required steps, the user must install an authenticator app on a portable device, such as his smartphone.
Please use each app documentation for more details on how to proceed to add your RDPlus account.
Login using Two-factor Authentication
Once a user has configured his RDPlus account in his authenticator app, he or she will be able to connect using its password and the code provided by its authenticator app.
Settings
The Settings tab allows you to whitelist users, in order for them to connect using an RDP client, without the need to enter a two-authentication code.
Click on the “Add” button to add a user and remove a user by selecting it and clicking on the “Remove” button.
The Advanced tab allows you to configure Two-Factor Authentication in-depth settings.
Discrepancy
You can modify the Discrepancy value, which allows you to set the validation time of a verification code. A discrepancy of 3 means that the same verification code remains valid 90 seconds backward and forward its original 30 seconds validity period. Default is 480, which means 480 x 30 seconds= 4 hours.
Issuer
A string indicating the name of the two-factor authentication service. The issuer is displayed on the client mobile app and identifies the service associated with the generated verification code. By default, it is composed of the server’s name with RDPlus.
Validity After First Session
Period during which a user can open a session without having to revalidate a previous two-factor authentication code. This setting allows users to open applications from the Web application portal successively. Default is 480 minutes.
Validity Before First Session
Period during which a user can open a session after validating a two-factor authentication code from the Web portal, in secondes. Default is 3600 seconds.
Digits
The number of digits to display to the user. Please note that this setting may not be supported by authentication apps. This number must be greater than or equal to 4 and lower or equal to 12. Default is 6.
SMS Verification Code Message
Message sent to users requesting a verification code if they are configured to receive it via SMS. This message must contain the %CODE% placeholder which will be replaced by the actual verification code. Default is: Your %ISSUER% verification code is: %CODE%
You need Windows 7 Enterprise or Ultimate / Windows 8 Enterprise or Professional to use multi-language on one system. You can install every language on the system if you need.
You could publish a language applet for users to change their own O/S language of UI and add IME (Input Method Editor).
For Windows 7: control /name Microsoft.RegionAndLanguage
Optional : this is how to restrict the Control Panel behavior for users by GPO :
Users can change O/S language of UI after logon system. (Users have to logout and logon again to take effect after changing this setting)
The user has to select Chinese IME first to input Chinese chars.
If your browser shows red warning on start by using HTML5 client
It means that your browser does not support Websockets or your browser does not support Canvas. Such browsers that do not support these technologies are IE6, IE7, IE8, IE9 and need FLASH to emulate these features.
If your browser automatically reloads the pages to HTTPS address
It means that Websockets transport is not supported. This is the case on several Android native mobile browsers. It is due to the fact that the browser automatically switches to XHR transport.
But because this transport layers on long distances with HTTP protocol, each request creates new connection. It is very slow and unstable to create new connections (up to 20 new connections per second), therefore to avoid this instability the program is conceived so that the page reloads automatically to HTTPS address to enforce HTTPS connection.
Physically you also get mostly persistent secured connection and much more stable on long distances. So the logic of browser reuses already established SSL connection instead of creating a new connection like by the use of HTTP protocol.
This behavior can be changed by the following option on the setting.js file located in the RDPlus program folder under this path: Clients\www\software\html5\settings.js:
forcesslforxhr = false;
But it is absolutely not recommended to disable the use of SSL in XHR mode.
*If you do not have a file named “settings.js” in the “C:\Program Files (x86)\RDPlus\Clients\www\software\html5” folder, then your RDPlus version is older and this documentation does not apply. Please update your system first or contact support.
The clipboard can be found on the HTML5 Top menu, with this icon:
Most browsers except older MSIE browsers do not support the direct clipboard reading and writing due to security reasons.
To copy the text from session to clipboard use Ctrl+C and to insert the text from clipboard use Ctrl+V.
But pay attention when you copy the text with Ctrl+C, wait some time before releasing the pushed Ctrl+C buttons, because if the requested clipboard text arrives after you release this key combination, the text will not be added to your environment clipboard. This way uses a native browser clipboard copy support initiated by Ctrl+C.
Alternatively you can use the clipboard menu to copy from and to insert the text into RDP session clipboard.
There you can just insert the text into RDP session clipboard or add it to clipboard and auto-initiate Ctrl+C on RDP session side to insert text. The clipboard menu can be opened via action menu or Shift + F11.
When you copy the clipboard with mouse inside a RDP session, the text gets sent to browser and as soon as you go out of browser focus, the clipboard menu appears automatically to inform you that there was a clipboard text and that you did not add it to your clipboard environment.
To avoid this behavior set the following line on the Clients folder, by default, the path is: C:\Program Files(x86)\rdplus\Clients\www\software\html5\settings.js :
openonclipblur = false;
*If you do not have a file named “settings.js” in the “C:\Program Files (x86)\RDPlus\Clients\www\software\html5” folder, then your RDPlus version is older and this documentation does not apply. Please update your system first or contact support.
File Transfer can be done in multiple ways on RDPlus: since Version 12.50, a contextual menu is available to download files from the server to the local pc:
More information can be found on this documentation.
Using the top menu for file transfer:
Unlike real RDP session the browsers do not allow to access the hard drives directly, the file transfer is emulated.
The sub-folder of gateway gets mounted as a WebFile device into your RDP session. Inside the RDP session you can access it via Explorer by clicking on “WebFile” or call “\\rdplus\WebFile” directly:
There are three different ways to transfer a file:
From the local computer to the server:
From the server to the local computer:
The file manager which enables you to transfer files from the local computer to the server, with an history of the transferred files:
On the browser side the files are showed inside the browser’s list menu. It can be opened via action menu or with Shift + F12.
When you copy files with Explorer into the WebFile folder, this triggers automatically the event about the creation of a new file in the WebFile folder and the browser menu opens/refreshes automatically to show the new file.
When using a custom folder, make sure this folder exists on client and server sides. You can set the upload/download destination folder on the Web Portal preferences tile on the web tab of the Admin Tool:
If you want to avoid this behavior, set the following line on the setting.js file which path is by default: C:\Program Files (x86)\rdplus\Clients\www\software\html5\settings.js :
dropboxonnewfile = 0;
Additionally you can set:
sharedfolder = "yes";
to show shared folder and share your files with other users (disabled by default).
If you do not have a file named “settings.js” in the “C:\Program Files (x86)\RDPlus\Clients\www\software\html5” folder, then your RDPlus version is older and this documentation does not apply. Please update your system first or contact support.
By default, explorer is used to transfer files. You can also directly download your files from server to client by checking the “use RDPlus GUI”, and copy any files into the webfile folder:
Using screen area:
Easy touch on screen = mouse move to touched position and left mouse click
Fast double tap on screen = mouse move to touched position and left mouse double click
Touch and hold for one second on screen = mouse move to touched position and right mouse click
Touch and move outside of cursor area = scrolling the visible session frame (this is native browsers behavior for scrolling especially after pinch-zoom)
Touch in cursor area and move = mouse cursor moving only
Double tap inside cursor area and move = left mouse down and mouse moving Useful for moving window, moving elements, resizing.
Double tap on screen(outside of cursor area) and move finger down/up = middle mouse scrolling Useful for scrolling pages or view pdf’s.
Pinch zoom with two fingers = zoom the RDP session frame (this is native browsers behavior)
Using mouse pad area – additional functions in the middle point of mouse pad:
Easy touch in the middle = left mouse click
Double tap in the middle = left mouse double click
Touch and move in the middle = mouse move and mouse pad moving
Touch and hold for one second = right mouse click
Keyboard mode on:
Easy touch on screen = focus lose, keyboard disabled (this is native browsers behavior) but this will fire mouse move and left mouse click.
Fast double tap = mouse move and left mouse click (without keyboard disabling) Useful to reposition the cursor, set focus on different character and stay at the same time in keyboard mode.
+Functions of mouse pad described above
By default the HTML5 client tries to recognize browsers default language and then use it inside RDP session. This behavior is controlled by tag “asbrowser” However you may find the full list of available language tags in http://***yourserver***/software/language.html under “Locale”
You have the choice to set fixed language either A: per client directly from HTML5 top menu.
B: or from portal by setting it in AdminTool GUI which will be effective for everyone.
You should restart session if setting another language as main.
Remember: when using HTML5 client in mulitple language scenario go sure that language used inside Web-HTML5-RDP session is synchronized with the language actually set on your PC/Laptop/Mac etc. Else some chars that are represented and crossing in every language map may produce wrong char by sending scan code actual for another language. Also that means, if you changed the language from English to German inside web-session then change it to German on PC/Laptop/Mac too.
RDPlus HTML5 Server runs on JAVA. Understanding how JAVA handles memory help to understand RDPlus HTML5 Server memory usage.
Assigned memory
When Java runs, it tries to allocate 25% of the computer physical memory. This memory is “assigned” but not directly used – it is not the real memory usage that one can see in Windows Task Manager.
JAVA platform: 32-bit vs 64-bit
There is one big difference between these two platforms:
JAVA 32-bit cannot handle more than 4GB of RAM by definition. Since it will allocate 25% of all available memory, it will allocate at most 1GB, assuming there is 4GB physical memory. If there is only 2GB physical memory, it will only allocate 500MB, etc.
JAVA 64-bit can handle a lot more than 4GB (theoretically up to 16 exabytes), so the allocated memory will only depend on physical memory.
JAVA memory management
JAVA is a “virtual machine”. It means that JAVA handles memory management on its own. Once JAVA allocates some memory, even when it does not need it anymore, it will not automatically give it back to the system. This is for performance reasons, as memory allocating and de-allocating are CPU intensive tasks.
JAVA will usually wait until it has a big chunk of unused memory before giving it back to the system. The size of this big chunk directly depends on the size of the computer physical memory. The more physical memory on a computer, the more memory is allocated by JAVA.
RDPlus HTML5 Server Memory Usage
All these technical details are the reason why one can open Windows Task Manager and think that RDPlus HTML5 Server uses a lot of memory, or that JAVA 32 bit uses less memory than JAVA 64 bit.
Actually, the memory really used by RDPlus HTML5 Server is directly related to the number of opened HTML5 sessions. The more available memory on the computer, the more HTML5 sessions you can open.
HTML5 Session Memory Usage
The memory used by an HTML5 session depend on the user activities (applications and programs used, Word/Excel versus drawing-intensive programs) and the connectivity method established between the RDPlus HTML5 Server and the client computer.
In the general use case, an HTML5 session will use 30 MB of memory (standard use, binary websockets connectivity). In the worst case, a session will use up to 100 MB of memory (intensive use, “XHR” fallback connectivity for older browsers).
Since the new 8.40 version of RDPlus, there is no need anymore for a Java plugin to be installed on the client browser. You can now access the Windows RemoteApp client by downloading and installing a small Windows plugin. This operation is fast and needed only once per client.
When using firefox, this message will be displayed on your first connection. If you choose the ‘’remember my choices’’ option, the notification will be disabled upon future connections
Note: Since RDPlus 12.40, RemoteApp client setup and the The Client Setup Program have been merged and can be deployed with one single setup – so if you download the RemoteApp Client Setup, there will be no need to download the Connection Client one.
You can connect to your RDPlus server on any browser from any mobile device supporting the HTML5 technology, such as:
an iPhone
an iPad
an Android smartphone
an Android tablet
Edit the preferences for Mobile devices
Since the 11.20 release, the RDPlus HTML5 client has been greatly enhanced to offer the best possible user experience even from Smartphones or tablets. The keyboard has been redesigned to automatically pop-up when the focus is over an entry field. The mouse pointer has been redesigned to facilitate the selection of buttons and fields even if located on the left or the bottom borders of a Smartphone.
You can set up various different HTML5 settings for mobile devices or computers on the HTML5 client tile of the Web Tab:
Display the menu bar for all devices and computers or for mobile devices only.
Enable or Disable File Transfer.
Allow the Ctrl + Alt + Del shortcut on a specific type of device.
Choose your favorite Top Menu display between transparency and solid.
The number of graphical color bits.
The Connection Timeout.
Show or Hide Warning Messages.
Enable or disable sounds.
Choose your favorite background color.
Add a logo to the background.
Change the logon screen message and animated gif, as well as its display time in milliseconds.
Smartphone and tablets Preferences:
If the administrator uses the software keyboard, when it is hiding an entry field, the application is moved up and the user is still able to see what he is typing.
The administrator can select a small, a medium or a large size for the mouse pointer or no mouse pointer at all. It makes intuitive for the user to navigate inside his application.
He can also select the level of transparency for mouse and keyboard.
Edit the HTML5 Top Menu
On the HTML5 Top Menu tab, you can add applications that will be displayed on the first or second level of the Top Menu in HTML5:
On this example, Foxit and Excel are published on level 2:
And can be found under the integrated features on the top menu into the HTML5 session:
Furthermore, the top-right icon allows you to switch your session to fullscreen.
RDPlus built-in HTML5 client provides the user a completely new menu on tablets and mobile devices. With this new menu the user gets an easy access to mobile keyboard and right click, but also to file sharing and to our unique Universal Printing feature!
Please refer to this documentation for how to use the mini mouse and keyboard.
Language selection
You can now change the language with the language button at the right of the top menu:
You can choose the language for the specific country you wish to on this menu:
RDPlus Gateway has a lot of benefits. It allows you to assign servers to users or groups. Doing so, your users will be able to access their assigned servers. This feature is useful if you plan on having a large number of users and load-balancing is required in any case.
Overview
A server can be set as the Gateway of your farm of servers.
You can Add/Edit/Remove servers from your farm.
You can assign one or several servers to a user / a local group / an Active Directory group.
Note: Assigning servers only works on the web, not with connection clients.
According to his credential, the user will be able to choose which server he wants to access in the list of servers assigned to him.
If the farm is within a Domain, the Gateway will use his AD credentials and the user will connect with Single Sign-On (SSO). Otherwise, he must have the same local credentials on each server.
Managing the Servers of the Gateway
Open the Admin Tool and click on the Farm tab, then on Assigned Servers.
Click on the “Manage Servers” button to open the Gateway Portal Servers Management tool:
When you click on the “Add a new Server” button you can then add a RDPlus Server by Display name and IP address (you can type an IP or a domain name, without a port number):
When you are done, please click the “Save” button to add the server to the Servers list.
To remove a server from the Servers list, click on the server you want to remove and then click on the “Remove Server” button. After a confirmation message, the server will then be removed from the list.
You can also edit a server by selecting it on the list and clicking on the “Edit Server” button.
Managing Gateway Users
Warning: Don’t add users or groups here if you aim to use load-balancing. To manage the users please click on the “Assign Servers to Users” button. The window “Assign Servers per User or per Groups” will open:
To assign a server to a user, simply click on the user in the “Users and Groups” list and then check the server’s checkbox in the “Servers” list. To remove a server from a user, simply click on the user in the “Users and Groups” list and then uncheck the server’s checkbox in the “Servers” list.
Notes
The server must be added first to assign it to a user.
The example above is for a Domain or a Workgroup.
If you use a workgroup the users logins must be the same on each RDPlus server that you assign.
Example of what you will get when users connect to the Gateway
John can select the server. He wants and he will get an auto-logon to this server:
If he types a wrong password, John will have to retype his password:
Julia has a different list of possible servers:
Someone tries to hack the Gateway. He does not see any server and the Gateway blocks his web access.
* * *
RDPlus Farm of Servers Architecture
There are 2 options to deploy a RDPlus farms of servers:
Option 1: All your servers have public IP addresses and can be reached from the Internet. OR Option 2: Only the Gateway Portal can be reached from the Internet. The Gateway is providing a “Reverse Proxy Role”.
In both options:
Every server has the same RDPlus configuration.
Every server has the same HTTP/HTTPS ports.
To publish a new Application just add it to your users/groups of users on the AdminTool.
Of course, make sure that this application is installed on the targeted Application Servers. All Web Access types are available without any specific configuration: RemoteApp and HTML5 clients.
In the Admin Tool, click on the Web tile, then click on the Web Portal Preferences tile.
Check the “Generate a Gateway Portal enabled Web Page” box, then click on “Save”.
On the Web Access page, your users will be able to choose between the servers that were assigned to them:
Option 1 – All Servers have their own Public IP Address and can be reached from the Internet.
This is the recommended architecture to use RDPlus Gateway.
This architecture follows best practices and allows the IT Administrator to industrialize its environment:
Every server has the same RDPlus configuration
Every server has the same HTTP/HTTPS ports
Deploying a new Application server is only a matter of minutes (just add the server to the farm in the AdminTool on the Gateway server)
With this architecture, all access types are available without any specific configuration: Remoteapp and HTML5 clients.
This architecture is described in the diagram below:
* * *
Option 2: Only the Gateway Portal can be reached from the Internet and includes a “Reverse Proxy Role”.
RDPlus Gateway can also be set up with only 1 Public IP Address.
The Gateway redirects any external connection request to any available server. If you do not use the load balancing feature, users will connect to their assigned server(s).
This architecture is described in the diagram below:
For more information about the Reverse Proxy Role, see the Reverse Proxy Feature documentation.
RDPlus farm of Servers without Load Balancing
You can set a range of Application Servers. Each of them with different types of applications (Accountancy Server, Payroll Server, Office Automation Servers…). In such deployment, the Administrator will enter a list of servers and will assign servers to users. For example, the user John will be allowed to access to the 3 servers, but the user Paul will have access only to the Payroll Server.
The Gateway Feature is not compatible with Load-Balancing. When load balancing is activated, the user will not be able to choose the server on which he wants to open a session. It is the RDPlus load balancer which checks which server is less loaded and will assign it to the incoming user request. To setup a load balanced Farm of Servers, please read this page.
There are 2 ways to access the Gateway Server:
HTML5 / HTML
RDP Session (via the Gateway IP/DNS – Port number)
How to LOCK DOWN HTML/HTML5
We can use mstsc with a PORT number and RDP into a RDPlus Application / Gateway Server.
However, if we use these advanced Security tools located the RDPlus Admin Console on the Gateway Server, by going on the Security tile/tab, then clicking on the Advanced Security options tile…:
…the access is denied when trying to connect with RDP. To avoid this behavior, on the Gateway Server, you will have to do the following:
Go to Gpedit.msc, then under Computer Configuration, click on the Administrative Templates folder, on the Windows Components folder and on Remote Desktop Services:
Then, click on the Remote Desktop Connection Client folder, double-click on the “Allow .rdp files from unknown publishers” setting and enable it, as well as the “Configure server authentication for client”:
Under the Remote Desktop Client menu, click on the Remote Desktop Session Host folder, then on the Security folder. Enable the “Require user authentication for remote connections by using Network Level Authentication” setting.
Pre-requisites
Using this feature, you will be able to manage a load balanced environment.
It means that the load of all your users will be distributed between your servers. The workload will be shared between all the servers of your farm.
Load Balancing enables to use an unlimited number of servers with load balancing, and is available with the Enterprise edition (one valid license per server). This very powerful and advanced capability is to be used when a large number of users/servers has to be deployed.
Warning : Load Balancing is not compatible with the Gateway Feature (allowing you to assign servers to users/groups, see this documentation for more information.)
Usually we recommend using one server for 50 concurrent users. For standard commercial application written in VB, C, C++, Delphi or Uniface you can go up to 100 concurrent users especially if you decide to use XP 64-bit which, according to our experience, tops most operating systems delivered by Microsoft. XP or Windows 7 are much more stable operating systems. For W7, we recommend to use the 64-bit version.
Generated Clients and Web Access
There are three ways to connect to a Load Balanced cluster:
Using a Web Portal Access by activating it on the Web Portal Preferences window.
Load Balancing Main Window
The Load Balancing Manager can be found under the Farm Tab of the AdminTool:
The main window allows you to configure Load Balancing. It lists all the servers in your Load Balanced server farm, and allows you to add a new server (by clicking on the “Add a new Server” button) or displays an existing server (by clicking on it). It also allows you to enable, disable and configure the Load Balancing (more on this below).
Enabling/Disabling Load Balancing
On top of the Load Balancing window, you will see a big button:
This button displays the current state of the Load Balancing.
If you click on it, it will enable or disable the Load Balancing depending on its current state.
Here is the button when the Load Balancing is Disabled. A click on it will activate it and disable the Users/Servers Assignment.
Here is the button when the Load Balancing is Enabled. A click on it will deactivate it and enable the Users/Servers Assignment.
How does Load Balancing choose a server?
When Load Balancing is enabled, the user will be sent to the less loaded server at the time of his connection.
Configuring the Computation of Servers’ Loads
To determinate which is the less loaded server, the load of every server is computed using a weighted average between several performance indicators:
number of connected users
processor usage
memory usage
disk usage
You can modify the weight (importance) of these indicators by using the following sliders:
Using these sliders, you will be able to fine-tune the Load Balancing, and to optimize it to your own needs. For instance if your users launch a business application with big memory requirements, it might be a good idea to increase the impact of the RAM in the load computation using the “Memory” slider.
You can also reset these values by clicking on the “Back to Default Settings” button.
How is Server’s Load computed?
The load of each server is computed when needed in order to decide on which server the user must be sent.
For this computation, we use a weighted average between 4 hardware metrics.
The 4 sliders allow you to give more (or less) weight on each of these metrics, which are:
Users : number of connected users
CPU : percentage of non-idle processor time
Memory : percentage of used memory
I/O : percentage of non-idle disk time
For example, if you put the “Memory” slider on its right side and all the other sliders on their left side, the load of each servers will be computed using almost only the percentage of used memory – and your users will be sent to the server having the most available memory.
When a slider is completely on the left, the weight used in load computation will be 1.
When a slider is completely on the left, the weight used in load computation will be 100.
Moreover, the load of a given server depends on the ratio [ used resources / total resources ] ; so if a server A is twice as powerful as a server B, twice more users should be sent to server A than to server B (all other things being equals).
Adding a new Server
To add a new server, simply click on the “Add a new Server” button. The following window will be displayed:
The “Display Name” is the title that will be shown to your users on the Web Access HTML page. It is supposed to be more user-friendly than a technical value (such as an IP), for instance “US Server” or “Blue Zone”.
The server address is reachable with http or https ports.
When using Load Balancing, the “RDP Port” will not be used. It is only used when connecting using a Generated Client. We advise you to keep the default setting (“Same as web”).
You also have the possibility to enable or disable the server.
Editing an existing Server
To modify an existing server, simply click on the “Edit” button of the server you want to update. The following window will be displayed:
The progress bar shows the current load of the server. It also confirms you that the server is well configured and can be contacted by the Gateway.
Load Balancing using a Connection Client
You are not using the Reverse Proxy role of the Gateway (default case)
This is the default case if you just installed RDPlus. In this case, if you want to generate a Connection Client to connect to a given Application server, then:
Do not check the “Use Load-Balancing” checkbox on the on the Gateway Portal tab of the Connection Client Generator,
Use the public IP address or hostname of your Application Server directly in the “Server” field.
However, if you want to generate a Connection Client to connect to the less loaded server and use Load Balancing, then:
Check the “Use Load-Balancing” checkbox on the Connection Client Generator,
Use the public IP address or hostname of your Gateway Server directly in the “Server” field.
You are using the Reverse Proxy role of the Gateway (“/~~” in URL)
Activating the Load Balancing for a Gateway Portal access
Activating Load Balancing is really easy. It only takes three steps:
1) Generate a Web Access page with the option “Generate a Gateway Portal enabled Web Page” checked, by clicking on the Web Portal Preferences tile of the Web tab:
2) Enable Load Balancing by clicking on the “Enable/Disable Load Balancing” button (on the Load Balancing Manager, located on the Farm tab of the AdminTool):
3) Open a browser and navigate to the Web Access page you generated in step 1 (by default: http://localhost/index.html). After typing a login, you will see that the Web Access page choose the less loaded server of your farm:
Activating the sticky session feature
Regardless of your connection method, you will always be able to activate the sticky session feature by clicking on the right button of the Load balancing window:
It will allow you to reconnect to a disconnected session instead of opening a new session on a different server.
It is possible to use servers behind reverse proxies via xhr-polling, with some limitations.
As described, Websockets are not part of HTTP protocol, even if first http request looks like http request, actually, it isn’t, therefore most known reverse proxies do not support Websockets and drop many important areas of first Websocket request.
If you know that the server is behind reverse proxy, disable Websockets by setting this option in Clients\www\software\html5\settings.js :
disablewebsocket = true;
That will enforce the usage of XHR-polling and avoid time delay when connecting.
If you do not have a file named “settings.js” in the “C:\Program Files (x86)\RDPlus\Clients\www\software\html5” folder, then your RDPlus version is older and this documentation does not apply. Please update your system first or contact support.
Please note that the usage of XHR-polling is not as stable as Websockets due its connection nature.
The other limitation using Xhr polling via reverse proxy is the poor support on files upload. While working with XHR in direct connection, done for example via Apache reverse proxy, Apache can accidentally interrupt the file’s upload.
This feature is available in the RDPlus Enterprise Edition.
The Reverse Proxy system acts as an intermediary for its associated servers to be contacted by any client. The advantage of using a reverse-proxy is simple: you will no longer need to create as many port redirection rules as your number of RDPlus servers. Whether or not you are using the load balancing feature, you need to activate it in order to connect using the reverse proxy. In RDPlus, it provides a unique access point to a farm of load-balanced RDPlus servers:
This unique access point will be your Gateway Portal Server. Since this server is going to be accessed remotely, you will need to set up one port redirection rule on your router, including the http or https ports depending on your preference (80 being the default port for http and 443 for https).
Click on the Farm Tab, then click on the Reverse-Proxy tab:
The Gateway Public IP must be set with a fixed valid IP address.
Select Http or Https for your preferred connection method, the servers of your farm must be able to communicate with eachother on either port 80 or 443, depending on which connection method you use. It is also important that your windows firewall don’t block these ports.
Enable the load-balancing feature if you wish to load-balance your farm. If you do not activate this feature, you will need to assign the servers of your farm to the Users or Groups. More information on this subject can be found here.
Click on “Add an Application server” and fill in the Display Name for your server, its hostname in the Internal Name field and its Private (LAN) IP address, then click on “Save”.
Once you completed your list of servers, click on “Save Gateway Reverse-Proxy settings” and restart the Web services located in the Admin Tool’s Web tile.
Reverse-Proxy and Generated Connection Clients
You can generate a Connection Client which will connect to an Application Server through the Reverse-Proxy Server.
To do so, assuming that your gateway has public IP 1.1.1.1 and your backend server has internal name “srv2”, then use the special URL 1.1.1.1:443/~~srv2 in the server address field of the Connection Client Generator.
For example:
Don’t forget to also check this box:
Unless you want to connect to a given Application server.
Overview
The Farm Manager is RDPlus centralized farm administration user interface.
The Farm Manager goal is that the Administrator will be able to administer all his RDPlus servers from a centralized location, namely the Farm Manager application running on the Farm Controller server.
To run the Farm Manager application, open an Administrator session on the server which will become the Farm Controller, then Open RDPlus AdminTool, click on the “Farm” tab, then on “Farm Manager” as shown below:
Servers
The “Servers” tab is displayed by default when launching the Farm Manager:
In this tab, you can see the list of Application Servers in the Farm, add a new Application Server to the Farm and perform several actions on an Application Server by selecting it and clicking on one of the following buttons:
“Connect to Server“: open the default RDP client and connect automatically to the selected server. If your credentials are saved in MSTSC they will be used, otherwise you will have to enter your credentials.
“Details“: show a window with the selected server details: name, hostname, ports, versions.
“Remove“: permanently remove the selected server from the farm (you can still add it again later with the “Add” button).
“Enable“: set the state of the selected server to “Active” (this is the default state).
“Disable“: set the state of the selected server to “Disable” (this state will be used later for Load-Balancing feature and users-draining use cases).
“Refresh“: perform a full refresh of the list of Application Servers.
Sessions
Click on the “Sessions” menu to display the following tab:
In this tab, you can see the list of User Sessions on any Application Server of the Farm, connect to the selected Application Server and perform several actions on one or several User Session(s) by selecting it/them and clicking on one of the following buttons:
“Disconnect”: disconnect the selected user session(s) (the user will still be able to connect back to his session).
“Logoff”: log off the selected user session(s) (every unsaved modification will be lost, applications will be shut down abruptly).
“Send Message”: display a window to enter a title and a text, then send this message to the selected user session(s).
“Refresh”: perform a full refresh of the list of user sessions for the selected server.
The list of User Sessions is automatically refreshed every 5 seconds. This automatic refresh stops if the selected server becomes unavailable. A click on the “Refresh” button will resume the automatic refresh.
Settings
Click on the “Settings” menu to display the following tab:
Using this Farm Manager feature, you can configure all the Application Servers in your Farm from a centralized location.
In this tab, you can see the list of all the settings which can be managed at the Farm level.
To edit a setting, either click on it in the settings list and click on the “Edit…” button or just double-click on the setting. The following window will be displayed:
If you want to apply this setting to all the Application Servers in your Farm, click on “Configured” and choose a value.
If you do not want to set this setting at the Farm level, click on “Not Configured”. In this case, the existing values will not be changed on the Application Servers.
Once you have set all the settings you wanted to change, click on “Apply all…” to apply all your configured settings on your Farm’s servers. The following window will be displayed:
Check all the servers on which you want to apply your configured settings, then click on “OK”. The following window will be displayed, allowing you to monitor the task progress:
All the settings marked as “Configured” have now been updated on all the selected Servers.
Load-Balancing
Click on the “Load-Balancing” menu to display the following tab:
In this tab, you can see the list of Load-Balanced Servers Status and perform several actions on an Application Server by selecting it and clicking on one of the following buttons:
“Connect to Server”: open the default RDP client and connect automatically to the selected server. If your credentials are saved in MSTSC they will be used, otherwise you will have to enter your credentials.
“Refresh”: perform a full refresh of the list of load-balanced servers status.
The list of Load-Balanced Servers Status is automatically refreshed every 5 seconds. This automatic refresh stops if the connection becomes unavailable. A click on the “Refresh” button will resume the automatic refresh.
Naming
The goal of RDPlus Farm features is to allow the Administrator to manage all his RDPlus servers from a single server. This server is named the Farm Controller.
The RDPlus servers in the Farm are named the Application Servers, or just Servers.
Finally, the application which allows the Administrator to manage and monitor his Farm is named the Farm Manager.
Releases History
API 1.4 (released with RDPlus 10.10)
Load-Balancing centralized monitoring
Enable/Disable a Server in RDPlus Load-Balancing Manager
Translations in multiple languages (RDPlus language will be used)
Sessions centralized monitoring and management (messages/disconnect/logoff)
API 1.1 (released with RDPlus 9.30)
Load-Balancing internals
Load-Balancing Sticky-Sessions
Hardware Requirements
Farm Controller and Application Servers have the standard RDPlus requirements for hardware.
Operating System Requirements
Farm Controller and Application Servers must use one of the following Operating System:
Windows 7
Windows Server 2008 R2
Windows 8
Windows Server 2012
Windows 8.1
Windows Server 2012 R2
Windows 10 Pro
Windows Server 2016
Windows Server 2019
32 and 64-bit platforms are supported.
Network Requirements
Every Application Server must be accessible from the Farm Controller.
More specifically, the Farm Controller will issue requests to every Application Server on its API port (19955 by default) and this port must be opened on any firewall standing between the Farm Controller and Application Servers.
The network latency must be low between the Farm Controller and Application Servers. A latency under 200 ms is recommended, a latency under 2 000 ms is required.
Software Requirements
.NET 2.0 or higher is required – this should not be a problem as a compatible .NET version is enabled by default on every Operating System supported for RDPlus Farm.
RDPlus License and Version Requirements
RDPlus must be in “Enterprise” edition on the Farm Controller and on all the Application Servers.
All the servers must also run the same version of RDPlus.
Configuration Requirements
Farm Controller and Application Servers must have the same date/time configured. It is highly recommended to synchronize the Windows clock of all servers with an Internet Time Server if not already done.
Users Requirements
An Active Directory is not required, however if you do have an Active Directory, then your Domain Administrators must also be Local Administrators of the Farm Controller to be able to use RDPlus Farm
Promoting a Server to Farm Controller role
Open an Administrator session on the server which will become the Farm Controller (usually this is the “Gateway” server).
Open RDPlus AdminTool, click on the “Gateway” tab, then on “Farm Manager” as shown below:
The following dialog box will be displayed:
Click on “Yes” to promote the current Server: it will become the Controller of your Farm.
Next, the Farm Manager main window will be displayed: this is the Farm Manager, the centralized farm administration user interface.
Adding an Application Server to the Farm
Once there is a Farm Controller, you can add Application Servers to the Farm.
To do so, open an Administrator session on the Application Server you want to add to the Farm.
This is the server’s “Key”. This Key is the “password” of your server for every RDPlus farm related features. Treat this Key as a password: do not communicate it to anyone, do not display it publicly.
Now open an Administrator session on the Farm Controller and open the Farm Manager on it:
On the default “Servers” tab, click on the “Add” button. The following window will be displayed:
Enter the Application Server details, as well as the Key you retrieved just before, then click on the “Save” button to add the Application Server to the Farm.
Overview
On this tab, you can modify RDPlus settings by adding an AdminTool Pincode, use the Windows RDS role and customize the background color and language of the AdminTool.
Administrator Pin Code
The Administrator can secure the Administrator Tool access by setting a pin code which will be asked at every start, on the Advanced tab of the AdminTool, under the Product Settings:
Use RDS role
Multi-session role and Windows RDS role are not compatible. You can either select the Windows RDS role, or RDPlus Multi-session role.
When using Multi-session role, the Windows RDS role must be uninstalled.
When using the Windows RDS role, this Windows role must be installed.
WARNING: changing role requires to reboot the system. When selecting the Windows Remote Desktop, only one user at a time will be allowed on a workstation system.
To use the Windows RDS role, select the “Yes” value and Save.
Modify the AdminTool Background color
Customize AdminTool’s background color using an hexadecimal code (for example: 0xFFFFFF).
Modify the AdminTool Language
Select your preferred language for the AdminTool among the 21 available.
Overview
On the Security section of the Advanced features, you can block, disable or customize connection types for users.
Block Standard RDP Clients
Select the “Yes” value if you wish to deny access to standard RDP clients such as mstsc to your users.
Disable existing sessions web listing
This listing is required for Load-Balancing Sticky Sessions feature and is enabled by default. If you wish to disable it, select the “No” value on this window, then click on save:
No Web for Admins
Disable the Web Portal for Administrators by selecting the “Yes” value:
Block WAN RDP clients
Deny access from standard RDP clients connected from outside the LAN by selecting the “Yes” value.
Only Web Portal
Make Web Portal access mandatory for every user by selecting the “yes” value.
Only Web Portal for Users
Make Web Portal access mandatory for every user, except the Admins by selecting the “yes” value.
Only Users with Applications
Allow access only for users with, at least, one assigned application by selecting the “yes” value.
Whitelist Admins without Applications
Allow access for admins even if they do not have any assigned application and “Only Users with Applications” is enabled. This feature is enabled by default. If you wish to disable it, select the “No” value on this window, then click on save:
Overview
This section of the Advanced tab allows you to configure user rights and aspects on their sessions.
Desktop for all users
Enable a full Desktop for all users by selecting the “Yes” value on this window, then click on save:
Application Command Line
Application Command Line can be specified on client side. This feature is enabled by default. If you wish to disable it, select the “No” value on this window, then click on save:
Remote Application Menu
Remote Application Menu will be added on user’s PC. This feature is enabled by default. If you wish to disable it, select the “No” value on this window, then click on save:
Remote Application Menu Title
You can modify the title of the Remote Application Menu. The default one is “My Remote Applications”. If you wish to modify it, enter the desired title, then click on save:
Background color
Customize the user sessions background color using a COLORREF code (for example, the default one is: 10841658).
Use “All Users” desktop shortcuts
Copy the shortcuts existing in Windows shared desktop in the Taskbar and Floating Panel. Enable this feature by selecting the “Yes” value on this window, then click on save:
Fallback application path if no assigned application
Run this application if no application is assigned to the user when he logs in. There is no value by default. Enable this feature by entering a “Yes” value on this window, then click on save:
Disable the daughter process handler
Skip daughter process search when launching applications. It will cause premature logoff if a published application uses daughter process. This feature is disabled by default. Enable this feature by selecting the “Yes” value on this window, then click on save:
Force logoff if no assigned application
The user will be automatically logoff if he has no application assigned to him. This feature is disabled by default. Enable this feature by selecting the “Yes” value on this window, then click on save:
Allow screen saver
This feature is disabled by default. Enable Windows screensaver by selecting the “Yes” value on this window, then click on save:
Download target folder
Downloaded files will be put on the Desktop by default. If you wish to modify it, enter the desired download folder’s path, then click on save:
Upload target folder
Uploaded files will be put in this folder. If you wish to modify it, enter the desired upload folder’s path, then click on save:
Use Windows Shell
Define Windows Shell as default shell. This feature is enabled by default. If you wish to disable it, select the “No” value on this window, then click on save:
Force WinXshell
This feature is disabled by default. Force WinXshell alternate shell instead of the default shell by selecting the “Yes” value on this window, then click on save:
Add a delay when the session is opening
Add additional waiting time at user session logon to get everything initialized. Default value is 0. If you wish to modify it, enter the desired value (in seconds), then click on save:
Daughter process wait duration
Time to wait (in milliseconds) before searching for a daughter process when lauching applications.
File browser
The selected application will be displayed to the user for file selection. Default browser is Windows Explorer. You can use the RDPlus file browser by selecting it, then click on save:
Use WinXshell when required
Authorize system to use WinXshell alternate shell instead of the default shell when recommended. This feature is enabled by default. If you wish to disable it, select the “No” value on this window, then click on save:
Many people are expecting extra security and Mutual authentication is already supported in RDPlus. It is usually implemented by banks or government bodies. To understand what that is, we can compare it to a standard SSL process where you will add extra check to verify if the user web browser is allowing SSL connection. You know what your server-side SSL certificate is. Imagine that the certificate is imported into the web browser to ensure that this specific web browser is trusted to create a connection. In the first step of communication, the web browser is acting as a client and in the second step, it is the reverse. At the end both side, client web browser and web server, have accepted the authority and the connection can start.
A more complete definition: Mutual SSL authentication or certificate-based mutual authentication refers to two parties authenticating each other through verifying the provided digital certificate so that both parties are assured of the others’ identity. In technology terms, it refers to a client (web browser or client application) authenticating themselves to a server (website or server application) and that server also authenticating itself to the client through verifying the public key certificate/digital certificate issued by the trusted Certificate Authorities (CAs). Because authentication relies on digital certificates, certification authorities such as Verisign or Microsoft Certificate Server are an important part of the mutual authentication process.
Activating it on RDPlus
RDPlus built-in web server enables to setup mutual authentication.
To enable the mutual authentication follow this process:
You will have to install the latest Java Development Kit (JDK), available from http://java.com > Downloads > JDK.

1. Create and edit with Notepad the following file:
C:\Program Files (x86)\RDPlus\Clients\webserver\settings.bin

Add these 3 lines:

disable_http_only=true
disable_print_polling=true
force_mutual_auth_on_https=true

2. Remove cert.jks

In "C:\Program Files (x86)\RDPlus\Clients\webserver" you will see the file cert.jks
Copy it in "C:\Program Files (x86)\RDPlus\Clients\"
Remove "C:\Program Files (x86)\RDPlus\Clients\webserver\cert.jks"

3. Create the batch file

In 'C:\Program Files (x86)\RDPlus\Clients' create a batch file, for example "createcertuser.bat" with these settings:

@rem uncomment next line, if you want to generate new self signed cert.jks
@rem keytool -genkey -v -alias jwts -keyalg RSA -validity 3650 -keystore cert.jks -storepass secret -keypass secret -dname "CN=localhost, OU=my_ou, O=my_org, L=my_city, ST=my_state, C=MY"
@keytool -genkey -v -alias AliasUser1 -keyalg RSA -storetype PKCS12 -keystore forBrowserUser1.p12 -dname "CN=some_name, OU=some_ou, O=some_org, L=Paris,
ST=FR, C=FR" -storepass mypassword -keypass mypassword
@keytool -export -alias AliasUser1 -keystore forBrowserUser1.p12 -storetype PKCS12 -storepass mypassword -rfc -file forCertUser1.cer
@keytool -alias AliasCertUser2 -import -v -file forCertUser1.cer -keystore cert.jks -storepass secret
@del forCertUser1.cer

This will automatically import the cert key pair from the web browser into "cert.jks" after creating its browsers key pair.

4. Restore the new created the modified "cert.jks"

Copy "C:\Program Files (x86)\RDPlus\Clients\cert.jks" into
"C:\Program Files (x86)\RDPlus\Clients\webserver" and restart the Web Servers.

5. Certificate import and Testing

The provided batch example should have generated a test file "BrowserUser1.p12".
When you will open the HTTPS address, you will get a security message and you will be unable to access Web Server pages.
With Chrome or IE, you can click on this 'BrowserUser1.p12' file to import the certificate into Windows default key store.
With FireFox, you have to go to Settings and to import this "BrowserUser1.p12" file under your certificate folder.

As soon as you have properly imported it, you will be able to access the HTTPS address.

The administrator can create a separate key pair file for each user.

For example:

forBrowserUser1.p12
forBrowserUser2.p12
forBrowserUser3.p12

And he can export theses certificates into cert.jks.
If he wants to disable the access to one user he will just have to delete this user from "cert.jks".
Doing so, the user will lose his authorization and will not be able to access the web server anymore.

This mutual authentication only affects the HTTPS connections and HTTP connection will be prohibited with the command line:
settings.bin>disable_http_only=true
Standard Case
Starting from RDPlus version 9.20, you can redirect every web request which uses HTTP to the HTTPS secure protocol.
To activate this feature on a server, edit (or create) the file “C:\Program Files (x86)\RDPlus\Clients\webserver\settings.bin” and add the following line:
disable_http_only=true
Save the file and restart RDPlus web servers (AdminTool > Web > Restart Web Servers or reread configuration by accessing http://127.0.0.1/w0j3?settings.bin).
Once this feature is enabled, you can try to browse to the insecure web page at:
http://your-server
and it will automatically redirect your request to the secure Web Portal page at:
https://your-server
Special case: Custom Web Ports
If you are using a specific port to serve HTTPS, then edit the file “C:\Program Files (x86)\RDPlus\Clients\webserver\settings.bin” and use the following line instead of the line described above:
disable_http_only="domain.com:4431"
where domain.com is your own server host name and 4431 is your HTTPS custom port.
Save the file and restart RDPlus web servers (AdminTool > Web > Restart Web Servers).
Once this feature is enabled, you can try to browse to the insecure web page at:
http://domain.com
and it will automatically redirect your request to the secure Web Portal page at:
https://domain.com:4431
Comment: Even if this is not secure but you wish to disable ssl/https on http port then edit the settings.bin file and add: disable_ssl_on_http=true, save and restart the servers.
Disable http on https
By default it is allowed to access https://my-domain.com, https://my-domain.com:80, http://my-domain.com:443 So it allows http on port 443 or allow https on port 80, it does not have impact on security and makes it easy to fallback to degraded xhr-connection when no websockets support is possible But if wished to disable it, edit the settings.bin file and add the following line:
disable_http_on_https=true
Then restart RDPlus web servers (AdminTool > Web > Restart Web Servers or reread configuration http://127.0.0.1/w0j3?settings.bin)
HTTPS Enforcement and Free SSL Certificate Validation
Please note that this HTTPS Enforcement feature is fully compatible with our Free SSL Certificate feature.
Starting from RDPlus version 6.60, you can block/disable any attempt to connect using mstsc.exe (or any RDP clients) over the open/redirected port (80 or 443).
This feature only allows accesses from the RDPlus Web Portal and disables any other RDP connection on port 80/443.
To activate this feature on a server, edit the file C:\Program Files (x86)\RDPlus\UserDesktop\files\AppControl.ini and add/modify the following variable:
[Security]
Block_rdp_splitter=yes
Overview
By using the Web Portal you can customize RDPlus Web Access Pages in an extensive way.
However, in some cases, this is not enough. In these cases, you can completely customize the Web Access Page, beyond the Web Portal capabilities, by modifying by yourself the Web Access Page generated by the Webmaster Toolkit.
Warning, this documentation is intended only for skilled Web developers.
Generating mandatory settings
In order to include the mandatory settings in your Web Access page, we recommend that you start by generating your Web Access Page by using the Web Portal.
Files location
The Web Access Page will be generated in the “C:\Program Files (x86)\RDPlus\Clients\www” folder, for instance if you choose “index” as the page name, it will be the file named “index.html” in this folder.
It is a standard HTML file, so you can use all your knowledge of HTML, JavaScript and CSS programming languages to develop your custom page.
All the files inclusion are written relatively to the “C:\Program Files (x86)\RDPlus\Clients\www” folder. For instance, the main CSS styles file is located at “C:\Program Files (x86)\RDPlus\Clients\www\software\common.css”, so it is included in the HTML Web Access Page file by the following line:
Starting from an HTML file generated by the Web Portal Preferences, we will reduce it down to a minimal Web Access Page. We advise you to use a text editor such as Notepad or Notepad++ (do not use Word).
After our work, it will look like the screenshot below:
First, you must keep everything that is between the and HTML tags: – meta tags to force browsers to clear their cache – .js files inclusions – JavaScript settings declarations
Then, you can reduce the content between the ‘body’ and ‘/body’ HTML tags down to these few lines:
Refresh the web page in your web browser, and you should get the minimal page of the above screenshot.
We recommend you clear your browser’s cache after saving any changed file.
Finally, it is now up to you!
As long as you keep the calls to JavaScripts functions on specific events and the given identifiers (id=”…”), your fully customized Web Access Page will be working fine!
This tutorial will cover the following aspects:
How to deploy a logon script and have multiple logon scripts scenarii.
Mounting a specific folder within a session from client or server side.
If you wish to publish a folder on a logical virtual drive for your users, just follow this procedure:
Prior to creating the script, open windows explorer and click on “Folder and search options”.
Then, click on the view tab and uncheck the box “Hide extensions for known types”:
Create a text document and modify the extension by naming it “logon.bat”:
Inside the file, enter for example this command to publish the Folder.exe folder:
“subst Y: \tsclient\C\Users\%USERNAME%\Documents”
Then, on the start menu, type in gpedit.msc on the search taskbar. We are going to use local policy so that every user connecting to this server launches the script.
Go into the user’s configuration menu, then into the Windows settings, and finally, into Scripts (Logon/Logoff) Double click on the Logon script, then click on “Add”, then on “Browse”.
Then, click on “Show Files” button on the Logon Propeties window and copy your logon.bat script into the path given by the Policy Editor, i.e.: “C:\Windows\System32\GroupPolicy\User\Scripts\Logon”
You can copy this logon.bat file in C:\ProgramData if you want this script to be executed for all of your users.
If you need a specific logon script for each user then copy the script in C:\Users\Username\AppData\Roaming
Now how do we make this Y drive appear in the user session? There many ways to achieve this. You can create a new application within the admin tool and assign it to your users, doing so the shortcut will appear in the session:
If you connect to a session with mstsc.exe, don’t forget to go to the options menu, and on the Local Resources tab, under Local devices and resources, click on “More”, then check the box “Drives”.
If you want to secure the access of a folder, see our documentation to publish a secured folder.
Prerequisites
This feature is very technical and this documentation is only for technical experts.
You should be familiar with HTTP protocol as well as HTTP Headers.
Overview
Some use case might require that RDPlus web server returns one or more custom HTTP Headers in addition to the standard ones.
This feature answers this specific need.
Setting up a custom HTTP Header
To add your own custom HTTP Header, you need to:
Create the file “headers.bin” in the folder “C:\Program Files (x86)\RDPlus\Clients\webserver”
Add the custom headers separated by new line, for instance case: header1=X-Frame-Options
Restart webserver (AdminTool > Web > Restart Web Servers) to apply changes
RDPlus server will now respond to all queries with this custom HTTP Header in addition to the standard ones.
Overview
Some use case might require that RDPlus web server listens on more than one network card, for instance if the server belongs to several different networks.
This feature answers this specific need.
Binding Web Server to Several Network Cards
To bind RDPlus web server to several network cards, you need to:
Create the file “settings.bin” in the folder “C:\Program Files (x86)\RDPlus\Clients\webserver”
Add the following line with all the local IP addresses for all the network cards you want to bind to, for instance:bind_nic=”127.0.0.3″,”127.0.0.4″
Restart webserver (AdminTool > Web > Restart Web Servers) to apply changes
RDPlus web server will now listen to all queries from all the binded network cards (in our example case the binding would be done to 127.0.0.3, 127.0.0.4 and 127.0.0.1 automatically)
You can edit the provided HTML pages with Notepad or Notepad++ to customize it user interface.
index.html page
The index.html is located in Web Server root folder path.
C:\Program Files (x86)\RDPlus\Clients\www
Index.html page is the default web page. It’s like a front-end Portal page with links to the connection pages which are located in \www\ folder. This web page can be copied and renamed to allow multiple configuration and / or logon information. For example let’s copy and rename index.html into index2.html, this page will be available using this url http://localhost/index2.html
Beware that if you change the “index.html” file name to “index2.html” and that you are using the Web Applications Portal, then you must change the following variable on this file: “page_configuration[“applications_portal”] = “index_applications.html” to “index2_applications.html” then rename the “index_applications.html” file into “index_2applications.html”.
The default index.html includes all possible options:
RemoteApp access to applications, connection outside the Web Browser
Connection using HTML5 from any device
Local printing preferences
You will be able to change header and footer in the Web portal design feature on the web portal preferences tile of the Web tab.
By editing the index.html web page, you will have access to various settings.
// ————— Access Configuration ————— var user = “”; // Login to use when connecting to the remote server (leave “” to use the login typed in this page) var pass = “”; // Password to use when connecting to the remote server (leave “” to use the password typed in this page) var domain = “”; // Domain to use when connecting to the remote server (leave “” to use the domain typed in this page) var server = “127.0.0.1”; // Server to connect to (leave “” to use localhost and/or the server chosen in this page) var port = “”; // Port to connect to (leave “” to use localhost and/or the port of the server chosen in this page) var lang = “as_browser”; // Language to use var serverhtml5 = “127.0.0.1”; // Server to connect to, when using HTML5 client var porthtml5 = “3389”; // Port to connect to, when using HTML5 client var cmdline = “”; // Optional text that will be put in the server’s clipboard once connected // ————— End of Access Configuration —————
For example I will preset demo/Psw as login/password by editing: var user = “Demo”; var pass = “Psw”;
Doing so, pre-filled credentials are made visible at each visit of the portal.
Another very important configuration file is settings.js, located in C:\Program Files (x86)\RDPlus\Clients\www\software\html5:
This file contains various settings for the HTML5 web client like disabling sound, clipboard or allowing session reconnection if browser tab is closed.
Disabling sound is done with this setting:”W.playsound = false;”
Changing default resolution for Mobile devices:”W.viewportwidth = “1024” ” – The height gets computed by browser.
Forcing HTTPS for remote connection”W.forcealways_ssl = true;”
Allowing session reconnection when browser tab is closed:”W.send_logoff = false;”
Adding a warning pop up to prevent closing the browser tab:search the “W.pageUnloadMessage = “” ” parameter.
I have set an example of message to be used below :
W.pageUnloadMessage = “Closing this tab will disconnect your remote session, are you sure ?”; //Dialog to return when page unloads. //1. Important notice, own dialogs are not supported in all browsers. //2. HTML standard does not distinguish between page refresh and page close action, the dialog will popup on page refresh too.
The general settings for the RemoteApp web page is stored on the software folder, in two different files: remoteapp.html and remoteapp2.js.
Example of available settings present in remoteapp2.js :
// Remote Desktop Server var remoteapp2_server = ”; var remoteapp2_port = ‘443’;
// Windows Authentication var remoteapp2_user = ”; var remoteapp2_psw = ”; var remoteapp2_domain = ”;
// Optional Command Line Parameters var remoteapp2_apppath = ”;
// Seamless/RemoteApp mode var remoteapp2_wallp = ‘green’; var remoteapp2_seamless = ‘off’; var remoteapp2_remoteapp = ‘on’;
// Screen var remoteapp2_color = ’32’; var remoteapp2_full = ‘2’; var remoteapp2_width = ”; var remoteapp2_height = ”; var remoteapp2_scale = ‘100’; var remoteapp2_smartsizing = ‘1’; var remoteapp2_dualscreen = ‘off’; var remoteapp2_span = ‘off’;
// Disks mapping (required for printing) var remoteapp2_disk = ‘1’;
// Printing var remoteapp2_printer = ‘off’; var remoteapp2_preview = ‘off’; var remoteapp2_default = ‘on’; var remoteapp2_select = ‘off’;
// Hardware var remoteapp2_com = ‘0’; var remoteapp2_smartcard = ‘0’; var remoteapp2_serial = ‘off’; var remoteapp2_usb = ‘off’; var remoteapp2_sound = ‘on’; var remoteapp2_directx = ‘off’;
// Miscellaneous var remoteapp2_alttab = ‘0’; var remoteapp2_firewall = ‘1’; var remoteapp2_localtb = ’32’; var remoteapp2_lock = ‘off’; var remoteapp2_rdp5 = ‘off’; var remoteapp2_reset = ‘off’;
Overview
The RDP protocol does not allow to resize while connected without a reconnection.
Please note that you will get the best experience possible from RDPlus HTML5 client by connecting with a maximized browser.
However, if you want to force the browser window to be as big as possible, you can try to “force” the HTML5 window to open with the maximum size (but not as a “maximized” window, due to internet browsers security limitations).
Maximizing the browser window
You will have to modify the file “Clients\www\software\common.js” located in your RDPlus directory. We advise you to use a text editor such as Notepad++ (do not use Word).
In order to have a browser window which uses all the screen, you will have to modify the line(s) with “window.open” in it, and add the following text:
This allows IE/Chrome/Firefox/Safari to open the window with a screen size (minus Windows bar). Unfortunately it is not possible to force a web browser to “maximize” the window in a “fullscreen” Windows type.
Open the file and search “window.open(“
Then add the new at the end before the brackets, for example:
cpwin = window.open("about:blank", n, "screenX=0,screenY=0,left=0,top=0,fullscreen=yes,width="+(screen.availWidth-5)+",height="+(screen.availHeight-(55)));
When using RDPlus HTML5 client to connect to a remote server, you can specify several parameters in the URL address to override default parameters, such as:
user login
user password
program to run
startup directory for the program to run
command line for the program to run
Run a Specific Application
Here is an example of a full html5 client URL address to open a remote session for user “john” with password “demo” and by starting standard notepad upon session opening: https://you.rdplus.server/software/html5.html?user=demo&pwd=demo&program=c:\\windows\\system32\\notepad.exe&startupdir=c:\\windows\\system32¶ms=
You can disable the Application Command Line for users by going on the Advanced –> Session tab of the AdminTool, double-clicking on the “Application Command Line” setting and setting the value to “No”.
The common screen resolution by most devices, especially mobile phones is 320×480, but that is obviously not sufficient to create the RDP session.
Therefore the resolution was preset to 800 in width. The height of resolution gets recomputed by hidden browsers native logic. The higher the width the bigger the height.
As an example, standard resolution is 320×480, now when you set the viewport to 800, the browser recomputes the value for height for example to 800×904, when you set the width to 1280, then it’s 1280×1160 etc.
The height and width depend on landscape/portrait view of your device, like 800×904 or 904×800 etc. Each browser can recompute it on its own logic to fit the rdp screen into the viewport of your device and may differ depending on the browser even when used on same device.
If you set the height manually, then you will break the viewport ratio of your device and the final RDP session will be out of your port view, and to reach these areas you will have to scroll to wished positions.
Therefore it is recommended not to set height manually, but let the device choose automatically the height.
If you need more height, increase the width! By testing on mobile phone devices, the good value for width was 800. Though you must pay attention : the CPU’s on most mobile phones are usually slow, therefore when you increase the height, it will increase the CPU load. On tablet devices the CPU’s are faster, therefore it is recommended to set the width to higher value like 1280 and allow the device to recompute the value for height.
Because some browsers like FireFox mobile do not allow the setting of viewport after page loading, this value was set fixed into the Clients\www\software\html5.html file:
Also it is random data sending/receiving without special sequential order and without any http header data.
That makes the usage with reverse proxies impossible due to the lack of Websockets support by most known reverse proxies; but half of the xhr transport may work with Apache reverse proxy.
Usually the SSH package support HTTP(S) proxies and this should be sufficient to overcome most known proxies.
However, there are existing very difficult cases, where the proxy environment can not be properly recognized, is hidden from third party software or the target servers are behind reverse proxies.
For such difficult cases the software contains Non-SSH solution called “Rescue mode”.
If you can establish HTML5 connection, then you can be sure this software will help you to establish native socket connections through Websocket(FF, Chrome, Opera, IE10 etc) or XHR (IE6-IE9).
Be careful, some proxies allow Websocket/XHR traffic only via HTTPS layer, so use https address instead of http.
If proxy does not ask for proxy authentication and you can access pages via browser:
Open http(s)://yourserver.com/software/html5/jwres/
Wait for successful connection (and authorize Java execution if asked)
Click on the red text “open the link” to open the working web access page
Use Windows client access as usual
If proxy requests proxy authentication and you can access pages via browser:
Open http(s)://yourserver.com/software/html5/jwres/
If the proxy requests for authentication for java applets, press “cancel”
Click on “Download LocalWebserver”, and execute it after successful download, that will start local http server on port 18888
Click on “Force Applet loading from http://localhost:18888”, this will reload the page with loading of jars from local http server
Wait for successful connection
Click on the red text “open the link” to open the working web access page
Use Windows client access as usual
If you want to bypass RDPlus standard logon Web Access page when using the Web Applications Portal and go directly to the Web Applications Portal page, you must specify several parameters in the URL address:
user login
user password
user domain
server
port
client type (HTML5 or Windows)
To use a Windows client, use:
&type=remoteaccess
Using those parameters in the URL address, you can go directly to the Web Applications Portal page.
You do not have to specify all these parameters at the same time: the parameters not specified will have their default configured value.
If you wish to bypass RDPlus standard logon when using theconnect with the HTML5 client, check this page.
Overview
RDPlus Web Portal allows users to connect to their remote servers from any web browser simply by using their Windows credentials.
Sometimes however, you want to connect automatically when you launch a given URL address. This feature is called Web Autologon.
With Web Autologon, you will connect using the settings (login, password, ports, …) specified in specific RDPlus files.
You will need to specify at least a login and a password in order to benefit from Web Autologon.
You might need to refresh the page on your web browser after modifying this file.
Enable multiple user sessions using the same credentials
If you want to enable multiple user sessions using the same credentials, then you can follow this procedure.
You can copy the index.html file located in:
C:\Program Files (x86)\RDPlus\Clients\www
as many times as your number of users. You can rename it and then access it with the url: http://nameofyourserver.com/renamedindex.html
Edit the paragraph corresponding to users credentials:
Access Configuration ————— var user = “”; // Login to use when connecting to the remote server (leave “” to use the login typed in this page) var pass = “”; // Password to use when connecting to the remote server (leave “” to use the password typed in this page) var domain = “”;
You can copy the index.html file as much time as you want, renaming it with the username will make it easier for you to provide a personal link.
Overview
When the remote connection is loading, the HTML5 client is displaying a default splashscreen such as the screenshot below:
You can customize this content by modifying a JavaScript configuration file.
HTML5 Client
Creating your customized Splashscreen content
Any content in text or HTML can be used for the Splashscreen.
Also, if you need to use simple quotes ( ‘ ) or double quotes ( ” ) you will have to write a backslash before ( \’ and \” ) instead of just the quotes.
Finally, please note that the content must be written in only 1 line.
The following example is a valid content for the Splashscreen:
<h1>This is my customized splashscreen</h1>Please say \"hello\"!<img src='html5/imgs/ring64.gif' border=0>
It will display a title (“This is my customized splashscreen”), a text (“Please say hello!”) and the animated ring picture as in the standard RDPlus Splashscreen.
Modifying the Splashscreen data to use your own content
If you do not have a file named “settings.js” in the “C:\Program Files (x86)\RDPlus\Clients\www\software\html5” folder, then your RDPlus version is older and this documentation does not apply. Please update your system first or contact support.
Edit the file “settings.js” located in the “C:\Program Files (x86)\RDPlus\Clients\www\software\html5” folder. We advise you to use a text editor such as Notepad or Notepad++ (do not use Word).
Do not forget the ending double quotes and semi-colon ( “; ).
If you wish to lengthen the duration of the logon splashscreen in HTML5, you can do so by modifying the value in milliseconds:
W.splashscreentime = 5000; //splash screen play time.
We recommend you clear your browser’s cache after saving the changed html page.
Overview
On the Web logon page, when the user clicks on the “Log on” button, the chosen client (HTML5 or Windows) is opened in a new browser’s tab.
Sometimes, and more specifically when using the Windows client, you might want to hide the logon form to the user, for instance in order to avoid the user to click again on the “Log-on” button.
Depending on the Internet browser used, you have two choices on how to change this default behavior. Both solutions requires you to modify a JavaScript file.
Solution A: Closing the Logon tab – For Internet Explorer only
In this solution, when the user clicks on the “Log on” button, the chosen client will be opened in a new browser’s tab and the Logon tab will close itself. Depending on the Internet Explorer version, a small message window might be displayed to the user, asking him to confirm that he wants to close this tab.
Edit the file “common.js” file which is stored into the “C:\Program Files (x86)\RDPlus\Clients\www\software” folder. We advise you to use a text editor such as Notepad or Notepad++ (do not use Word).
We recommend you clear your browser’s cache after saving the changed JavaScript file.
Solution B: Redirecting the Logon tab to another web page – For all browsers
In this solution, when the user clicks on the “Log on” button, the chosen client will be opened in a new browser’s tab and the Logon tab will automatically navigate to another web page.
You are free to use any existing Internet address (URL) such as “http://google.com” or “http://your_intranet/your/page.html”, or you can create your own web page by using “thankyou.html” as the URL and creating a file named “thankyou.html” in the “C:\Program Files (x86)\RDPlus\Clients\www” folder and putting HTML content in it.
Edit the file “common.js” file which is stored into the “C:\Program Files (x86)\RDPlus\Clients\www\software” folder. We advise you to use a text editor such as Notepad or Notepad++ (do not use Word).
We recommend you clear your browser’s cache after saving the changed JavaScript file.
Overview
On the Web logon page, when the user clicks on the “Log on” button, the HTML5 client is opened in a new browser’s tab.
You can change this behavior and have the HTML5 client to open in the same browser tab as the Web logon page by modifying a JavaScript file.
Modifying the custom.js file
Edit the file “custom.js” file which is stored into the “C:\Program Files (x86)\RDPlus\Clients\www” folder. We advise you to use a text editor such as Notepad or Notepad++ (do not use Word).
Add this line:
var openinsamewindow = true;
We recommend you clear your browser’s cache after saving the changed JavaScript file.
Modifying the common_applications.js file
If you are using RDPlus Web Applications Portal feature, then you need to edit a second file. Edit the file “common_applications.js” file which is stored into the “C:\Program Files (x86)\RDPlus\Clients\www\software” folder. We advise you to use a text editor such as Notepad or Notepad++ (do *not* use Word).
We recommend you clear your browser’s cache after saving the changed JavaScript file.
1) General Information
Important: RDPlus RemoteWork is not compatible with RDPlus RemoteAccess.
It is not possible to install it on a server with RDPlus RemoteAccess already installed.
RDPlus Remote Work enables easy remote desktop access from your home office to your workstation at the office.
Your office workstation (the host) can be any PC running a Windows Professional OS from Windows XP Pro to Windows 11 Pro. Please note that Windows Home, Basic and Family additions are not supported.
The RDPlus Remote Work Server is both your Web Portal and Connection Broker. It redirects connection requests to your own office workstation. The Connection Broker can be installed on any Windows system, server, or workstation. The Connection Broker PC can also be remotely accessed like any other one.
The Connection Broker is usually installed nearby your ISP’s Router. A NAT (Network Address Translation) rule redirects the HTTP and/or the HTTPS ports (default value is port 80/443) from the external IP to the LAN IP of your Connection Broker. In this configuration, your Connection Broker is the only system exposed to Internet.
For the most reliable access to your Remote Work Server, a Static Public IP Address is required. If you do not have a Static Public IP Address, you may also try alternative Dynamic DNS services like DynDNS.org or NO-IP.org.
Unlike traditional Remote Desktop services, Remote Work does not require the default remote desktop port (3389) to be exposed to the internet. All traffic is web based, using HTTP/HTTPS. This enables administrators to use SSL certificates for encrypted connections from the outside world.
2) Operating system
Your hardware must use one of the operating systems below:
Windows Vista Service Pack 2
Windows 7 Service Pack 1
Windows 8/8.1
Windows 10 Pro
Windows 11 Pro
Windows Server 2008 SP2/Small Business Server SP2 or 2008 R2 SP1
Windows Server 2012 or 2012 R2
Windows Server 2016
Windows Server 2019
Windows Server 2022
32 and 64 bits are supported.
The required framework is .NET version 4.5.2 for all supported Windows versions.
If you install Remote Work on a Windows 2008 to 2019 make sure the RDS or Terminal Services roles as well as the RDS Terminal Services licensing role are not installed before installing Remote Work .
If these roles were present, remove them and reboot.

Windows 10 Home edition is not supported.

On Windows Server 2016, 15 sessions maximum are allowed for Remote Desktop access.

Windows Server 2019 Essentials Edition does not support RemoteApp.
3) Network parameters
The RDPlus Remote Work Server must have a fixed IP address:
Remote access (from Wide Area Network – WAN)
A DSL connection is recommended as well as a public fixed address. Without a fixed IP address, you should install a dynamic DNS service like http://DynDNS.org More information about how to set this up can be found here.
The TCP RDP port (by default 3389) must be opened both ways on your firewall.
4) Sessions accessibility
Computers must be able to be accessible during remote connection sessions, it is therefore necessary that these computers are powered on, and also that the Standby or Hibernation mode are deactivated. The monitor(s) can be turned off.
If a user makes a mistake and turns off his computer remotely, it is not practical to access it again the next day. The solution consists in activating this GPO : Administrative Templates (Computers) > Start Menu and Taskbar > Remove and prevent access to the Shut Down, Restart, Sleep, and Hibernate commands.
It is also possible directly via the registry key:
HKEY_LOCAL_MACHINE\Software\Microsoft\Windows\CurrentVersion\Policies\Explorer > HidePowerOptions (DWORD put to 1)
Finally, it is also possible via RDPlus Advanced Security, by checking the “No disconnect” box on the Security level Customization tile:
Our development team is working on a daily-basis to ensure the stability and compatibility of RDPlus Remote Work with the latest versions of Microsoft Operating Systems and the latest Updates.
We are proud to provide you with new features and enhancements every week.
This is why it is recommended to keep your server up to date. By subscribing to our annual Support and Updates Services, you will have access to the latest Updates and bug fixes.
Login
From his home PC, John opens a web browser (Firefox, Chrome or Edge for example). Then, he types the address of his Connection Broker and enters his login information:
Done: The logon goes to John’s office workstation.
Session Capture
If John leaves the office with unfinished work and an opens a session on his workstation, RDPlus Remote Work will capture his Desktop when he will start working from home.
Printing
John can print documents on his local printer at home. He just has to select the Universal Printer. The Universal Printer turns each of John’s print into a PDF file. This PDF is saved by his web browser:
John can display, print or save this PDF print file on his home PC.
After installing Remote Work, your server is immediately ready to go.
However, you can customize all the system parameters with a powerful Administrator Tool.
To do so, click on the following icon created on your Desktop:
The Administrator Tool will then be displayed:
The Administration Tool must be installed on your PC Connection Broker.
It allows you to configure all of the office workstations.
Want to get help on a feature of RDPlus Remote Work Admin Tool quickly? Just click on a tile or on a tab to go to the matching help!
You can then select two custom options by ticking the corresponding boxes :
Use custom proxy settings.
Only download setup, which does not install RDPlus Remote Work.
Click on next.
Click on “I accept the agreement”.
Web servers are listening on ports 80 and 443 by default. We recommend you to accept our RDPlus Remote Work default installation settings. According to our experience, most of the production issues are due to Windows security features.
You can still modify these ports if you wish during installation or at any time on the Built-in Web Server Management of the AdminTool. Just make sure that the defined ports are available and that Java is installed on the server.
The progress bar appears and allows you to follow the progress of the process:
Then the RDPlus Remote Work logo appears and a window informs you about the completion of the installation.
To use RDPlus Remote Work, you must reboot your system.
The trial period delivers a full product for 15 days and 5 concurrent workstations.
Locate the Administrator Tool on your desktop :
If you cannot find the admin tool shortcut, it should be located in the desktop folder on the administrator account used to download RDPlus Remote Work. You can also find the RDPlus Remote Work folder on this path: 'C:\Program Files (x86)\RDPlus-RemoteWork\UserDesktop\files'.
Double-click on it, then click on the license tab:
Here you can see the status of your RDPlus Remote Work license, as well as your Computer ID and Computer Name:
Activating your license
When you order a license, you will receive an Activation Key via email.
You can then go to the License Tile of the AdminTool, click on the “Activate your License” button, enter this activation key and click on “Next” .
You will get a list of all the available licenses/supports assigned to this activation key, i.e. all licenses/supports not activated yet:
Check one or more items and click on the “Next” button. Please note that you can activate several products at the same time by checking several products/support!
All your products/support are now activated.
Offline Activation
If the server does not have access to internet when activating, an offline activation process will start.
It will display a quite long URL address. Copy this URL on an internet-connected computer browser and access it in order to retrieve a license file:
Enter your Activation Key:
Your license is then validated. You can no proceed to download the license file by clicking on the corresponding button.
This license file must then be copied back to the server in order to finish the offline activation process;:
A message will confirm that your license was retrieved succesfully:
You will then have to select the corresponding licenses / support to activate and a message confirming that all your products/support are now activated.
Offline Rehost
Offline Activation can also be done for rehosting licenses.
When the server does not have Internet access, the ‘rehost an existing License’ button will present the offline rehost page:
Using the Web Portal Design and the Web portal Preferences, you will be able to create your own customized HTML Web Access pages – and there is no need to be a web developer!
This tile allows you to configure the Web Access page:
- "Default Values": you can specify a default login, password and domain that will auto-populate the login fields. All of the settings present here are saved in the index.html file, which can be copied and renamed to your preference.
- "Show the Domain Field": when checked, the Domain field is included in the login information request.
- "Keyboard": only for advanced administrators who have special keyboard requirements.
- "Upload - Download": choose source and destination paths for file uploads and downloads.
Generating the HTML Web Access page
We advise you to try a “Preview” before generating a new HTML Web Access page.
Once you are pleased by the preview, then you can click on the “Publish” button to generate and publish the page to your web server’s root folder.
You will be asked for a page name. If you want to overwrite your default page, use “index”. In this case, the newly published web page will be accessible at: http://your-server.com/index.html
On this tile, you can edit the parameters for the HTML5 client web display:
- Display the menu bar for all devices and computers or for mobile devices only.
- Enable or Disable File Transfer.
- Allow the Ctrl + Alt + Del shortcut on a specific type of device.
- Choose your favorite Top Menu display between transparency and solid.
- The number of graphical color bits.
- The Connection Timeout.
- Show or Hide Warning Messages.
- Enable or disable sounds.
- Choose your favorite background color.
- Add a logo to the background.
- Change the logon screen message and animated gif, as well as its display time in milliseconds.
Smartphone and tablets Preferences:
- If the administrator uses the software keyboard, when it is hiding an entry field, the application is moved up and the user is still able to see what he is typing.
- The administrator can select a small, a medium or a large size for the mouse pointer or no mouse pointer at all. It makes intuitive for the user to navigate inside his application.
- He can also select the level of transparency for mouse and keyboard.
With the Web Portal Design tab, you will be able to customize all the display and graphic settings, as well as add your own logo. You have the choice between a collection of 20 photos, or you can add your own. You can also set any color theme with the background color of your choice or you can use one of the classic themes.
Some advanced tips:
- You don't have to click on a "Choose..." button if you already know a color code: just type it in the input.
- Be careful with the real size of the pictures: your page could be quite bad-looking if a picture is too big.
- Do not hesitate to use the "Preview" button on the bottom, it's fast and easy!
Saving typed values and Resetting to default ones
When you close this window, all the values you typed and checked are saved.
If you want to reset these values to values by default, click on the “Reset” button on the bottom.
Changing the RDP port number and setting up the firewall
With the AdminTool, you can select a different TCP/IP port number for the RDP service to accept connections on. The default one is 3389. You can choose any arbitrary port, assuming that it is not already used on your network and that you set the same port number on your firewalls and on each remote-work user access programs.
Remote Work includes a unique port forwarding and tunneling capability: regardless the RDP port that has been set, the RDP will also be available on the HTTP and on the HTTPS port number!
If users want to access your remote-work server outside from your network, you must ensure all incoming connections on the port chosen are forwarded to the remote-work server.
Your Remote Desktop Server must be available, easy-to-access and safe. That’s why Remote Work utilizes a built-in Web Server which helps you easily manage its status and operations. A Management Console is available in the Administrator Tool.
This Management Console enables you to view and configure the status of Terminal Service Plus built-in Web Server. When you install Remote Work, web servers are listening on ports 80 and 443 by default. Make sure that the defined ports are available and that Java is installed on the server.
Web Server Components Status
The status of the Web Server main components are displayed on the AdminTool Home dashboard.
Ports Considerations (Local Machine and Firewall / Router)
Remote Work only requires either Port 80 or Port 443 to be opened. Port 3389 can stay closed.
Restart / Stop the Web Server Service
If you see that a service is not running, you may need to restart the Web servers by clicking on the “Restart Web Servers button” which is represented by an arrow on the right, the Web Servers will be restarted and the service should be running again.
If you click on the “Stop Web Servers” button, placed on the middle, the Web servers will be stopped. The HTTP and HTTPS server status will now display in red indicating that the HTTP / HTTPS services are stopped:
Manage Web Servers
You can change the ports during installation or at any time by clicking on the Web – Web Server tab. On this tab, you can choose to use a different HTTP web server, modify the Web Server root path and the HTTP/HTTPS port numbers. Make sure that these ports are available before changing them: if a conflict occur Remote Work web server will not work. Here is a non-exhaustive list of TCP port that might be used by an application on your server. Once these modifications done, click on save and the AdminTool will restart.
1) Click on Manage Workstations to begin:
2) Click on Add and enter a friendly Workstation name and it’s IP address.
Of course, all of your users’ workstations and the “Connection Broker” must have a fixed IP address:
In the case of Elisabeth, her PC’s IP address is 192.168.1.135:
Repeat this process for the rest of your client PCs:
3) Assign PCs to users:
Let’s take the example of John. Select ‘John Workstation’ and click on ‘Add’ in Users section on the right:
In this example, the Windows login on this PC is “John”. You can use the Active Directory login if PCs are members of a domain:
John’s workstation is now all set and ready to go:
4) Multiple users:
Nicolas and Paul share a PC at work. Paul uses it during the morning shift and Nicolas, during the evening shift. So, for this example, we will assign two users to Nicolas’ workstation.
5) Workstation setup:
On each of the 5 users’ workstation assigned in the Connection Broker, download and run the client setup program. It is a small program: You can easily ask each of your users to do it themselves.
The download link is http://192.168.1.120/download
Where 192.168.1.120 is the IP address of your RDPlus Remote Work Connection Broker:
You can also download it by clicking on one of the links on the Managing Workstations tile:
Once these steps are completed, you are all set and can begin using RDPlus Remote Work.
Free and Easy-to-install HTTPS Certificate
Overview
With RDPlus Remote Work, in 3 mouse clicks you can get a secured valid certificate, renewed automatically, and configured automatically into Remote Work built-in web server.
This feature uses Let’s Encrypt to provide a free and secure HTTPS certificate for your HTTPS connections.
Prerequisites
Please ensure that your server meet these requirements before using the Free Certificate Manager:
- You must use Remote Work built-in web server listening on port 80 for HTTP. This is required by Let's Encrypt domain ownership validation process.

- Your server's domain name must be accessible from the public Internet. This is required as well to validate that you are the real owner of the domain.

- You must run this program on the Gateway server or a Standalone server, not an Application server (except if your Application Server is accessible from the public Internet and has a public domain name).
It is not possible to get a certificate for an IP address, be it public or private. It is not possible to get a certificate for an internal domain name (i.e. a domain which only resolves inside your private network).
Free Certificate Manager GUI
To open Remote Work Free Certificate Manager GUI, open Remote Work AdminTool, click on the “Web – HTTPS” tab, then click on “Generate a free valid HTTPS certificate” as shown in the screenshot below:
The Free Certificate Manager GUI will open and remind you about the prerequisites, as shown in the screenshot below:
Please read carefully and check that your server meet all the requirements, then click on the “Next” button.
Step 1: Enter your Email
As shown in the step 2 screenshot below, you only need to enter a valid email address.
This email will not be used to spam you. Actually it will not even be sent to Remote Work or any third party, except the certificate issuer: Let’s Encrypt.
They will only contact you if needed, according to their Terms Of Service.
Step 2: Enter the server’s Domain Name
As shown in the screenshot below, you only need to enter your server’s public domain name.
This is the public Internet accessible Domain Name, something like gateway.your-company.com. You can also enter another domain name or a subdomain name, separated with a comma. Example: “server1.example.com,www.server1example.com”
As explained in the GUI, do not add a protocol prefix and/or a port suffix, just enter the clean domain name(s).
The certificate will be generated for this domain name, and it will only be valid on a web page hosted at this domain name. If your users connect to your Web Portal using https://server1.example.com:1234, then you must enter “server1.example.com”.
Enjoy your Certificate!
Remote Work Free Certificate Manager will now use all the data to connect with Let’s Encrypt, validate that you really own the domain name you typed, and get the matching valid certificate.
Once the program receives the certificate, it will automatically handle all the required file format conversions and softly reload Remote Work built-in web server in order to apply the new certificate to every new connection. The web server is not restarted and no connection is stopped.
Certificate Renewal
Let’s Encrypt certificates are valid for 90 days.
Remote Work will automatically renew the certificate every 60 days for safety. A check is done at every reboot of the Windows server, and then every 24 hours.
You can manually renew your certificate by opening the Free Certificate Manager tool. It will display the domain name of the certificate and its expiration date, as shown in the screenshot below.
To manually renew your certificate, just click on the “Next” button.
The “Reset Domain” button on this window deletes the SSL certificate and reconfigure the Web Server to its original state before using the Certificate Manager.
Best Practices
If no error occurs, Remote Work will renew the certificate automatically every 60 days. We recommend that you check every 60-70 days that your certificate has been automatically renewed.
We also recommend that you backup at least every month the following folder and its sub-folders:
It will contain every “cert.jks” files used. These are the “key store” files and we never delete them, we only rename them with the date and time of their disabling.
Error Codes
Error 801: Free Certificate Manager was not able to register your Let's Encrypt account. Check your Internet connection. Check that your email is not already registered at Let's Encrypt. Try again with another email.

Error 802 & Error 803: Free Certificate Manager could not retrieve Let's Encrypt Terms Of Service URL address. This is a non blocking error: you can still continue and accept Let's Encrypt Terms Of Service - be sure to read them from your browser first of course.

Error 804: Free Certificate Manager was not able to validate your agreement to Let's Encrypt Terms Of Service with Let's Encrypt servers. Check you Internet connection. Try again.

Error 805 & Error 806: Free Certificate Manager was not able to validate that you own the domain you entered during certificate creation (Error 805) or certificate renewal (Error 806). Check again all the prerequisites. Check your Internet connection. Check that your web server is listening on port 80. Check that you do not use a third-party web server such as IIS or Apache. Check that your domain name is accessible from the public Internet.
RDPlus Advanced Security is available as an Add-On on RDPlus Remote Work AdminTool:
The Brute-Force attack Defender enables you to protect your public server from hackers, network scanners and brute-force robots that try to guess your Administrator login and password. Using current logins and password dictionaries, they will automatically try to login to your server hundreds to thousands times every minute. Learn more about this feature on this page.
On the Web Portal
Brute-force attacks on the Web Portal are blocked when users enter wrong credentials.
After 10 attempts during a period of 10 minutes, the Web Portal will prohibit the user to logon for 20 minutes:
These are the default settings which are customizable on the BruteForce tab of RDPlus Security AdminTool.
You can check all blocked connections and logs on the IP Addresses tile of RDPlus Security Ultimate Protection:
This functionality is visible and active after the first Web Portal connection.
Two-factor authentication adds an extra layer of security and prevents access to your users’ session even if someone knows their password. A combination of two different factors is used to achieve a greater level of security:
1) something they know, a password. 2) something they have, a device – such as a smartphone – with an authentication app installed.
Each time a user sign in to its remote session it will need its password and a verification code available from its mobile phone. Once configured, the authenticator app will display a verification code to allow him or her to log in any time. It works even if its device is offline.
Two-factor authentication is available with HTML5 and Remoteapp connections on remote-work Web portal only and on RDPlus Remote Access HTML5, Remoteapp and Client Generator . This authentication mode does not support login through Remote Desktop client.
Activating the Two-factor Authentication Add-On License
The Two-Factor Authentication feature can be found on the Add-On tab of the AdminTool:
To activate your license, copy the Activation Key you received via email and select the product you wish to activate.
You will be prompted with a pop-up confirming that your license has been activated!
Enable Two-factor Authentication
Perform the following steps to enable two-factor authentication for your RDPlus server or deployment. If your RDPlus deployment is configured to use multiple servers, perform this task on the RDPlus server exposed as the single point of entry for users or having the reverse proxy role.
1) Open the two-factor authentication administration application. The two-factor authentication status and the license status are displayed:
By default, 2FA is disabled.
Enable it:
Add Users and Groups
Once two-factor authentication is enabled, you can configure users for two-factor authentication.
1) From the two-factor authentication administration application, click on the Manage Users menu.
2) Then, click on Add to select users and/or groups of users. The Select Users or Groups box opens.
3) Add as many users and groups as required and then click OK. The users and groups are added to the list and enabled for two-factor authentication.
Edit Users
On the same tile, you can edit the way users receive verification codes by selecting a user and clicking on the “Edit” button:
The user receives verification codes on the authentication app by default. You can choose that he/she receives it by SMS by selecting the option and adding the user’s phone number on the field below.
Remove Users and Groups
In order to remove users or groups, select the user or the group and then click on Remove. A confirmation message is displayed.
Click Yes. The user or the group is removed from its list and won’t connect using two-factor authentication anymore.
Reset QR codes
In the event of the loss of the authenticating device for a user, or if the user needs to display the secret QR code again, you must reset the user authentication settings.
1) From the two-factor authentication administration application, click on the Manage Users tab.
2) Select one or multiple activated users and then click on Reset. A confirmation message is displayed:
3) Click Yes. The selected users will be presented a new QR code at the next login and will have to scan it in their device’s authentication app. You can also modify the user’s phone number, so that he can receive a verification code on his new device.
Enroll User for Two-factor Authentication
Once a user has been enabled for using two-factor authentication, an activation message will be displayed at his next successful logon from the RDPlus Web portal.
In order to complete the required steps, the user must install an authenticator app on a portable device, such as his smartphone.
Please use each app documentation for more details on how to proceed to add your RDPlus account.
Configure SMS
In order for the user to receive verification codes by SMS, you must first enable it. Click on the Configure SMS tab:
remote-work leverages Twilio in order to send verification codes by SMS. Twilio is a third-party cloud platform, not affiliated with remote-work.
1) Just create a free account on Twilio by clicking on the button below “Start your free trial with Twilio”:
2) On your Twilio account dashboard, you will need to activate your Trial Number:
3) The next step is only necessary for Trial versions. It allows Twilio to verify the actual phone number on which SMS will be sent. Enter this number under the “Phone Numbers” menu – “Verified Caller IDs” tab :
4) You will then be able to enter your account SID, Authentication Token and Trial Number as the Phone Number on the Configure SMS tab of remote-work:
Then, click on Save. The following message will be displayed:
You can manage your Twilio subscription on the Manage Twilio subscription section, at the bottom of the Configure SMS tab. Administrate your account, see the Service Status or reach Twilio Support Center just by clicking on the corresponding buttons.
Login using Two-factor Authentication
Once a user has configured his RDPlus account in his authenticator app, he or she will be able to connect using its password and the code provided by its authenticator app.
Time Synchronization
RDPlus Remote Work server and Devices must be on time. This means that the time and date of the server must be synchronized with a time server. Devices must also have time synchronization, regardless of the time zone on which they are configured.
If an authentication request comes from a Device whose date and time are not synchronized, or if the server’s date and time are not synchronized, this request may be rejected.
The validation of information between the Device and the server relates to UTC time. In the Settings section, the Discrepency parameter is used to manage the period of validity of the code, in intervals of 30 seconds.
Example of validation or valid authentication:
- the server is synchronized with a time server, the time zone is UTC + 2, it is 2:30 pm
- the Device is synchronized with a time server, the time zone is UTC + 1, it is 1:30 pm
- the Discrepancy parameter is configured at 60, i.e. a code validity period of 30 minutes
- referred to UTC time, the Device time and the server time are identical.
Example of validation or invalid authentication:
- the server is synchronized with a time server, the time zone is UTC + 2, it is 2:30 pm
- the Device is not synchronized with a time server, the time zone is UTC-1, the time is manually set to 1:30 pm
- the Discrepancy parameter is configured at 60, i.e. a code validity period of 30 minutes
- the server time referred to UTC time is 12:30 am
- the time communicated by the Device, referred to UTC time is 2:30 pm
- the difference is 120 minutes, the validation code is therefore refused.
Two-factor Authentication-Settings
The Settings tab allows you to whitelist users, in order for them to connect using an RDP client, without the need to enter a two-authentication code.
Click on the “Add” button to add a user and remove a user by selecting it and clicking on the “Remove” button.
The Advanced tab allows you to configure Two-Factor Authentication in-depth settings.
Discrepancy
You can modify the Discrepancy value, which allows you to set the validation time of a verification code. A discrepancy of 3 means that the same verification code remains valid 90 seconds backward and forward its original 30 seconds validity period. Default is 480, which means 480 x 30 seconds= 4 hours.
Issuer
A string indicating the name of the two-factor authentication service. The issuer is displayed on the client mobile app and identifies the service associated with the generated verification code. By default, it is composed of the server’s name with RDPlus.
Validity After First Session
Period during which a user can open a session without having to revalidate a previous two-factor authentication code. This setting allows users to open applications from the Web application portal successively. Default is 480 minutes.
Validity Before First Session
Period during which a user can open a session after validating a two-factor authentication code from the Web portal, in secondes. Default is 3600 seconds.
Digits
The number of digits to display to the user. Please note that this setting may not be supported by authentication apps. This number must be greater than or equal to 4 and lower or equal to 12. Default is 6.
SMS Verification Code Message
Message sent to users requesting a verification code if they are configured to receive it via SMS. This message must contain the %CODE% placeholder which will be replaced by the actual verification code. Default is: Your %ISSUER% verification code is: %CODE%
Step 1: Installing RDPlus Security on your computer
Installing RDPlus Security is an easy process.
Just download it from our web site, run the Setup-RDPlus-Security.exe and follow the steps detailed here.
Files are decompressed and copied into:
“C:\Program Files (x86)\RDPlus-Security” folder. The trial version is a full featured version limited to 2 weeks.
After the installation, there will be a new icon on your Desktop:
Step 2: Using RDPlus Security
You can now launch the RDPlus Security interface and begin to set RDPlus Security features and prevent your server from both internal and external threats. The dashboard proposes an immediate access to the five last security events. Moreover, the version tile allows administrators to directly update RDPlus Security to the latest version directly from there.
You can begin by defining a security level for your group of users, and customize it for a specific user.
Then, you can set specific working hours in order for your users to connect only during their working time.
You can protect your server from foreign cyber-attacks by allowing the access to the countries of your choice, with the Homeland access protection.
Look at our documentation for all security features.
Run the RDPlus Security setup program and then follow the installation steps.
Please note that you must run this Setup as an Administrator, but don’t worry, Windows will automatically require it.
Click on “Next” if you agree to the license.
The Setup is now ready to install RDPlus Security on your computer.
Click on “next” to start the actual installation.
A progress bar is displayed and allows you to follow the installation progress.
Please be patient, as it can sometimes take up to a few minutes to fully install the software.
The installation is now finished, you can now start using RDPlus Security!
The free trial version is fully featured for 2 weeks.
Uninstall RDPlus Security
In order to completely uninstall RDPlus Security, go to C:\Program Files (x86)\RDPlus-Security\ :
Then, double-click on the “unins000” application.
Click on yes on the next window to completely remove the software and all of its components.
Hardware Requirements
RDPlus Security can only work on 32 and 64-bit editions of OS servers.
Operating System
RDPlus Security is compatible with the following OS:
Windows 7
Windows 8.1
Windows 10
Windows Server 2008 R2
Windows Server 2012 / 2012 R2
Windows Server 2016
Windows Server 2019
The required framework is .NET version 3.5.
RDPlus Security offers a System Audit located on the AdminTool dashboard. The tick on the System Audit button turns red when an issue has been found.
When you click on it, you can see that it monitors :
If the RDPlus Security service is running.
If you allowed RDPlus Security to access Internet to check for updates.
If RDPlus Security main programs exist.
If the Windows Firewall is enabled.
If the Logging is disabled in production use.
If the Windows minimum password length is greater than zero.
If the Guest account is diabled.
Warnings
If you see the Windows password length error, like on the screenshot below:
It is because you need to modify the minimum password length on your server, under Local Policy/Account Policies/Password Policy:
Updating RDPlus Security is easy and can be done by clicking on the corresponding tile, on the Home Dashboard:
RDPlus Security automatically downloads and applies Update Release program when requested.
The Update Release program is designed to continuously improve all RDPlus Security functionalities and keep your current RDPlus Security settings safe.
Overview
To launch the RDPlus Security interface, just click on the RDPlus Security AdminTool icon on your desktop.
There are several tiles on the main window, each tile giving you access to the various features and settings offered by RDPlus Security.
The Dashboard proposes an immediate access to the five last security events.
Moreover, the version tile allows administrators to directly run a System Audit and update RDPlus Security to the latest version directly from there.
Explore each tile to know more about each feature.
Open the RDPlus Security interface and click on the License tab:
Then, click on the “Activate your License” button:
Click on the “Activate License” button, enter your Activation Key and select products you want to activate.
You will be prompted with a pop-up confirming that your license has been activated!
Thank you for choosing RDPlus Security!
Open the RDPlus Security interface and click on the License tab:
Then, click on the “Activate your License” button:
Click on the “Activate License” button, and select the license.lic file you have been given.
When your license is activated, the following confirmation message will be displayed:
From now on, your License window will look like the one below, to confirm that you have indeed an activated license:
Thank you for choosing RDPlus Security!
On this tile, you can allow access for users connecting from all countries by letting this feature by default:
Or decide to restrict the access to only private and whitelisted IP addresses:
You can allow access only to specific country by selecting the “Allow connections only from this list of countries” button and by clicking on the “Add country” button:
Then, you can begin to add allowed countries, by clicking on the “Add country” button:
Select the country you wish to add on the list. (on this example, access is allowed for users connecting from Australia and Hungary.)
– You also have the choice to check the box below to unblock all IP addresses from the selected country.
When you selected the countries you wish to allow, click on the apply button:
When an IP address gets blocked, it appears on the Ip Addresses list, and you have the possibility to unblock it.
– By default, the HTML5 service is the watched process. If you wish to disable its monitoring or check connections on other processes, go to the Settings – Advanced tab.
Warning: please triple-check that you have at least included the country where you are currently connected from. Otherwise, your IP address will be blocked quite quickly after applying the settings, more precisely as soon as a new user session will be opened on the server, thus disconnecting you without any hope of connecting back again from the same IP. If you get blocked, we recommend that you try connecting from any country you allowed onRDPlus Security, for instance by connecting from another remote server. You can also use your console session to fix the settings, as this connection is not using Remote Desktop Services or any non-local network and will not be blocked by RDPlus Security.
Notes: If you ever notice that Homeland Access Protection does not block connections coming from a country which is actually not in the authorized countries’ list, it is certainly because:
In order to block an IP address, this feature add a blocking rule on the Windows firewall. So, firstly, the firewall must be active. You also have to check if some firewall parameters are not handled by an other program, like an antivirus. In this case, you will have to deactivate this program and restart the service “Windows Firewall”. You can also contact your third-party program editor and ask them to find a way for their program to respect the rules when added to the Windows firewall. If you know any software editor’s technical contact, we are ready to develop these “connectors” for the firewall. Contact us.
VPN: In case the remote client uses a VPN, Homeland Access Protection will get an IP address chosen by the VPN provider. As you know, VPN providers use relays all around the globe to allow its users to browse anonymously. Some VPN providers allow users to define the relay’s country. Thus, users with VPN providers may be relayed through an unauthorized country. For example, if a VPN provider choses an IP from Sri Lanka, this country must be authorized by Homeland Access Protection. Also, if the VPN uses an internal corporate IP address, then the protection becomes irrelevant.
Firewall / Proxy: The purpose of an hardware firewall is to filter incoming and outgoing connections for large companies. As it is only a filter, it should not modify the originating IP address and therefore should not impact Homeland Access Protection. However, a proxy would definitively change the originating IP address to use a private network address, which will always be allowed by Homeland Access Protection. The primary purpose of this feature is to block access to a server opened to the Internet. If all connections comes from the corporate network, then the protection becomes irrelevant.
This product includes GeoLite data created by MaxMind, available from http://www.maxmind.com. If you find that some IP address is not registered in its real country, please contact MaxMind directly.
The Brute-Force Attacks Defender enables you to protect your public server from hackers, network scanners and brute-force robots that try to guess your Administrator login and password. Using current logins and password dictionaries, they will automatically try to login to your server hundreds to thousands times every minute.
With this RDP Defender, you can monitor Windows failed login attempts and automatically blacklist the offending IP addresses after several failures.
– You can set the maximum failed logon attempts from a single IP address inside the IPs Detection block (by default, it is 10), as well as the time of reset for failed logon attempts counters (by default it is 2 hours).
– On the bottom of this window, you can see the Defender status, where you can check if the HTML5 Web Portal logon failures, the Windows Logon Failures are monitored and if the Windows Firewall and RDPlus Security service are enabled. In this case, like in our example, all the status are ticked.
– Manage Blocked IP addresses: You can of course configure it to match your needs, for example by adding your own workstation IP address in the IPs Whitelist, so this tool never block you. You can add as many IP addresses as you want in the whitelist. These addresses will never be blocked by the brute-force attacks defender. – You can ignore Local and Private IP Addresses by changing the default setting on the Settings – Advanced – Bruteforce tab
Note: If you ever notice that the Brute-Force Attacks Defender blocked 10 IP addresses per day and that now, it is not the case anymore; and blocks one, two or even doesn’t block any address, it is actually normal. Indeed, before RDPlus Security installation, the server having an RDP port publicly available is known by all the robots, and many robots try the current passwords and the ones coming from dictionaries. When you install RDPlus Security, these robots are progressively being blocked, so that one day:
Most of the active robots are already blocked and are not interested by the server, even the new ones.
Also, the server does not appear anymore on the list of publicly known servers.
IP addresses management is easy with a single list to manage both blocked and whitelisted IP addresses:
By default, IPV4, IPV6 and all server localhosts addresses are whitelisted.
A convenient search bar provide search capabilities based on all information provided. For example, if we searched for blocked addresses, by entering the word “blocked” on the search bar, all the blocked IPs will be visible:
Furthermore, administrators are able to perform actions on several selected IP addresses with a single click. Among the new features IP addresses management introduced, you will find the possibility to provide meaningful descriptions to any IP addresses:
Last but not least, administrators are now able to unblock and add to whitelist multiple blocked IP addresses in a single action, by clicking on the “Add Existing to Whitelist” tab.
Working Hours Restriction
You can configure working hours restrictions per user or per group.
Choose the restriction of your choice:
Always authorize this user/group access
Always block this user/group access
or Authorize only during specific time ranges.
You can configure it day by day and select the time range of your preference:
It is possible to select a specific timezone depending on your user’s office location.
Users/Groups rules priorities
When a user opens a new session on the server:
1) if this user has Working Hours Restrictions directly defined for himself, then these rules are enforced. 2) if this user does not have Working Hours Restrictions directly defined for himself, then RDPlus Security will load any existing Working Hours Restrictions for all the groups of this user, and keep the more permissive rules. For instance if a first group has a rule to block the connection on Monday, a second group has a rule to authorize the connection on Monday from 9 AM to 5 PM and a third group has a rule to authorize the connection on Monday from 8AM to 3PM, then the user will be able to open a connection on Monday from 8AM to 5PM.
Warning: This feature uses server’s time. Using the user’s workstation time and/or time-zone would be pointless, as all the user would only have to change its time-zone to open a session outside his authorized hours.
You can configure the security level for each user or group. There are three security levels:
The Windows Mode, where the user has access to a default Windows session.
The Secured Desktop Mode, where the user has no access to the Control Panel, programs, disks, browser, no right-click…: no access to the server resources. He just has access to documents, printers, Windows key and can disconnect his session.
The Kiosk Mode is the most secure one, where the user has very limited actions in his session.
Customization
In any mode, you have the possibility to customize the security on three levels:
Desktop Security:
Disks Control:
Applications Control:
Users/Groups rules priorities
When a user opens a new session on the server:
1) If this user has a Security Level directly defined for himself, then this Security Level is enforced. 2) If this user does not have a Security Level directly defined for himself, then RDPlus Security will load any existing Security Level settings for all the groups of this user, and keep the more permissive rules.
For instance if a first group has a rule to remove the Recycle Bin icon from the desktop, but this rule is disabled for a second group, then the user will have the Recycle Bin icon on his desktop. The same priority rules will apply on every custom rule (Desktop Security, Disks Control and Applications Control) as well as for the principal Security Level (the Windows Mode being considered more permissive than the Secured Desktop Mode, which is considered more permissive than the Kiosk Mode).
The endpoint protection and device control allows you to control users device by allowing each user to use only one or multiple specific device(s), which will be checked on any incoming session. A logon from any invalid device name will be blocked.
On this example, John will be using the device names John-PC and John-Tablet.
Auto-fill of device name field
You might notice that the Device Name field is already filled with a device name for some users. In order to help the administrator, RDPlus Security will automatically save the name of the latest device used to connect to the server by any user who does not have the Endpoint Protection and Device Control feature enabled. After one working day, the device name of most users will be known by RDPlus Security, thus allowing you to quickly enable the Endpoint Protection feature without having to check every user’s workstation name.
Note: Endpoint Protection is not compatible with HTML5 connections.
The Ransomware Protection enables you to efficiently DETECT, BLOCK and PREVENT ransomware attacks. RDPlus Security reacts as soon as it detects ransomware on your session. It possesses both static and behavioral analysis:
The static analysis enables the software to react immediately when an extension name changed,
The behavorial analysis looks at how a program will interact with files and detect new strain of ransomware.
You can enable it by clicking on the “Enable Ransomware Protection” on the Ransomware Protection tab:
Learning Period
After enabling the Ransomware Protection feature, the Learning Period is automatically activated. During the Learning Period, all programs detected by the Ransomware Protection feature will be considered as false positive and will be able to resume their execution. The programs detected as false positive will be automatically added to the list of allowed programs.
This feature allows to configure Ransomware Protection on a production server without disrupting its activity. We recommend to start with a 5 days Learning Period to identify all legit business applications.
If you stop the Learning Period, it will deactivate the Ransomware Protection. Click on the “Ransomware Protection is disabled” button to reactivate the Learning Period.
Ransomware Protection Action
It quickly scans your disk(s) and displays the file(s) or program(s) responsible, in addition to providing a list of the infected items. RDPlus Security automatically stops the attack and quarantines the program(s) along with the file(s) encrypted before its intervention.
Only the administrator can whitelist them, by entering the path of the desired program on the bottom line and by clicking on “Add”:
Ransomware Protection Report
RDPlus Security prevents catastrophic events for businesses by removing ransomware at an early stage.
The administrator has access to information regarding the source of the attack and running processes, and therefore learns how to anticipate these threats.
Note: Ransomware Protection observes how programs interact with system and personal files. To ensure a greater level of protection, Ransomware Protection creates bait files in key folders where ransomware often begins its attack. Therefore, a few hidden files may appear in the users’ desktop and documents folders, as well as in other locations. When it detects a malicious behaviour, it stops the ransomware immediately (or ask if the logged user is an administrator). Ransomware Protection uses pure behavioural detection techniques and does not rely on malware signatures, allowing it to catch ransomware which does not exist yet.
Add an SMTP configuration – Email Alerts
You can configure your SMTP settings in order for RDPlus Security to send you email alerts to highlight important security events by clicking on the button below the Ransomware activation one:
Enter your SMTP Hostname, Port and check the Use SSL box and change change the port from 25 to 465 if you wish to use SSL. Enter the SMTP Username and Password, as well as the sender and receiver addresses. Email Settings can be validated by sending a test when saving SMTP settings.
Snapshots
Snaphshots taken by Ransomware Protection are visible under the Snapshots tab:
The list can be refreshed by clicking on the corresponding button. Each element can be restored or removed.
Quarantine
Quarantined programs are visible under the Quarantine tab:
Each element can be restored or removed.
List of Ignored by Default File Extensions
Ignored files are not used to detect possible malicious actions and are not saved when they are modified. The idea is to exclude any operation on large or irrelevant files (such as log files).
sys
dll
exe
tmp
~tmp
temp
cache
lnk
1
2
3
4
5
LOG1
LOG2
customDestinations-ms
log
wab~
vmc
vhd
vhdx
vdi
vo1
vo2
vsv
vud
iso
dmg
sparseimage
cab
msi
mui
dl_
wim
ost
o
qtch
ithmb
vmdk
vmem
vmsd
vmsn
vmss
vmx
vmxf
menudata
appicon
appinfo
pva
pvs
pvi
pvm
fdd
hds
drk
mem
nvram
hdd
pk3
pf
trn
automaticDestinations-ms
Caution about Backup Files Extension
The file extension used for saving modified files is: snapshot. The driver prohibits any modification or deletion action on these files other than by the RDPlus Security service. Stopping the service deletes the backed up files. In order to delete these files manually, you must temporarily unload the driver.
Backup File Configuration
By default, the directory of saved files is located in the installation directory of RDPlus Security and is called “snapshots”. However, it is possible to define another location for this directory. This can allow the administrator to define a directory located on a faster disk (SSD) or on a larger disk according to his needs. The backup directory path must not be a UNC path, in the form of:
\\<computer name>\<backup directory>\
Adding Backup Utilities to the Whitelist
We recommend adding backup utilities in the Whitelist.
RDPlus Security is not a security audit solution. However, we pushed further the security events logs by allowing to trace the last two thousand and five hundred events, which should offer a more relevant alternative to a full audit solution. The security events are a great source of information as they display the operations performed by RDPlus Security to protect your computer.
The Events Viewer window can be opened from the RDPlus Security main window, by clicking directly on the last 5 events displayed or on the Events tab. The information displayed on the Events Viewer window are refreshed automatically every few seconds.
Note that the example above ilustrates real life bruteforce attacks attempts managed by RDPlus Security. The description often explains why the action was performed or not. As illustrated, retaliatory actions are often written in red and highlighted with a red shield icon. The list of security events presents four columns, which describes the severity, the date of the check or performed operation, the associated feature icon and the description.
Note: The RDPlus Security Events Viewer window can be moved around and does not prevent you from using the other RDPlus Security feature.
The five tiles at the top of the window displays a status for each RDPlus Security features.
In the example above, the One Click to Secure Desktops status shows 5 user session configured. Also, the example warn that the Endpoint Protection and Device Control feature is not enabled. The status are displayed according to the security events recorded. The window title highlights the oldest security events.
Plus, a deep global search is now available in order to find specific events quickly. It is also possible to copy the event message or unblocking an IP address by right-clicking on it.
Users Whitelist
The Users Whitelist tab gives the Administrator the possibility to add/remove users from the whitelist. Users on the whitelist are ignored by RDPlus Security and their settings will not be applied.
The user who downloaded RDPlus Security is automatically added to the Whitelist:
Programs
On the Programs tab, you can add programs to the list of allowed programs, that won’t be checked by RDPlus Security Ransomware Protectio.
Click on the “Add Application” button to add a program. You can also remove them by selecting application(s) and clicking on the Remove Application(s) button.
Open Server Monitoring web interface (http://localhost:7777 by default) and click on the “Administration” > “License” menu.
The following page should be displayed:
Click on the “Activate your License” button, and look for the license.lic file you have been given.
Then browse and select your license.lic file and click on the “Activate” button. From now on, your License page will look like the one below, to confirm that you have indeed an activated license:
You can see the new status of your License by going back to your license details:
Thank you for choosing Server Monitoring!
Sometimes, the server computer name is not the easiest way to distinguish your monitored servers. ServerGenius enables you to choose a nickname for your servers and easily identify them.
From ServerGenius homepage, select Administration and then, click on RDS Servers.
From the list of monitored servers, click on Edit in order to give a nickname to the corresponding server.
Type a nickname for your server, and then click Save.
Your server has been renamed in ServerGenius and will be displayed using the specified nickname in the reporting sections.
Step 1: Installing ServerGenius on your computer
Installing ServerGenius is an easy process.
Just download it from our web site, run the Setup-ServerGenius.exe and follow the steps detailed here.
Files are decompressed and copied into:
“C:\Program Files\RDS-Tools\ServerGenius” folder (32 bit systems)
“C:\Program Files (x86)\RDS-Tools\ServerGenius” folder (64 bit systems).
The trial version is a full featured version limited to 2 weeks.
After the installation, there will be a new icon on your Desktop:
Step 2: Checking your Installation
On your server, start an Internet browser (such as Chrome, Firefox or Internet Explorer).
Browse to http://localhost:7777 by default, or change the “7777” part with the port you have chosen during the installation.
If everything has been installed and configured properly, then you should have a web page such as the one below:
If this page is not displayed, please contact our Support team.
By default, the login is admin, password admin which you can then change by modifying the Settings on the Administration tab.
Step 3: Connecting Remotely to your Server’s Reporting & Monitoring web interface
You can now connect to ServerGenius web interface from virtually any device (your computer or laptop, your tablet, your mobile phone…).
All you have to do is to browse to http://yourserver:7777 (using your server’s domain name or public IP address).
Next steps
We advise all our customers to read our online documentation.
Do not hesitate to contact us if you have questions or feedback about ServerGenius and/or this quick-start guide.
Run ServerGenius Setup program and then follow the installation steps.
Please note that you must run this Setup as an Administrator, but don’t worry, Windows will automatically require it.
Click on “Next” if you agree to the license.
Choose where to install ServerGenius on your computer (we recommend to use the default path).
Choose the port on which ServerGenius will publish its web interface.
This is the network port on which you will browse to see ServerGenius reports, alerts, administration panel, etc.
If you do not know what to enter, we recommend you to use the default port. You can change it after the installation if you need to.
The Setup is now ready to install ServerGenius on your computer. Click on “Install” to start the actual installation.
A progress bar is displayed and allows you to follow the installation progress.
Please be patient, as it can sometimes take up to a few minutes to fully install the software.
The installation is now finished and ServerGenius is already running in the background on your server.
You can now start using ServerGenius by double-clicking on its icon on your Windows desktop:
or by opening your browser and browsing to ServerGenius address (http://localhost:7777 by default):
The free trial version is fully featured for 2 weeks.
Hardware Requirements
Please find below our recommendations based on the number of monitored servers:
Monitored servers
CPU
Memory (RAM)
1-2
2
8
3-4
4
16
5+
8
32
Installing ServerGenius on an SSD type disk drive is recommended for better performance.
Also, you may need to allocate additional disk space for ServerGenius Server, depending on the number of servers and websites monitored, and coincidently the amount of data collected and stored in the PostgreSQL database.
Finally, please note that it is generally a good idea to run a monitoring application such as ServerGenius on a dedicated server. This prevents other applications to reduce available resources.
Operating System
ServerGenius is compatible with the following OS:
Windows 7
Windows 8
Windows 10
Windows Server 2008 / 2008 R2
Windows Server 2012 / 2012 R2
Windows Server 2016
Windows Server 2019
32 and 64 bits editions are supported.
Network
Only 1 network port is required, and will be asked during the setup. By default, we suggest to use port 7777, which is not an officially registered port, and therefore not assigned to specific services.
If you want to access your ServerGenius web interface from outside your company’s network, you will need either a public IP address or a domain name / subdomain to access the server.
If you cannot connect to ServerGenius web interface on your server, please contact your Administrator first, as this is most probably a network or firewall issue, not a ServerGenius issue.
You can see and remove the servers you wish to monitor under the Administration tab > RDS Servers tile of Server Genius:
Add a new server by clicking on the “Add a new server” button, you will then see this interface:
Follow the procedure by downloading Server Genius Agent on the new server you wish to add:
As for Server Genius setup, agree to the License, then select the destination location folder (by default, it will be installed on C:\Program Files (x86)\RDS-Tools\ServerGenius Agent):
Then, enter the main server URL:
Click on install:
Then click on finish to exit the Setup.
Run the agent and your new server should be visible on the Servers Management interface and on the Dashboard:
Warning: If you accidentally removed your server or want to change its name, we recommend you to uninstall and reinstall Server Monitoring.
You can manage ServerGenius settings by clicking under the Administration tab > Settings:
Under the General Settings, you can see your Server Genius current version and the port you set up during installation and setup your preferred language.
Under the Authentication settings, you can modify the Administrator username and password (Which is by default admin – admin).
Under the Email settings, you can set the SMTP Hostname, Port, Username, Password and even set the Email address you will receive the Alerts from.
Since Server Genius 3.4 version, an Email Settings Validation has been added and enables you to test and validate your SMTP server settings. Click on the Validate Saved Email Settings line, then send an email to the recipient of your choice:
The Websites Management page enables you to display the list of monitored websites, add a new website to monitor and remove a website.
The Websites Management page can be found under the Administration tab > Websites of Server Genius:
Add a new website by clicking on the Add a new Website button. Then, the New Website page is displayed and invite you to specify the new website web address:
Please note that in case the protocol is not specified, “http://” will be prepended to the website address provided. For example, if the website address is www.example.com, then the website address monitored by ServerGenius will be http://www.example.com. Also, please enter two website addresses to monitor if your website is accessible through both “http” and “https”.
Your new website should be visible on the Websites Management page and on the Dashboard:
Locate the Administrator Tool on your desktop :
If you cannot find the admin tool shortcut, it should be located in the desktop folder on the administrator account used to download RDPlus. You can also find the RDPlus folder on this path: ‘C:\\Program Files (x86)\RDPlus\UserDesktop\files’.
Double-click on it, then click on the license tab.
Click on the “Activate your license” tile:
Enter your Activation Key and select the product you want to activate.
You will get a pop-up confirming that your license has been activated.
Afterward, Open ServerGenius web interface (http://localhost:7777 by default) and click on the “Administration” > “License” menu.
You can see the new status of your License by going back to your license details:
Thank you for choosing Server Monitoring!
Run ServerGenius Update Release program (It is actually the Setup Program, available here and then follow the installation steps.
Please note that you must run this Update Release as an Administrator, but don’t worry, Windows will automatically require it.
Click on “Next” if you agree to the license.
Choose the ServerGenius installation folder on your computer, then click on “Next”.
Choose the port on which ServerGenius will publish its web interface.
This is the network port on which you will browse to see ServerGenius reports, alerts, administration panel, etc.
If you do not know what to enter, we recommend you to use the default port. You can change it after the installation if you need to.
The Setup is now ready to install ServerGenius on your computer.
Click on “Install” to start the actual installation.
A progress bar is displayed and allows you to follow the update progress.
The update is now finished, and you can start using the latest version of ServerGenius.
When it is required by the update, the Update Release program will ask you to reboot your computer to finish the update process.
This report is available from the ServerGenius Web interface by clicking on the RDS Servers tab, then Server Monitoring Reports tab, and then Disk Drives Activity Tracking Report.
It displays the Disk used space, in percentage of the total available disk space
The date-range can be customized by using the date-range picker at the top right of the Web page.
This report is available by clicking under the Servers tab –> Network on the Server Genius web interface.
It displays the Network usage with data sent and received in bytes/second for each hour, per server:
The date-range can be customized by using the date-range picker at the top right of the web page.
This report is available by clicking under the Servers tab –> Performance on the Server Genius web interface.
It displays the following data:
CPU usage (in percentage of the total available CPU power)
Memory usage (in percentage of the total available RAM memory)
I/O (in percentage of the total available disk time)
The date-range can be customized by using the date-range picker at the top right of the web page.
This report is available from the ServerGenius Web interface by clicking on the RDS Servers tab, then Users Activity Reports tab, and then Concurrent Sessions.
It displays the number of opened Remote Desktop Services (RDS) sessions for the selected period of time.
The date-range can be customized by using the date-range picker at the top right of the Web page.
This report is available from the ServerGenius Web interface by clicking on the RDS Servers tab, then Users Activity Reports tab, and then Connected Users.
It displays the log of the opened Remote Desktop Services (RDS) sessions for the selected period of time.
The date-range can be customized by using the date-range picker at the top right of the Web page.
This report is available from the ServerGenius Web interface by clicking on the RDS Servers tab, then Users Activity Reports tab, and then Connection Time.
It displays the number of minutes each user was connected to the server through a Remote Desktop Services (RDS) session for the selected period of time.
The date-range can be customized by using the date-range picker at the top right of the Web page.
This report is available from the ServerGenius Web interface by clicking on the RDS Servers tab, then Running Applications Reports tab, and then Per User Elapsed Time.
It displays the application’s total execution time per user, in minutes, for the top 30 applications over the selected time range.
The date-range can be customized by using the date-range picker at the top right of the Web page.
This report is available from the ServerGenius Web interface by clicking on the RDS Servers tab, then Running Applications Reports tab, and then Application Elapsed Time.
It displays the application’s total execution time, in minutes, for the top 30 applications over the selected time range.
The date-range can be customized by using the date-range picker at the top right of the Web page.
This report is available from the ServerGenius Web interface by clicking on the RDS Servers tab, then Running Applications Reports tab, and then Application Usage Audit.
It displays the Number of users connected simultaneously to the application, for the top 30 most utilized applications over the selected time range.
The date-range can be customized by using the date-range picker at the top right of the Web page.
This report is available from the ServerGenius Web interface by clicking on the RDS Servers tab, then Running Applications Reports tab, and then Top Most Running Application.
It displays the number of each application’s simultaneous utilizations, for the top 15 most utilized applications over the selected time range.
The date-range can be customized by using the date-range picker at the top right of the Web page.
This report is available by clicking on the Availability tab from the Websites menu on ServerGenius web interface.
The Website Availability Report displays the uptime in percentage for the specified period of time.
The period of time can be customized by using the date-range picker at the top right of the web page.
This report is available by clicking on the Overview tab from the Websites menu on ServerGenius web interface.
The Website Overview Report provides the following information:
An heat map highlighting the website health for the past years. A red square indicates that the website was subject of one or multiple outages during the day. An outage means that the website was unreachable by ServerGenius or the website response code is an error code.
Availability panel presents the calculated uptime and downtime in percentage for the specified period of time ; as well as the number of outages registered and the outages total duration in minutes.
Performance panel displays the latest, average, minimum and maximum response time in milliseconds for the specified period of time.
Responses panel list the number of responses by response category.
The period of time can be customized by using the date-range picker at the top right of the web page. Please note that the heat-map will display the complete years corresponding to the selected period of time.
This report is available by clicking on the Performance tab from the Websites menu on ServerGenius web interface.
The Website Performance Report displays the maximum, average and minimum response time in milliseconds for the specified period of time.
Please note that for a narrowed down period of time, the maximum and minimum response time will not be displayed and the actual response time will be displayed.
The period of time can be customized by using the date-range picker at the top right of the web page.
This report is available by clicking on the Responses tab from the Websites menu on ServerGenius web interface.
The Website Responses Report displays the number of responses per HTTP Code and the failed requests over the selected period of time.
The number of HTTP Responses 200 (OK) over the selected period is displayed on the top of the graph.
The period of time can be customized by using the date-range picker at the top right of the web page.
You can access the Alerts Management by clicking on the “Alerts” tab on the Server Genius web interface, then on the “Management” menu item. Using the “Create a new Alert” button, you can add alerts on your Server Genius system.
For servers, alerts can be set on:
Processor
Memory
I/O
Disk used space
Network Throughput In
Active Users
Downtime Duration
You can customize with your own values:
For websites, alerts can be set on Response Time or Downtime Duration.
Once you have configured an alert on your server or your website, Server Genius will closely monitor the chosen metric and send you an email as soon as the targeted threshold is reached or exceeded. Server Genius will of course also send you an email when the metric is back to normal.
Notifications
Once you have configured an alert on your server or website, ServerGenius will closely monitor the chosen metric and send you an email as soon as the targeted threshold is reached or exceeded. Server Genius will of course also send you an email when the metric is back to normal.
Since Server Genius 3.4 version, it is now possible to enable real-time web notifications by allowing them into your web browser:
On Microsoft Edge, it enables a Windows native notification display:
On Firefox, Chrome and Opera the web push is displayed at the same location than native notifications:
Finally, you can see a list of active and historic alerts by clicking on the “Alerts” tab on the Server Genius web interface, then on the “History” menu item.
Follow the steps below in order to enable HTTPS (SSL) for the ServerGenius administration website and agents endpoint. As a result, administrators and machine agents will be able to access ServerGenius using the configured HTTPS port.
Please note that enabling SSL support for ServerGenius does not prevent administrators and machine agents from accessing ServerGenius using the current HTTP port configured (default is 7777 for administration website). Therefore, there is no need to reconfigure machines already monitored by ServerGenius!
Summary
Requirements
Open Certificate Manager
Import certificates
Find the certificate thumbprint
Register SSL certificate for ServerGenius
Configure ServerGenius SSL port
Restart ServerGenius
Requirements
Please make sure you have administrator privileges on the server where ServerGenius is installed.
Enabling SSL support for ServerGenius requires a valid certificate, with the following details:
The certificate’s Issued To or Alternate Subject Name should specify the ServerGenius website’s domain name (i.e. servergenius.mycompany.com) or the server name (i.e. COMP-SRVR01)
The certificate’s purpose should be Server authentication
The certificate must contain the private key
If the certificate is not validated by a trusted certificate authority (CA) already installed in ServerGenius server, then the CA certificate is also required. Usually, the CA certificate is required when the certificate is a self generated certificate.
The password for the private key of the certificate and the CA certificate, if applicable, are required for the following steps.
Open Certificate Manager
Log in as a local administrator on the server where ServerGenius is installed. Then, from the Windows task bar, click on Start. Then, click on Run….
A window opens and prompts for a program executable name. Type mmc.exe and click OK.
The Microsoft Management Console (MMC) opens. Click on File and then click on Add/Remove Snap-in to choose the feature to manage.
In the list of Snap-in, choose Certificates and then click on Add. The snap-in is added to the Selected snaps-inscolumn. Then, click OK.
In the dialog that appears, select Computer Account, then click Next.
Choose Local Computer and click Finish.
Click OK to proceed with importing the certificates.
Import certificates
In the MMC window opened in the previous section, drill down to Certificates (Local Computer) and Personal.
From the Action menu on the command bar, select All Tasks and then click on Import….
The Certificate Import Wizard opens. Click Next to continue.
In this step, Click on Browse to find the cerficate. Then, click Next to continue and import the selected certificate. On the next screen, enter the password you chose for the certificate.
Click Next to continue.
Choose Place all certificates in the following store. Verify that the selected certificate store is Personal, then click Next.
Click Finish to import the certificate.
Note:
If you need to import a CA authority certificate, repeat the import procedure above for the CA certificate.
Find the certificate thumbprint
From MMC, right-click on the certificate and click Open.
The certificate’s details are displayed. Click on Details tab to display the certificate’s properties.
Copy the value of the Thumbprint property for the next steps.
Register SSL certificate for ServerGenius
From the administrative command line, type the following to set up the SSL binding to ServerGenius, and specify the appropriate port:
The above command line takes the following parameters:
ipport defines the IP address and port which should be configured for ServerGenius. By default, we suggest to use port 7778.
certhash identifies the certificate by its thumbprint, found in the previous section.
appid specifies the application ID. ServerGenius application ID is 35c57165-b326-49b5-9346-f4e2cf7f2353.
For Windows XP and earlier:
If your ServerGenius server is running under Windows XP or an earlier Windows release, the command netshwon’t be available. use the httpcfg command instead as below:
httpcfg set ssl /i 0.0.0.0:7778 /h 11d66d6b314a3b041ffcf8c0ad72758704d5d18b /g "{35c57165-b326-49b5-9346-f4e2cf7f2353}"
Configure ServerGenius SSL port
Open Windows File explorer and navigate to ServerGenius setup directory. By default, the ServerGenius setup path is the following:
C:\Program Files (x86)\RDS-Tools\ServerGenius
Then, open the file config.json and specify the SSL port (e.g. 7778) as the value of the SslPort property.
Note: in order to disable SSL for ServerGenius, rollback the changes by setting the SslPort property’s value to 0and then restart ServerGenius.
Restart ServerGenius
From the administrative command line, type the following to restart ServerGenius service:
net stop ServerGenius && net start ServerGenius
ServerGenius is now configured to use SSL (HTTPS).
The RDPlus virtual printer is a new alternative to classic remote desktop printing solutions, which can be unreliable, hardware dependent and difficult to manage. The virtual printer’s unique compression algorithm improves the transit speed of remote print jobs by minimizing data transfer while maintaining image quality.
RDPlus virtual printer OS compatibility list, in 32 and 64-bit::
Windows Vista
Windows 7
Windows 8
Windows 8.1
Windows 10
Windows Server 2008
Windows Server 2008 R2
Windows Server 2012
Windows Server 2012 R2
Windows Server 2016
Windows Server 2019
The RDPlus Virtual Printer is compatible with:
The RDPlus generated client
The RDPlus RemoteApp client
The RDPlus RemoteApp plug-in when using the Web Portal
The Microsoft Remote Desktop client
It is not compatible with:
The RDPlus HTML5 client
Hard Coded Thin-client devices where the client side setup cannot be installed.
Two Parts
The RDPlus Virtual Printer is made up of two components:
A server side component that comes installed on RDPlus12.70 Edition.
A Desktop component that is installed on the end-user’s Windows Workstation.
Both setups are available directly in the server side in the “C:\Program Files (x86)\RDPlus\UserDesktop\files\addons” folder and named “Setup-VirtualPrinter-Server.exe” and “Setup-VirtualPrinter-Client.exe”:
The Client setup is also available from your RDPlus web server, using the link below:
RDPlus virtual printer is automatically installed during the first RDPlus installation, and directly available during the trial period.
Once RDPlus is installed, you will need to install the “Virtual Printer Client” on user’s computer.
When you connect remotely to your RDPlus server using either Microsoft RDP client (mstsc), RDPlus generated client or Web Portal RemoteApp plug-in, you will be able to print from your remote session to your local printer using the “Virtual Printer” printer. By default, the local printer selected is the local default printer.
You have 2 ways to change the local printer mapped to the “Virtual Printer” printer based on your situation:
1.If you are using the full desktop, then you can select which local printer to be used by using the virtual printer icon in the systray:
2.If you don’t have access to the full desktop, you will need to use the “Virtual Printer Tool” named “VirtualPrinterTool.exe” located in “C:\Program Files (x86)\RDPlus\UserDesktop\files”. Note: you can either assign the application to the user, or make it run automatically on logon through the Virtual Printer advanced settings:
Configuration
To access to the RDPlus Virtual Printer control panel, please navigate through the AdminTool: ADD-ONS > Virtual Printer
From the HOME section, you will be able to:
Install the virtual printer
Update the virtual printer
Check the “Virtual Printer” printer properties
Remove the Virtual Printer
Set the Virtual Printer as the default printer
Check the Virtual Printer status and pending documents
From the SETTINGS > Advanced section, you will be able to set up advanced parameters such as: “Run the virtual printer tool at logon” which will make the Virtual Printer Tool available on the remote session at logon. This parameter is mainly used to avoid the extra steps of assigning the “Virtual Printer Tool” to every users who needs it, making it available for everyone directly.
From the LICENSE section, you will be able to:
Activate your license
To activate it, click on the Activate your license button, enter the Activation Key and select the program you wish to activate.
Two-factor authentication adds an extra layer of security and prevents access to your users’ session even if someone knows their password. A combination of two different factors is used to achieve a greater level of security:
1) something they know, a password. 2) something they have, a device – such as a smartphone – with an authentication app installed.
Each time a user sign in to its remote session it will need its password and a verification code available from its mobile phone. Once configured, the authenticator app will display a verification code to allow him or her to log in any time. It works even if its device is offline.
Two-factor authentication is available for RDPlus Web portal only. This authentication mode does not support login through Remote Desktop client. Since 2FA authentication only works with the Web portal with HTML5 and RemoteApp connections. RDP connections are denied for 2FA enabled users.
Activating the Two-factor Authentication Add-On (Activation Key)
The Two-Factor Authentication feature can be found on the Add-On tab of the AdminTool:
It is available as a 30-day trial for 10 users. To activate your license, open the license tile of the add-on, then click on Activate your License and enter your Activation Key.
Select the product you wish to activate and then you will be prompted with a pop-up confirming that your license has been activated!
Activating the Two-factor Authentication Add-On (Legacy)
The Two-Factor Authentication feature can be found on the Add-On tab of the AdminTool:
It is available as a 30-day trial for 10 users. To activate your license, copy the serial number you can find on this tile:
Then, connect to our online store and purchase a license.
You will get your license.lic file, then, click on the “Activate your license” tile:
Enable Two-factor Authentication
Perform the following steps to enable two-factor authentication for your RDPlus server or deployment. If your RDPlus deployment is configured to use multiple servers, perform this task on the RDPlus server exposed as the single point of entry for users or having the reverse proxy role.
1) Open the two-factor authentication administration application. The two-factor authentication status and the license status are displayed:
By default, 2FA is enabled for the RDPlus gateway and stand-alone application servers.
You can enable it for RDPlus application servers only, by entering the authentication server URL:
Or disable it:
Add Users and Groups
Once two-factor authentication is enabled, you can configure users for two-factor authentication.
1) From the two-factor authentication administration application, click on the Manage Users menu.
2) Then, click on Add to select users and/or groups of users. The Select Users or Groups box opens.
3) Add as many users and groups as required and then click OK. The users and groups are added to the list and enabled for two-factor authentication.
Remove Users and Groups
1) To disable two-factor authentication for a user or a group, from the two-factor authentication administration application, click on the Manage Users menu.
2) Select the user or the group and then click on Remove. A confirmation message is displayed.
3) Click Yes. The user or the group is removed from its list and won’t connect using two-factor authentication anymore.
Reset QR codes
In the event of the loss of the authenticating device for a user, or if the user needs to display the secret QR code again, you must reset the user authentication settings.
1) From the two-factor authentication administration application, click on the Reset Users menu.
2) Select one or multiple users and then click on Reset. A confirmation message is displayed.
3) Click Yes. The selected users will be presented a new QR code at the next login and will have to scan it in their device’s authentication app.
Enroll User for Two-factor Authentication
Once a user has been enabled for using two-factor authentication, an activation message will be displayed at his next successful logon from the RDPlus Web portal.
In order to complete the required steps, the user must install an authenticator app on a portable device, such as his smartphone.
Please use each app documentation for more details on how to proceed to add your RDPlus account.
Login using Two-factor Authentication
Once a user has configured his RDPlus account in his authenticator app, he or she will be able to connect using its password and the code provided by its authenticator app.
Settings
The Settings tab allows you to whitelist users, in order for them to connect using an RDP client, without the need to enter a two-authentication code.
Click on the “Add” button to add a user and remove a user by selecting it and clicking on the “Remove” button.
The Advanced tab allows you to configure Two-Factor Authentication in-depth settings.
Discrepancy
You can modify the Discrepancy value, which allows you to set the validation time of a verification code. A discrepancy of 3 means that the same verification code remains valid 90 seconds backward and forward its original 30 seconds validity period. Default is 480, which means 480 x 30 seconds= 4 hours.
Issuer
A string indicating the name of the two-factor authentication service. The issuer is displayed on the client mobile app and identifies the service associated with the generated verification code. By default, it is composed of the server’s name with RDPlus.
Validity After First Session
Period during which a user can open a session without having to revalidate a previous two-factor authentication code. This setting allows users to open applications from the Web application portal successively. Default is 480 minutes.
Validity Before First Session
Period during which a user can open a session after validating a two-factor authentication code from the Web portal, in secondes. Default is 3600 seconds.
Digits
The number of digits to display to the user. Please note that this setting may not be supported by authentication apps. This number must be greater than or equal to 4 and lower or equal to 12. Default is 6.
SMS Verification Code Message
Message sent to users requesting a verification code if they are configured to receive it via SMS. This message must contain the %CODE% placeholder which will be replaced by the actual verification code. Default is: Your %ISSUER% verification code is: %CODE%
You will require an active support and updates subscription in order to be able to apply the latest RDPlus updates.
You can purchase a support subscription from our Store page.
Please do not email us asking for the emergency code, we very rarely give these out, and only in emergencies.
This script will reboot distant access, so keep in mind that you shouldn’t be connected via RDP when performing this task.
First reduce the maximum of graphic effects and colors.
– Open a client generator, choose “Disable background and animation for better performances“.
– In the display tab, choose 15 bits colors.
If you are connecting using the HTML5 web client,
– open an admin tool \ web portal \ HTML5 client
– check the “Use recommended value” box
– refresh your client browser
– right click on “My computer” and click on properties.
– click on advanced system properties, performances, visual effects, and select “Adjust for best performances“.
This setting can be set on client and server side and will enhance graphic performance.
Make sure that your graphic adapter drivers are up to date.
Make sure that your RDP protocols and Windows are up to date.
You can also force the use of the Windows Classic Theme using group policy:
– type gpedit.msc in start search and hit Enter to open the Group PolicyEditor.
– navigate to User Configuration > Administrative Templates > Control Panel > Personalization
– in the right pane, double click on Force a specific visual style or force Windows Classic.
– enable the group policy and leave the field blank to enforce windows classic theme
– reboot
– open a command prompt and run the gpupdate /force command.
Open RDPlus and simply click on the pencil symbol in the home tile. The value currently in used is displayed, here by default it is the 3389 port that is used.
Enter the new port number in the corresponding window. Make sure that the port you entered is not currently used by another application to avoid any conflict, if a conflict occur RDPlus will not work. Here is a non-exhaustive list of TCP port that might be used by an application on your server.
A reboot of the server is mandatory for the changes to apply.
Open an Admin Tool and click on the Web tile.
Then click on the “Manage Web Servers” tile:
At the bottom of the window, you can see the Web Servers Options:
Change the HTTP and/or HTTPS port number with your chosen value. Click save. Make sure that the port you entered is not currently used by another application to avoid any conflict, if a conflict occur RDPlus web server will not work.Here is a non-exhaustive list of TCP port that might be used by an application on your server.
Click on “Save and Restart AdminTool” to apply your new settings.You can also click on “Restart Web servers”, if the modification was not taken into account.
Once you changed the web port, do not forget to add your modified port to the link of your web portal page, example with port 8080 replacing port 80 : http://www.yourwebpage.com:8080
To hide your server hard disks, please proceed as following :
open the AdminTool,
click on the “Sessions” tile and then click on “Settings”,
click on the “Hide Disk drives”.
You can now select the drives you want to be hidden!
This tool works globally meaning that even the administrator will not have a normal access to drives after the settings have been applied.
Hiding the drives does not disable the access to them. It prevents the user from seeing them.
The tool flags the disks drives as hidden, and it also adds the HIDDEN property to the entire root folders and users list in Document and Settings.
If you need to completely restrict access to the drives, you will need to install and use RDS-Knight, available here: RDS-Knight.
To protect the AdminTool with a PIN code, please :
open the AdminTool,
click on the “Advanced” tile,
click on Product and then select the “Administrator Pin Code” tile,
A new window will prompt you to enter a new Pin code!
In order to connect remotely to a RDPlus server, you will need to disable your windows firewall or set an inbound and outbound rule to accept RDPlus connections.
Disabling the Windows Firewall can be a good choice if you already have an external firewall on your ISP router, it can be disabled easily this way :
Click on the start menu, go to Control Panel, System and Security, Windows Firewall. Then click on “Turn Windows Firewall on or off”.
Then click on :”Turn off Windows Firewall”.
If you choose to create a Windows Firewall rule to accept inbound and outbound connection, this is how to do it : Make sure to turn on your firewall first. Click on the start menu, go to Control Panel, System and Security, Windows Firewall. Then click on “Advanced settings”.
Click on “Inbound Rules”, then click on “New Rule” :
Click on “Port”, then click “Next.
Click on “Specific local ports”, if you want to use connect to a RDPlus server using RDP you will need to fill in this field with 3389 and/or 80 and/or 443 for the use of secured TSWeb. Note that RDPlus and TSWeb use TCP protocol only. Then click next.
Make sure “Allow the connection” is selected, then click next.
Make sure all boxes are checked, then Click next.
Type in a name for this new firewall rule, RDPlus for example. Then click “Finish”.
Now that the inbound rule has been made, you will have to repeat this exact process for the outbound rule.
In order to connect remotely to a RDPlus server, you will need to disable your windows firewall or set an inbound and outbound rule to accept RDPlus connections.
Disabling the Windows Firewall can be a good choice if you already have an external firewall on your ISP router, it can be disabled easily this way : Click on Start Menu, Control Panel, Security Center. Then click on “Windows Firewall” at the bottom of the window.
Click on “Off”, then OK to exit.
If you choose to create a Windows Firewall rule to accept inbound and outbound connections, this is how to do it : Make sure to turn on your firewall first.
Click on Start Menu, Control Panel, Security Center. Then click on “Windows Firewall” at the bottom of the window.
Click on the Exceptions tab, then check the Remote Desktop box, this will enable inbound and outbound communication on TCP port 3389, which is the default TCP port used for RDPlus.
The following is useful if you plan on using RDPlus Web portal. Click on “Add Port”, type in the name field “RDPWeb” and enter value 80, select TCP and then OK to exit. Repeat the same operation for port 443 to enable secure TSWeb.
Upgrading RDPlus allows you to add more users or more features.
To upgrade, open the AdminTool, then:
click on the ‘License’ tab
click on ‘Upgrade Edition or Add users’
a new window will display the edition you currently have and your number of users.
in the new window a code is generated. Copy the code.
click on the ‘Check Upgrade price’ button,
a web-page will open allowing you to choose your upgrade plan.
For the right click on Start button, you can customize the list of the displayed features.
Open the folder C:\wsession\WinXshell
Edit with Notepad the file named WinXshell.lua
You will see the display menu list:
{“#{@twinui.dll,10911}”, winx .. [[Group3\10 – Programs and Features.lnk]]}, –Programs and Features
{“#{@twinui.dll,10913}”, winx .. [[Group3\08 – Power Options.lnk]]}, –Power Options
A message then appears to ask you to confirm the RDPlus files creation on C:
The installation path is mandatory :
%ProgramFiles%\RDPlus
We recommend you to accept our RDPlus default installation settings. According to our experience, most of the production issues are due to Windows security features.
The progress bar appears and allows you to follow the progress of process.
Once the installation terminated, a window informs you about it.
To use RDPlus, you must reboot your system.
The trial periods delivers a full product for 15 days and 5 concurrent users.
Please follow the step by step procedure to uninstall RDPlus:
1. Uninstall RDPlus
– check that no user is connected to the RDPlus instance,
– in Windows, open the ‘Settings‘ menu and open ‘Apps‘,
– search RDPlus and click on ‘Uninstall‘
– once the un-installation has completed, reboot the server.
2. Delete folders
– after rebooting the server, open your usual admin session,
– manually delete this folder if still present: “c:\program Files (x86)\rdplus”
3. You may now RE-install RDPlus!
You will be able to update RDPlus as long as your subscription to Support and Updates is active.
You can renew your subscription to Support and Updates at our on-line store here. You have to select the proper edition and number of users, according to your current license.
You can order 1,2 or 3 years of subscription.
Updates are available from the Home tab of the admin tool by clicking on the version button as shown below :
Make sure no users are logged in before installing this update, you can check for remote users by launching a task manager and clicking on the users tab.
Disabling your antivirus is also recommended.
Make a scan exclusion rule on C:\wsession and C:\Program Files (x86)\RDPlus\UserDesktop\files and make sure your users have sufficient rights to read and execute all programs in these folders.
Yes, RDPlus works fine on SBS 2012. The only detail you should be aware is the requirement to change the RDPlus web servers (HTTP/HTTPS) port numbers to avoid a conflict with IIS. You can use the AdminTool to change it to 8080 and 4430. Check this << FAQ >> for more detailed information on how to change RDPWeb TCP port.
A RDPlus license can be moved from one server to another for reasons of hardware change or other reasons.
We call this a rehost / rehosting / moving a license from one server to another.
The old activation file will no longer work on the new server because it is tied to the server hardware.
For this reason it is necessary to request a new activation file.
In order to migrate RDPlus from a server to another, you need to complete 2 steps:
1. Installation of RDPlus TRIAL on your new server:
Install a trial version of the software. It will provide the new RDPlus serial number.
Here is the link for the download of RDPlus: RDPlus.exe
2. Request the rehosting via email, and provide these 3 informations:
– new Serial Number of your RDPlus TRIAL installation
The S/N (serial number) is located in the Home tab of the AdminTool.
– purchase order of your original license
We need to identify the edition of RDPlus and the number of users you purchased.
– purchase order of your subscription to support
Rehosting a license is one of the features of the Support and Update Services.
The Support and Update services also include our worldwide Phone/Email support service, FAQ, tutorial support and the right to install and to use any new release, patch and updates.
RDPlus offers 2 editions, depending on your needs :
Printer
Enterprise
We listed the features and differences of the different Editions at this comparison chart, please check it out!
Load Balancing is only available with the Enterprise edition!
1. Locate the RDPlus Administrator Tool on your desktop : AdminTool,
2. Open the AdminTool and go into the License tile,
3. You should see the Serial Number.
The bandwidth used will vary depending on:
– the graphical content,
– colors
– peripheral redirection
– streaming content and uploading / downloading files and printing.
You will be able to pin down which application is using the most bandwidth by using Microsoft resource monitor.
In short, a remote session will use between 20kbps to 100kbps.
To solve your performance issue, you can either ask your virtual machine host to add an extra network adapter card for your server (if that option is available) or do the following to tweak your server for better performances :
Disable background & animation for better performance in the general tab of the client generator.
Choose 15 bits color display in the display tab of the client generator.
Make sure your application does not display animated items such as .gif or videos. These are known to enhance greatly the bandwidth used.
Prevent device redirection and sound, only local disks are needed to be redirected if you need to print using the Universal Printer.
Disable peek on windows 10/2016 by editing system properties / advanced / performance
We don’t recommend streaming music and video within a RDPlus session because the RDP protocol is not optimized in this regard.
However, you can use the ‘Open on Client’ feature to download the video first, and read it locally.
In the Remote Desktop Connection client (MSTSC.exe), in the options then in the ‘Local Ressources‘ tab, you can choose the behavior for the Windows key combinations.
In RDPlus, the Window Keys are by default enabled on the server – only when Full Screen.
We ended generating “.exe” connection clients because the generated “.exe” clients were not signed and as such, detected by anti-viruses as false/positive threats.
Instead we now create “.connect” – flat – files.
Anti-virus programs are happy with it and they don’t create issues anymore!
If the application you wish to use with RDPlus is already compatible with the use of Microsoft Terminal Server, then, most likely it will work also with RDPlus.
You can benefit from dual screens if your two screens are connected to the same graphical adapter, other configurations are not supported.
By checking the dual screen box in the display tab of the client generator, you can move your remote session to both screens.
By checking the span box, you can extend your remote session to both screens.
Please make sure you are using the latest release of RDPlus for this purpose!
RDPlus uses Let’s Encrypt to generate SSL certificates.
The renewal of the certificates is automatic and even if you receive reminders, you won’t have to do anything.
However if the renewal happens not working, please contact our Support Team.
In RDP environment, doing a ‘Ctrl + Alt + End’ will make this menu appear and allow users to change their password:
However in an Html 5 environment, RDPlus cannot natively allow AD users change their password.
Therefore we have developed a small tool that allows to perform the task: RDPassChg3This tool can be published as an app with RDPlus for your users to easily have access to it! Please download the attachement containing the tool and provide it to your users.
Open AppControl.ini with a Notepad and edit it: change the order of the applications from [App6].
The applications assigned in the Floating panel will then have the desired display order.
RDPlus can handle up to 50-60 users on a single standard server. Some of our clients, using over the top servers, can handle around 100 users at once.
This really depends on the server’s hardware and what applications you published for your users.
However, for over 50 concurrent sessions, we recommend to use a farm of servers.
Each server (physical or virtual ones) handling up to 50 concurrent users.
The type of hardware you need will mostly depend on what kind of resources the applications you wish to publish .
You might consider getting a server with SSD drives if you plan on using an application that accesses a database on your RDPlus server as it will greatly enhance the performances.
You can publish a mapped drive either with a shortcut of the mapped drive that you copy in the desktop folder of the user profile.
Doing so, the shortcut will be present on the desktop of the remote user and in the Remote Taskbar if you plan on using it.
If your goal is to publish the content of a folder with an exclusive access to each users then follow this procedure : map a folder
Add in the generated script type in the path of your application subst Y: C:\Users\%USERNAME%\your folder
This way your user will have access to this drive letter Y:, which will be pointing to his exclusive profile folder.
If you would prefer to redirect your user’s local “My documents” folder or any other specific folder then type in :
subst Y: \\rdpclient\c\Users\%USERNAME%\Documents
The final step is to publish an application that will secure the Y: of each users, preventing them from accessing the whole server.
1. Check the time frame value for ending a disconnected session:
– open the AdminTool > Sessions > Session Management settings
– check the ‘Terminate any disconnected session after’ field. The default value is 60000 = 10 minutes.
You can change this to your convenience.
2. Edit the settings.js file:
– open a file browser,
– go to ‘rdplus\Clients\www\software\html5’,
– open ‘settings.js’ with Notepad or any other text editor,
– search the ‘W.send_logoff’ variable and change ‘True’ to ‘False‘ : W.send_logoff = false;
If true, by event of browser closing (if notified by browser), the session disconnects and logoff command gets sent to session
– then reboot the RDPlus web server from the AdminTool > Home:
POS and receipt printers manufacturers provide procedures to install their devices in RDS environments which are specific in terms of communication speed / print format (…) Moreover, port COM are usually preferred to USB as it supports a wider range of hardware.
To redirect port COM you will need the procedure issued from your device manufacturer to deploy on a RDS / terminal server environment – which is very similar to RDPlus. An RDS environment is where you install the RDS role and use redirection port COM device. For example, you may need to change the communication speed between server on client for COM mapping depending on the settings of your POS application.
Here is the solution to publish a unique folder to a user or a group.
Publishing a shared folder as a unique application :
Open an Admin Tool. Click on the Management of published application tab. In the display name type in the name of the shared folder or any name you want. Click on the browse button located on the right side of the “Path/Filename” field and locate C:\Windows\explorer.exe. The start directory will be filled in automatically with the path of explorer.exe. In the Command line option field, type in the path of the shared folder, it can be a local folder or a network shared folder using a UNC path (example : \\data\shared folder)
Fill in the field below with your shared folder information:
Then, click on “Add new application”
Click on the “Assign application” tab. Check the RDPlus Remote Taskbar and Shared Folder boxes:
Here is the result, when you open a session with an rdp client, you will see the RDPlus taskbar with the shared folder application:
You can also do this with the floating panel. Open an admin tool and click on the “Assign application” tab. Check the RDPlus Remote Taskbar and Shared Folder boxes
Here is the result:
Here is another way you can share a folder:Secured Folder Sharing – Folder. ExeThe Folder application will securely display the content of a folder that you will make available for your users. First, create a folder on your server with Applications or documents that you want to share. Open an explorer.exe and locate the folder.exe application in C:\Program Files\rdplus\UserDesktop\files:
Create a shortcut of this file. Edit the properties of this shortcut by right clicking on it. Then modify the target path of the shortcut by entering the path of your applications folder on the “Target” line, after the original target path, for example:”C:\Program Files\rdplus\UserDesktop\files\folder.exe” “C:\Shared Folder”
When you open the folder.exe shortcut, it should look like this (with your own documents and applications):
This shortcut can be copied to a user’s profile desktop folder or you can publish the folder.exe for a user as an application.If you do the latest, you will have to indicate the path of your folder in the Command Line option section:
We provide phone call support.
You can reach us on (07) 3209 4477
If the application you wish to use with RDPlus is already compatible with the use of Microsoft Terminal Server, than most likely it will work with RDPlus.
The best way to know is to install a trial version of RDPlus on the computer that has the application you wish to publish. Double click on the Portable Client Generator and type in the local IP address of your new RDPlus server, with the name of your client then click on “Create Client”
The generated client will be created on your desktop. copy it on a usb key and find a computer nearby located on same private network.
Plug in the usb key and double click on the client. Connect using your usual Windows account/password.
Note that you can use any local or domain Windows account to log in.
This is an example of what your remote desktop can look like :
Now simply click on your remote application to see if it works ! 🙂
RDPlus is an alternative to Microsoft RDS.
If you are using Microsoft RDS, you must purchase and install RDS CALs. However you are not obliged to use Windows technologies for such functions.
If you choose to use RDPlus as your remote access solution you will not require Microsoft RDS or TS CALS, only RDPlus CALs/Licenses.
Essentially if you are not using Microsoft RDS, you do not need to purchase RDS CALs.
What you are accessing is the services/sessions created by the application (RDPlus). Anyone is allowed to use VNC, Apache web server, LogMeIn, Teamviewer to directly or indirectly access a Windows system and to interact with the graphical user interface without purchasing TS CALS.
Browsers developer mode allows unrestricted changing of any setting that is served inside */html5/settings.js therefore restrictions on settings.js won’t give you full protection against malicious attacker. For this reason to get deeper level of protection some specific settings in settings.js have alternative on server side that can’t be affected from browser side. As example restricting of file access, clipboard access, file extensions etc.
The wished server side settings are located inside *\Clients\webserver\settings.bin
1. open with Notepad *\Clients\webserver\settings.bin and add one or few of following settings in bold font.
map_clip_board=false
>this setting will disable clipboard access for HTML5 clients
disable_file_access=true
>this setting will completely disable file access for HTML5 clients
no_file_listing=true
>instead complete disabling of file access this settings will stop files to be listed inside \\tsclient\WebFile but still enable file transfer
disable_shared_folder=true
>this will disable ability to access shared folder by HTML5 clients
allow_remote_app=false
>this setting will completely disable RemoteApp style calls of remote programs, however since HTML5 6.34 this setting is permanently disabled and must be enabled by allow_remote_app=true in order to be reused again.
disable_cgi=true
>this setting will completely disable CGI scripts execution for internal webserver but will have bad impact on functionality
disable_channel_eval=true
>this setting will completely disable JavaScript command execution sent from RDP session to browser, disabling it will have bad impact on functionality
upload_allow_extensions=”|*.pdf|*.txt|”
max_upload_size=”10mb”
>these setting set limits for files on server side, so that checks will be still effective even if attacker adapts settings on browser side
disable_xhr=true
disable_non_native_clients=true
>these settings will disable all clients running in compatibility mode, also not Websockets based, like XHR or Flashsocket
2. save the file and restart HTML5 client to take changes effect.
“.connect” connection clients now replace the previous”.exe” connection clients.
We ended generating the “.exe” connection clients because the generated “.exe” clients were not signed and as such, detected by anti-viruses as false/positive threats.
Instead we now create “.connect” -flat- files.
Anti-virus programs are happy with them and they don’t create issues anymore.
then enable ‘Require use of specific security layer for remote (RDP) connections’ and select ‘RDP’ as Security Layer.
then disable ‘Require user authentication for remote connections by using Network Level Authentication policy’.
finally, reboot the terminal server or use this command : gpupdate /force
If it doesn’t fix your issue:
update Windows to its most up-to-date version with all latest KB updates installed,
update RDPlus to its most up-to-date version,
run ‘MSTSC.exe’, open the options, then go to the Experience tab and UN-select ‘Reconnect if the connection is dropped’.
If one of your customer is still facing Internal Error message, then you might want to check if he has a lot of invalid logon attempts.We have seen several servers receiving a lot of logon attempts from hackers (several dozen per minutes), and this spams Windows Remote Desktop Service, thus causing the Internal Error message when trying to connect.
Change this GPO on the Windows server: gpedit.msc > Computer Configuration > System > Credential Delegation > Encryption Oracle Remediation > Only Updated Clients > Force Updated Clients
WARNING: with this GPO you will NOT be able to connect if your workstation computer Windows has not been updated, but you will be able to connect using HTML5 client anyway. The GPO is the official setting by Microsoft to prevent their vulnerability.
Cause:
The issue when you get ‘error HTML5 Internet Access’ happens when the cache of your web-browser still contains old data from your previous session and version.
Solution:
To solve this issue, please clear your browser cache by doing a “CRTL + F5“.
Cause:
SVCE.exe is a service only activated by the Enterprise Edition license. Its purpose is to handle Load Balancing and user assignation to servers. If it cannot run it means that it hasn’t started.
Solution:
– reboot the server if you hadn’t restarted it and try again.
– then please restart the following executable: ‘Entreprise Service’ from the service manager.
It is located in C:\Program Files (x86)\rdplus\UserDesktop\files\
The UmRdpService service (Remote Desktop User Mode Port Redirector) is a Windows Service dependent of SVCM (Application Publishing Service) when RDPLUS is installed.
– check if this service is actually started.
– if not, start it manually and then ask for SVCM to restart. It should indicate that UmRdpService and TermService have started – both services dependent on SVCM
This happens when Java OpenJDK JRE fails to install by itself.
To solve the issue you need to install Java manually:
Add the following line : sessionsmanager-showconsentprompt=no to the [Security] section of the appcontrol.ini file located in C:\Program Files (x86)\RDPlus\UserDesktop\files.
This error can happen for various reasons, the main one being a GPO that has been modified.
Try each of these following solutions:
– update RDPlus to the latest version and try again!
RDPlus is often updated and each update solves issues.
– apply all Windows patches – open the AdminTool then go to the Home tab> click on System Audit and make sure all are green checks
– then enable ‘Require use of specific security layer for remote (RDP) connections’ and select ‘RDP’ as Security Layer.
– then disable ‘Require user authentication for remote connections by using Network Level Authentication policy’.
– reboot the terminal server or use this command : gpupdate /force
Then try again.
– check RDS-Knight for blocked IPs – make sure that the RDS-Knight service is running
– check the RDPlus web server: ports must be 80/443
– check if IIS is installed and conflicting with RDPlus web server ports – delete the ports from IIS (not an issue they were already deleted)
– restart the RDPlus web server
Then try again.
This message indicates that a network problems occurred, please check the following :
1- Check out the IP address of the server you are trying to access. The IP address (private or public) set on your client must match the IP address of your server. It is advisable to have a fixed IP address set on the server to avoid the automatic change of the address that can occur when using DHCP. If you are trying to connect from a remote location using the public IP address, make sure that you have subscribed a fixed public address otherwise changes can occur, contact your Internet service provider for more information on this feature. It is also possible to use DynDns services to avoid this trouble.
2- Check your firewall settings. By default, inbound and outbound connections on TCP port 3389 must be enabled. Firewall can be located in various places such as your Internet connection router, or also your windows firewall, or firewall/antivirus software.
3- If you are trying to connect from a remote location, a redirection (or port forwarding) rule must be activated on your router.
4- Antivirus software can sometime block RDPlus. To avoid this, place an exclusion rule on the following folder :
– C:\Program Files (x86)\RDPlus
– C:\wsession
5 – With the AdminTool, verify the status of your RDPlus license.It is important to know if your issue is related to a RDPlus license or to a Windows system problem. If your current RDPlus license is invalid you will need to install the latest RDPlus update and activate a new valid one.
Open a windows explorer and locate the license.lic file in the following path C:\Program Files (x86)\RDPlus\UserDesktop\files and apply your license again.
Then reboot the server,
6 – In case of incompatible Updates that has been installed on your system, the solution is to download and run the latest update on your server : https://rdplus.com.au/download/ For old releases (5.xx and below) the RDPlus technology cannot match with the latest versions of Windows, so you will also need to update.
This error message indicate that you are trying to connect from an Windows XP computer to a Windows Vista/Seven or 2008 RDPlus server.
It happens because Windows XP uses RDP 5 protocol while Windows Vista/Seven/2008 uses RDP 6.
Solution : run Windows Update on the Windows client computer, it should be enough to solve the problem.
If you cannot update your Windows XP client computer, it is also possible to manually correct this issue by following this procedure :
Open a registry editor (regedit) on the client computer and find this location:
Within the “parameters” key, locate all Certificate and X509 Certificate and delete them.
Reboot your computer.
The certificate keys are rebuilt once XP is restarted and now compatible with Vista/Seven and 2008.
svcr.exe must be present in:
c:\wsession
c:\programdata
c:\program files (x86)\rdplus\userdesktop
c:\program files (x86)\rdplus\userdesktop\files
You can copy a svcr.exe from one of these locations to the location where svcr.exe is missing.
Connecting from anywhere using a connection client to a RDPlus server is a very useful feature, but what about printing ? We will study all different printing options present in the Portable Remote Client Generator.
1- Standard RDP redirection
Using standard redirection can be tricky, because many prerequisite must be met in order for it to work.
You need to install the exact same version of device drivers on client side and server side. This means if your server is installed with 2012 x64 but your client computers are installed with Windows XP x32, you will need to add manually these drivers on your server by editing the print server properties and add x32 drivers for XP.
For best results, it is also recommended not to use USB printers but prefer COM or LPT printers. If you are using USB printers, make sure you updated the RDP protocol of your client computer to 7 or above to ensure maximum compatibility with redirected printers.
Even with all this in mind exotic printers may not be suitable to be redirected in a RDPlus session, therefore you may need to look into specific procedure to install these printers in RDS / terminal server environment, which is very close to RDPlus in this case.
2- Universal Printer – Preview with the local PDF Reader
Printers are not always compatible with standard RDP redirection, and installing drivers on both client and server side can be difficult, especially if you are running a Windows XP client and connecting to a 2008 RDPlus server…
By default, all generated connection client are set to be made with automatic preview on your local PDF Reader. What does it mean ? It means that when you print from a remote location using a connection client, if you choose to print on the Universal Printer that is installed with RDPlus on server side, a preview of your print job will appear in a PDF format, enabling you to print/save/send by email locally. Of course this will work with any applications, and since the job is compressed to a PDF file it also print faster.
3- Universal Printer – Print on default printer – local driver included
This option will be best for users who print a lot, and want to save as many click as they can to work faster. When the user prints on the universal printer, the print job will automatically be redirected to his local default printer. Make sure to make the universal printer your default printer on RDPlus server side, it will save you some extra time.
4- Universal Printer – Select the local printer – local driver included
I you check this box and print on the Universal Printer the print job will be transfered locally on the client computer just like above and a pop up will appear asking you on which local printer you want to print.
When using only redirected printers on a RDPlus server, sometimes ghost printers can appear in the printer folders each time a user logs off. This can result in an overall downgrade of the server performance.
To avoid this, let’s set a group policy. Click start, execute, and type in gpedit.msc : Open Computer configuration, and locate Administrative Templates/Printers/Prune printers that are not automatically republished.
Click Enabled, and select “Whenever printer is not found”
Doing so each time a user will log off, there will be an automatic deleting of unused redirected printers. My advice is also to manually delete all ghost printers as well and reboot the server especially if you experience a lack of performance.
– Make sure the disk are correctly redirected in the remote session.
This can be checked in the local ressources tab of the client generator.
– Make sure your antivirus is not preventing the transfer of the print job.
On server side, you may need to set an exclusion rule in your antivirus on the following path : C:\Program Files (86)\RDPlus and C:\wsession
On client side the exclusion is to be set the following path : C:\Users\Nameoftheuser\RDP6
– Check the presence of two universal printer driver.
Open a control panel / Devices and Printers click on the universal printer and click on “Print server properties” and click on the drivers tab.
There should be either the CustPDF driver (old driver from version 9 and below) or the Ghostscript PDF (newest driver) driver.
If both are present, delete one of them.
If this is not enough, you can now reinstall the Universal Printer completely in the AdminTool
In the AdminTool, go to Printer and click on Remove the Universal Printer, Then click on Install Universal Printer (Ghostscript).
If you are using an older version of RDPlus (not recommended!), go to add / remove program in the control panel and look for universal printer, click uninstall and reboot.
You can also force the uninstall by clicking on the removeuniversalprinter.exe located in C:\Program Files (x86)\RDPlus\UserDesktop\files
You will be able to reinstall the Universal printer after rebooting by clicking on installuniversalprinter.exe
Printer redirection is not supported in Html 5, because of technical limitations that cannot be overcome.
That is why you can only use the Universal Printer when using Html5!
Sometimes when printing using universal printer the client won’t print. A working pdf reader must be installed to solve this issue. If a pdf reader like Adobe is already installed, then you might need to reinstall it.
Open a control panel, click add/remove programs, then select Adobe acrobat and click repair.
Part A:
In RDP protocol there are 3 basic security modes: 1=RDP only, 2=SSL, 3=SSL+NLA.
To activate RDP NLA (3=SSL+NLA) authentication do following
1. Open “System Properties“.
2. Check checkbox with “Network Level Authentication” (NLA) as on picture below in red box.
PS: if you run HTML5 client after enforcing that setting then first logon will fail despite of correct logon, so the HTML5 server gets enforced to change to NLA mode, but following logon tries should be accepted if logon and password were correctly. Alternatively you may restart HTML5 server to accept first logon try too.
Remember, that setting will enforce NLA authentication and exclude such RDP clients that do not support it. The NLA mode automatically enforces SSL mode since NLA can not work together with RDP security mode, so that is the highest security mode 3=SSL+NLA.
Part B:
The much better alternative opposite enforcing NLA mode is to enforce client compatibility mode, where the client decides which mode is the most preferable for connection. So this will allow most securest mode while being at same time most compatible with any client. To prefer client compatiblity mode instead NLA do following.
0. undo any changes regarding enforced NLA mode, also uncheck this option else following steps will have no effect.
1. execute as Administrator gpedit.msc
2. go to: Administrative Templates Windows > Components > Remote Desktop Services > Remote Desktop Session Host > Security > Require use of specific security layer for remote (RDP) connections > Enabled > Security Layer
3. Choose “Negotiate” and press “Apply“
With the Admin Tool you can prevent the opening of multiple sessions with the same user by using the “Allow only one session per user” feature.
Click on the sessions tile.
Click on the Session Management settings tile.
Two settings are available :
Select “Only one session per : The second session will capture the first one will allow you to recapture a user session from anywhere by using the same username / password.
Select “Only one session per user: The second session will be logoff” if you wish to prevent any user from connecting multiple times using the same username / password.
However for some reasons you might want to be able to remotely log off the connected user if someone tries to open a new session with the same account. This is possible by using Group Policy. Click on the start menu, and execute “gpedit.msc”, or click on the Group Policies in the Admin Tool under “server administration tab” as shown above.
Warning : Group Policy are not available on Home/Family/Basic version of Windows.
Then locate and enable the following GPO :
Computer Configuration\Administrative Templates\Windows Components\Remote Desktop Services\Remote Desktop Session Host\Connections\Restrict Remote Desktop Services users to a single Remote Desktop services session.
Sometime you might face disconnection of idle session. This can occur because of power energy settings of the client computer. In the control panel make sure your client hard drive does not go to sleep mode.
Deactivating the power management of the network card on the server and client can also be useful :
It is possible to set the server to keep alive all remote session using local strategy.
click start, type in “gpedit.msc”
Locate the following local group policy :
Local Computer Policy\Computer Configuration\Administrative Templates\Windows Components\Remote Desktop Services\Remote Desktop Session Host\Session Time Limit
Here you will find 4 strategies that you may find useful.
1- Set time for disconnected sessions : this strategy is used for logging off a disconnected session after a certain time. this can also be set in the Admin tool. 2- Set time limit for active but idle Remote Desktop Services session : this stategy is used to force a disconnection of active but idle session, this can be useful for freeing a session for another active user. 3- Set time limit for active Remote Desktop Services session : This strategy is used to force a disconnection of active session, for example a user can remotely connect for a limited duration of 30mn then will be disconnected. This strategy is rarely used. 4- Terminate session when time limits are reached : this strategy is useful for logging off disconnected session and can be used with a mix of the above strategies.
Tested on Windows 10 Professional and Windows 2008 R2, so this approach should work on Windows 2012 R2 etc. too. Actually these steps must be done manually.
A: If you have own signed SSL certificate then continue with part B:, this part describes usage of free “Let’s Encrypt” certificate generated by RDPlus SSL tool. 1. start AdminTool GUI > Security > SSL Certificate Toolkit 2. File > Open Keystore File > ***RDPlus_installation_folder***\Clients\webserver\cert.jks (default password: secret) 3. Right click on Private Key(jwts) > Export > Private Key and Certificates > PKCS#12 > OK (default password: secret, after next password fields should be empty) 4. save your *.p12 certificate file somewhere on Desktop for fast access. 5. continue with part B:
2. Console Root > Certificates (Local Computer) > Personal >> Right click > All Tasks > Import > Next > Browse > > (choose extension “Personal Information Exchange“) *.p12YOUR CERTIFICATE FILE > Next > (your pass, empty or you should remember it) >> (Allow “Mark this key as exportable” and “Include All Extended Properties“) > Next > (Automatically select the certificate based on the type of certificate) Next > Finish (press F5 to refresh if key did not yet appear under Personal\Certificates) 3. Double click on freshly imported private key/certificate for your domain (usually it has the name of your signed domain under “Issued to“)
4. Click on Details >> scroll down > Thumbprint > as example: ab 42 96 33 fb 19 28 65 30 a7 e1 63 2d 3f d2 96 70 1c 50 67> NOTICE IT SOMEWHERE
5. create with Notepad file “myreg.reg” and save there following text according to “Thumbprint” example above (remember the SSLCertificateSHA1Hash”=hex:ab,42,96,33***” is example, replace it by own values!!! Same in attached example_myreg.reg) REGEDIT4
6. now execute that “myreg.reg” file and add so this information to registry, if you don’t do this step then next step 8. will fail with error!!!
7. start cmd.exe with Administrator rights!
8. execute: wmic /namespace:\\root\CIMV2\TerminalServices PATH Win32_TSGeneralSetting Set SSLCertificateSHA1Hash=”ab429633fb19286530a7e1632d3fd296701c5067“
(now after execution it should report > Property(s) update successful > but if you missed some char or not added information from step 5. to registry then this step will fail with error) (remember the SSLCertificateSHA1Hash=”ab429633***” is example, replace it by own values!!!)
Congratulation, now whenever you call mstsc.exe > your_domain.com then the new signed certificate will be served to client by RDP server and so avoid annoying security message!
As one of the many security measures, to be able to hide and/or restrict access the local drives from your users can be an important matter. There are two ways of achieving this.
1- Hiding drives with the admin tool :
Open an Admin Tool, and click on the “Sessions” tile. Then click on “Hide Disk Drives” :
On the example below, I clicked “select all”, which will check all the box corresponding to drives that will be hidden to everybody. A reboot might be necessary for changes to apply.
Yes, the hard drive will be hidden for everybody, this can be troublesome for administrators that have to work on the server for maintenance, update and so on. To be able to see the drive from a remote session, open an explorer, as you can see below no drives are visible. Position your mouse on the target field.
Type in the location of desired folder :
2- Hiding/Restricting access to selected drives to non administrator users :
The second option will allow you to be able to hide the drives and/or restrict access to drives to non administrators users.
Once you have opened the Group Policy editor, locate and open the following GPO :
User Configuration\Administrative Templates\Windows Components\Windows Explorer\Hide these specified drives in My Computer
By enabling this GPO, you will be able to select which drive will be hidden to your users. Hiding drives will still make them available for applications to be used. They also will still be accessible by opening a Windows Explorer and typing the address of desired folder.
If hiding drives is not enough you can also choose to prevent access to selected drives. Be aware that enabling the GPO below can lead to applications not to work properly because of access restrictions that might lead to this kind of error :
Locate and open the following GPO :
User Configuration\Administrative Templates\Windows Components\Windows Explorer\Prevent access to drives from My Computer
By enabling this GPO, you prevent your users from accessing the selected drives in any way possible. Applications may not work anymore so I recommend to test this one first to if it fulfill your needs.
GPO once applied should be operative immediately, if not you can force them by opening a ms dos box with the command : gpudate /force To do so click start, execute and type in “cmd.exe”
There are some simple rules to follow if you to prevent your users to browse the file system of your RDPlus server :
1- Make sure you do not give your users administrators rights. Doing so is one of the basics to help you prevent your users from accessing sensible data. 2- Open an AdminTool and click on the “Applications” tile.
Click on the “Assign Application” tab:
Select a user from the list on the left and check the “RDPlus Remote Taskbar” application.On the example below the next time the demo user will open a session he will see only the RDPlus Remote Taskbar as well as other applications assigned to him, but no Remote Desktop:
Here is the result : Only a taskbar and the assigned application (in this case, a shared folder) is visible for the user “John”.
The best way to map a shared resource as a logon script is to do the following on your RDPlus server:
Open a windows explorer, and click on “Folder and search options”.
Click on the view tab, then uncheck the “Hide extensions for known types” box and click OK.
Right click on your desktop, select “new text document”,
and rename your file “logon.bat”.
Right click on the file and click “modify”. In this example, we use the net use command line to map a shared resource located on a server called DATASERVER, the shared ressource is called “Sharedfolder”… You can also use the command “subst” to create a virtual drive from a local directory.
Click on the start menu, type in gpedit.msc, we are going to use local policy so that every users connecting to this server launches the script.
Locate the following group policy : User Configuration/Windows settings/Scripts (logon/logoff) and double click on “Logon script”, then click “Add”
Copy your logon.bat file and paste in the following location : C:\Windows\System32\GroupPolicy\User\Scripts\Logon This can be done in the browse window :
We are done ! Now how do we make this Y drive appear in the user session ? There many ways to achieve this.
You can create a new application within the admin tool and assign it to your users, doing so the shortcut will appear in the session.
If you want to create your own shortcut, simply create a shortcut of explorer.exe, edit it and type Y: at the end of the “Target” field. Then copy the shortcut in the desktop folder of your users. Default location for desktop folder is C:\Users\Name_the_user\Desktop for Windows Seven, Vista and 2008 servers, and C:\Documents and Settings\Name_of_the_user\Desktop for Windows XP and 2003 servers.
RDPlus prevents brute-force attacks by locking accounts after repeated failed attempts to login through the Portal. By default, the lockout feature uses the following parameters:
Parameter
Description
Default value
LockoutActivated
Defines if the Lockout feature is activated. The Lockout feature can be disabled by setting this parameter to false. Possible values are: true, false.
true
LockoutInterval
Specifies the allowable interval of time between failed login attempts. In seconds.
600
LockoutLimit
Defines the number of allowed failed attempts before the account is locked out.
10
LockoutPeriod
Specifies the amount of time an account is locked out and unable to login. In seconds.
1800
These parameters can be overridden by editing the configuration file hb.exe.config located in <RDPlus setup directory>\Clients\www\cgi-bin directory. In the appSettings node of the document, the parameter key may be set to a different value. The change are effective once the hb.exe.config file is saved.
For example, below is illustrated the configuration for disabling the lockout feature:
Note: The period of time a user is locked out is the greatest value between LockoutPeriod and LockoutInterval settings. Therefore, when changing LockoutPeriod’s value, one should update the LockoutInterval setting with a smaller value to ensure a relevant behavior.
Click on the start menu, execute, gpedit.msc
Locate and activate the following local GPO on your RDPlus server : User Configuration/Windows Components/Windows Explorer/Remove Security Tab
1- Introduction :
Windows Seven allows you to easily deploy group policies to a single user or to non administrator groups. We do not advise to apply a GPO to the administrator user or administrator group as it can lead to unpredictable behaviors. Therefore we decline all responsibilities and support in this matter.
2- Procedure :
Open an MMC console by clicking start, execute, mmc.exe
3- Add a snap-in :
Click on file, then select “Add/Remove Snap-in”
4- Select Group Policy Object Editor :
Click on “Group Policy Object Editor, and then click on the “Add >” button.
5- Select the user or group to which the GPO will apply :
Click Browse.
6- Select the target :
Choose the users or the non administrator group.
7- Define the local strategies to be applied :
Your administrative template is ready for configuration.
8- Save your administrative template :
Click on File / Save.
If you wish to customize the remote control of a session, click start, gpedit.msc
Locate the following GPO : Computer Configuration/Administrative template/Windows Component/Remote Desktop Services/Remote Desktop Session Host/Connections/Set rules for remote control of Remote Desktop Services user sessions
Enable it and choose one of the following options to match your preferences :
We recommend choosing Windows Server 2019. It’s FAST and SECURE.
It is the best Windows version available for now.
Windows 7 / 2008 are field proven, reliable and predictable versions of Windows.
You can also choose Windows 2012 R2 without any problem either.
However these operating system will not be supported by Microsoft in the future.
Windows 10 PRO and Windows 2016 are also supported by RDPlus even if they are still not stable enough.
Usually, our customers prefer to use virtual environment and/or Cloud hosting solutions to deploy their RDPlus environments.
Sometimes when printing using Universal Printer the client won’t print.
A working pdf reader must be installed to solve this issue.
If a pdf reader like Adobe is already installed, then you might need to reinstall it.
Open a control panel, click add/remove programs, then select Adobe acrobat and click repair.
Make sure the disk are correctly redirected in the remote session. This can be checked in the local ressources tab of the client generator. You can also edit your connection client’s settings with this procedure to check the presence of the “-disk on”parameter : https://rdplus.com.au/documents/edit-or-delete-the-parameters-of-a-generated-client/
Make sure your antivirus is not preventing the transfer of the print job. On server side, you may need to set an exclusion rule in your antivirus on the following path : C:\Program Files (86)\RDPlus and C:\wsessionOn client side the exclusion is to be set the following path : C:\Users\Nameoftheuser\RDP6
Check the presence of two universal printer driver. Open a control panel / Devices and Printers click on the universal printer and click on “Print server properties” and click on the drivers tab. There should be either the CustPDF driver (old driver from version 9 and below) or the Ghostscript PDF (newest driver) driver. If both are present, delete one of them.
If this is not enough, you can now reinstall the Universal Printer completely in the AdminTool > Printer > Remove the Universal Printer > Install Universal Printer (Ghostscript).
If you are using an older version of RDPlus, go to add / remove program in the control panel and look for universal printer, click uninstall and reboot. You can also force the uninstall by clicking on the removeuniversalprinter.exe located in C:\Program Files (x86)\RDPlus\UserDesktop\files You will be able to reinstall the Universal printer after rebooting by clicking on installuniversalprinter.exe
In the AdminTool, click on the Server tile and click on “Group Policies (GPO)”
You can set up a timeout for disconnected sessions which will cause a disconnected user session to automatically logoff after a while.
If you want your disconnected sessions to terminate quickly, type in 0.5 for 30 sec. Enter 0 if you want your remote sessions to never end.
If your server is the member of a domain, this strategy may need to be set directly on the domain controller.
– open your domain strategy object editor (gpmc.msc) and locate the following strategy :
You can also make sure your domain controller do not prevent local strategies to be executed.
– this strategy needs to be disabled and is located in :
Computer configuration / Policies / Administrative Template / System / Group Policy / Turn off Local Group Policy objects processing.
Either solution should work, choose the one that fits your preference.
If you are experiencing this issue with the HTML5 web client: – edit the settings.js file with notepad located in C:\Program Files (x86)\RDPlus\Clients\www\software\html5
– and modify the W.send_logoff = true parameter to false.
Please note that if your RDPlus server has joined a Domain, then RDPlus disconnected sessions rules don’t apply.
We recommed reducing the maximum of graphic effects and colors.
1- Open a client generator, choose “Disable background and animation for better performances”.
2- In the display tab, choose 15 bits colors.
If you are connecting using the HTML5 web client, open an admin tool \ web portal \ HTML5 client and check the “Use recommended value” box. Refresh your client browser.
Right click on “My computer” and click on properties. click on advanced system properties, performances, visual effects, and select “Adjust for best performances”. This setting can be set on client and server side and will enhance graphic performance.
You can also make sure that your graphic adapter drivers are up to date as well as your RDP protocols and windows updates.
You can also force the use of the classic theme using group policy :
– To do so, type gpedit.msc in start search and hit Enter to open the Group PolicyEditor.
– Navigate to User Configuration > Administrative Templates > Control Panel > Personalization.
– Now in the right pane, double click on Force a specific visual style or force Windows Classic.
– Enable the group policy and leave the field blank to enforce windows classic theme.
– Reboot and open a command prompt and run the gpupdate /force command.
When connecting to a RDPlus server, if file copy between server and workstation is very slow, then change your TCP Auto-Tuning level.
To do so:
– open a command prompt as an administrator,
– then run the following command: netsh interface tcp set global autotuninglevel=highlyrestricted
This command should help improving file copy performance when connecting to legacy OS versions such as Windows Server 2003.
If you are using an old release of RDPlus then you will need to update and reboot.
If it exist please delete the c:\programdata\logon.exe
Updating your operating system is mandatory too. You also need to update the end user’s workstation graphic drivers.
Make sure you use a generated connection client with the “Disable background animation & performance”.
You can also set graphical settings in the admin tool / server tile / Groupe Policy (GPO) / adjust for best performance settings (recommended).
That being said, some application will not behave well with remote app so the only thing that you can do to help in this matter is to use standard RDP display instead.
If you want a stable system, you just shall decide to use the good practice for a “production system”.
Rule number one: No automatic update
– No Google automatic updates
– No Java automatic updates
– No Adobe automatic updates
– No MS automatic updates
– Set up a scan exclusion for RDPlus
If you want to apply any update, you shall do it under your control and you shall not accept that such modifications of your production system should be decided somewhere in the world during the week-end.
Rule number two: You shall reboot your system every night at 3 am
This will be very useful to clean the memory and to warrant a predictable performance of the system.
Rule number three: Avoid to allow the users to use any web browser within a session
This will prevent your users to download and/or to install incompatible application on the production system.
RDPlus enables to set the server for forwarding the use of the web browser on the user side. This can be a smart way to handle this rule.
Rule number four: Set the appropriate anti-virus exclusions and settings to be sure that such software will not kill your system performance or your application consistency.
It is not a surprise: when you run a speed test on your internet line, the provider ask you to disable the anti-virus. Why? It cost a lot of network resources.
More: some anti-virus start one instance for each user session: You can have 30 anti-virus copies running to look after the same disk space and the same memory.
So, never keep the default setting of such software to protect your system stability.
Rule number five: Disable the Windows Firewall or set the rules to allow RDPlus traffic
Having firewalls on the router, on the server, on all PCs, included into anti-spyware or anti-virus software… This is the best way to get poor performances and to block your production.
A Firewall, only a single one, shall be set at the door of your building, not in the middle of each room.
So, you shall use the router or your DSL modem built-in firewall to protect your network. And you shall disable any other one, including the Windows one.
What you could do is reduce the maximum of graphic effects and colors.
1- Open a client generator, choose “Disable background and animation for better performances”.
2- In the display tab, choose 15 bits colors.
If you are connecting using the HTML5 web client, open an admin tool \ web portal \ HTML5 client and check the “Use recommended value” box. Refresh your client browser.
Right click on “My computer” and click on properties. click on advanced system properties, performances, visual effects, and select “Adjust for best performances”. This setting can be set on client and server side and will enhance graphic performance.
You can also make sure that your graphic adapter drivers are up to date as well as your RDP protocols and windows updates.
You can also force the use of the classic theme using group policy : To do so, type gpedit.msc in start search and hit Enter to open the Group PolicyEditor. Navigate to User Configuration > Administrative Templates > Control Panel > Personalization. Now in the right pane, double click on Force a specific visual style or force Windows Classic. Enable the group policy and leave the field blank to enforce windows classic theme. Reboot and open a command prompt and run the gpupdate /force command.
If you discover having too much .mdmp files, then you need to :
– update Java, update RDPlus
– change the Java settings to disable log generation
When connecting to a RDPlus server from a secluded area with a low bandwidth and/or bad Interned connection, you can experience disconnection. Because of the ISP network infrastructure it is not always possible to upgrade the quality of your connection.
In this situation I recommend to use low color and no drive or peripheral redirection within the session, this will increase the performance significantly, also remove any wallpaper and animated pop up that can slow down your remote session.
Here is a procedure that prevent a RDPlus server to log off the remote session even thoug your connection might still be slow.
Click on start menu, execute, type in “gpedit.msc” and enter.
Open and locate the following folder : Computer Configuration/Administrative Templates/Windows Components/Remote Desktop Services/Remote Desktop Session Host/Connections
Double click on Automatic reconnection then OK.
When a user PC is losing its connection it can be for several reasons:
– Screen saver on the server
– Screen saver on the client
– Anti-virus false positive detection (on client or on server)
– Power saving setting on the client or the server, especially hard drive energy saving
– Power saving option on the network card property (on the client or the server)
– A cable that need to be re-plug somewhere
– A bad cable or network equipment (faulty switch/router)
– A Wifi signal that become poor
– A dynamic IP address which is changed by the Telecom provider
– Power failure or a power shortcut on any equipment (server, client, router, bridge)
– Lack of bandwidth due to poor Internet connection
We know that it is difficult to locate such event and the “good practice” is to analyze the question step by step.
1) Verify if this is happening just on one PC or any of your PCs. If it is just on PC this isolate the problem and means that the server and the network side are most probably not the cause of the disconnections.
2) If this is happening on several PCs, it can means that the problem is located on the server side or on the network. However it can also be due to a screen saver setting that all users PCs have.
3) Try first to turn off all screen saver and power saving (including the network card property which is a different one).
1 – Please update your RDPlus to the latest version, reboot the server and try again.
Make sure no users are logged in before installing this update, you can check for remote users by launching a task manager and clicking on the users tab.
Disabling your anti virus is also recommended.
Make scan exclusion rules:
– on C:\wsession
– and C:\Program Files (x86)\RDPlus\UserDesktop\files
and make sure your users have sufficient rights to read and execute all programs in these folders.
2 – If it still doesn’t work, then it means that a Windows update has impacted the RDP connection module and has overwrited the RDPlus settings.
– open a DOS command prompt as administrator
– navigate to the RDPlus\userdesktop\files installation directory (cd “c:\Program Files (x86)\rdplus\UserDesktop\files”)
– run ‘svcac.exe /updatekernel’
– after the popup, open the Windows Services Manager
– restart the Application Publishing Service
After that you should return to normal operation in multi-session mode.
Your license allows more than 2 users, however RDPlus allows no more than 2 concurrent connections.
1 – Please update your RDPlus to the latest version, reboot the server and try again.
Make sure no users are logged in before installing this update, you can check for remote users by launching a task manager and clicking on the users tab. Disabling your anti virus is also recommended.
Make a scan exclusion rule on C:\wsession and C:\Program Files (x86)\RDPlus\UserDesktop\files and make sure your users have sufficient rights to read and execute all programs in these folders.
2 – If it still doesn’t work, then it means that a Windows update has impacted the RDP connection module and has overwritten the RDPlus settings.
– open a DOS command prompt as administrator
– navigate to the rdplus\userdesktop\files installation directory (cd “c:\Program Files (x86)\rdplus\UserDesktop\files”)
– run ‘svcac.exe /updatekernel’
– after the popup, open the Windows Services Manager – open the Wndows Service Manager
– restart the ‘Application Publishing Service (APS)’ service. Two services will also be restarted
After that you should return to normal operation in multi-session mode.
Make sure you did not install RDPlus on a Windows 10 Home edition as the version 1803 and 1809 build are not supported. You will have to either revert to previous version of Windows or upgrade to Windows 10 Pro. If you installed RDPlus on a server version of Windows, check that the RDS role is not installed, if that is the case, uninstall this role and reboot. Then reapply the latest update of RDPlus and reboot again.
Your server should be accessible using either port 80/443/3389 depending on your connection method. You can try to connect from the console of the server by launching a mstsc.exe with 127.0.0.2 in the address. If you can connect from the console but not from a remote location please check your router / firewalls to allow traffic.
If your system has connection issues and the above did not work, you will need to check the following :
– Process one reboot to verify if you the issue remains after restarting the system.
– Verify that your RDPlus release is not a too old one. For old release (5.xx and below) the RDPlus technology cannot match with the latest version of Windows.
In such case, the solution is to update to the current release of RDPlus.
– In case of incompatible Updates that has been installed on your system, the solution is to download and run the latest update on your server : https://rdplus.com.au/download/
– With the AdminTool, verify the status of your RDPlus license.It is important to know if your issue is related to a RDPlus license or to a Windows system problem.
If your current RDPlus license is invalid you will need to install the latest RDPlus update and activate a new valid one.
Open a windows explorer and locate the license.lic file in the following path C:\Program Files (x86)\RDPlus\UserDesktop\files and apply your license again.
– If the above does not correspond to your issue, open a services.msc and make sure the “Application publishing service (APS) is running as well as the Remote Desktop Service. If the service is not running then it means another application is conflicting RDPlus like skype or teamviewer. You may need to change RDPlus port to another one that would be free to use. More information on port changing can be found here: https://rdplus.com.au/documents/how-do-i-change-communication-port-in-rdplus/
– You can verify the status of network running services by executing a netstat -nao command, any port with the status “Listening” means that the tcp port is currently used by another service. You can the identify which program is using one of these port by checking its PID and looking for it in the task manager. Open a task manager and sort all process by PID, then right click on the program and select “Open file location”. This should give you some valuable information on the program responsible for this
When using RemoteApp you can’t ‘just’ disconnect/reconnect.
You need to do a proper logoff.
However you can force your users to logoff instead of disconnecting this way:
– go in the RDPlus AdminTool,
– go to the ‘Server’ tile,
– then go into ‘Group Policies’ and check ‘All disconnected sessions will be immediately terminated’.
A slow logon process can come from various cause :
A slow active directory:
The user may take some time to authenticate on the AD.
Logon script:
When a logon script is executing and mapping network ressource, it can take time to perform the task.
Windows services and processes that are launched at logon:
This can be checked in msconfig. You can also open a task manager to monitor precisely which processes are run by each users. Doing so you should be able to narrow down the ones that are responsible for this.
Device drivers:
At each logon the server may look to make a peripheral available for a user, slowing down the logon process.
You can choose to un-check drives and peripherals that are not needed in the local ressource tab of the client generator.
When assigning the Remote Taskbar, it will display the application’s shortcuts present in the user’s profile.
This is visible at C:\Users\%USERNAME%\Desktop
You have to ways of solving this scenario:
– Use the FloatingPanel to only display the assigned applications,
Or
– Delete all unnecessary shortcuts present in C:\Users\%USERNAME%\Desktop if you prefer to use the full dektop.
Follow these steps :
Delete the C:\wsession and C:\Program Files (x86)\RDPlus folder and try again.
If this does not work then follow this procedure :
Open a control panel and manually uninstall the Universal printer.
Make sure no users are connected, then uninstall RDPlus, reboot your computer.
If these steps did not work then download and install a fresh setup before restarting above procedure : https://rdplus.com.au/download/
I recommended you also to deactivate your antivirus before installing/uninstalling RDPlus
First of all, check the power settings on client and server side, they are usually at cause.
In the AdminTool, click on the Server tile and click on “Group Policies (GPO)”
You can set up a timeout for disconnected sessions which will cause a disconnected user session to automatically logoff after a while.
If you want your disconnected sessions to terminate quickly, type in 0.5 for 30 sec. Enter 0 if you want your remote sessions to never end.
If your server is the member of a domain, this strategy may need to be set directly on the domain controller.
Open your domain strategy object editor (gpmc.msc) and locate the following strategy :
You can also make sure your domain controller do not prevent local strategies to be executed. This strategy needs to be disabled and is located in :
Computer configuration / Policies / Administrative Template / System / Group Policy / Turn off Local Group Policy objects processing.
Either solutions should work, choose the one that fits your preference.
If you are experiencing this issue with the HTML5 web client, edit the settings.js file with notepad located in C:\Program Files (x86)\RDPlus\Clients\www\software\html5
and modify the W.send_logoff = true parameter to false.
Cause:
When an application is published within the admin tool as a unique application and assigned to a user or a group, sometimes the session starts and logs off instantly.
This means your application is not suitable to be published as a unique application.
– The application, once started, is ending its own process and starts a new one, resulting in a log off because RDPlus detects that no more applications are running for this user.
– This issue can also occur because your third party application has explorer.exe dependencies which is not an issue when a full remote desktop is launched.
Solutions:
– Open the AdminTool and assign the Remote Desktop to your users or group. The session will remain active once the application is started.
– Open the AdminTool and assign the Remote Taskbar or the Floating Panel or the Application Panel to your user or group. The session will remain active once the application is started.
Cause:
This happens when the user profile hasn’t been properly created.
Solution:
– In the AdminTool, in Applications, assign the Microsoft Remote Desktop to your users,
– Have your users open a session, and then logoff.
This will create the missing files necessary for the completion of the account.
– Then assign your preferred settings to your users as you intended to
If you want to limit upload capabilties of your users only to specified file extensions do also following.
1. open with Notepad *\Clients\webserver\settings.bin
2. add as last line for example
upload_allow_extensions=”|*.pdf|*.txt|”
3. save it and restart HTML5 server in AdminTool GUI to take these changes effect.
This will only allow pdf and txt extensions and drop all others.
If you want only to restrict specified extensions but allow all other extensions
1. open with Notepad *\Clients\webserver\settings.bin
2. add as last line for example
upload_extensions=”|*.exe|*.com|*.bat|”
3. go sure you removed setting upload_allow_extensions=*** since it will be else preferred
4. save it and restart HTML5 server in AdminTool GUI to take these changes effect.
This will allow all extensions and drop exe, com and bat
If you want to limit size of uploaded files do also following.
1. open with Notepad *\Clients\webserver\settings.bin
2. add as last line for example
max_upload_size=”50mb”
3. save it and restart HTML5 server in AdminTool GUI to take these changes effect.
This will only allow file sizes up to 50mb and drop all higher values.
To change default title do following 1. locate *\Clients\www\software\html5\settings.js (if you use third part server like IIS/Apache then look inside their default root folders)
2. locate inside that file settings.js following string
(if you use third part server like IIS/Apache then look inside their default root folders)
2. place your favicon.ico inside that folder like in example *\Clients\www\favicon.ico
3. go sure your favicon.ico is accessible via http(s)://your_server.com/favicon.ico
PS: the favicon.ico works fine for FireFox, Chrome, IE11 browsers. However IE Edge 12 has unspecified behavior on https:// protocol (as example unsigned domain), so use working browsers if you want to display your specific favicon since this tutorial does not describe how to workaround third part issues. Tickets regarding such questions about IE Edgewill be discarded as not RDPlus related to be fixed. If favicon is not displayed on FireFox, Chrome or IE11, then delete cache, and check format of your icon image
Important notice: following FAQ in changing effective viewportwidth is only working by direct page view and won’t be working when used under iframe. That is the limitation of browsers that won’t allow the child pages to control its effective size. So by usage of iframe the size control should be implemented by parent holder that includes the iframe with HTML5 client. Iframe loaded HTML5 client always uses the size reported by parent holder.
Control viewportwidth
By default the HTML5 client reuses the default resolution of 1024 pixels in width where the height gets automatically computed by available screen height reported by browser excluding varying height of address bar, bottom bar etc, also purely computed by browser and can’t be affected by the program engine. Doing so the browser controls minimal zoom level to fit the entire screen of your mobile device.
Since 1024 pixels setting doesn’t always meet the needs of minimal width you can increase this value.
2. increase the value as example to W.viewportwidth = “1400”;
PS: Additionally the program supports instead numeric value the string “device-width” by setting W.viewportwidth = “device-width”; In such case the program will try its best to recognize real device resolution and use its physical size rather than explicitely given numeric value. But that may work or not work at all depending on browser device constellation, therefore use it at your own risk where you may exclude some not widely used browsers from expected behaving!
Control viewportminwidth Comparing to viewportwidth the variable viewportminwidth will increase effective resolution in width if given viewportwidth underflows the viewportminwidth, in such case the screen will overflow on right side so that to reach the most right edges you would need to scroll horizontally.
Let’s imagine following scenario: W.viewportwidth = “1024”; and W.viewportminwidth= “1400”;
In such case 1400 – 1024 = 376 pixels overflowing, also minimum visible area on screen will be 1024 pixels and 376 pixels will stay scrollable on right side, so that to reach these hidden 376 pixels you would need to scroll by horizontal panning (while holding one finger on screen move it immediately to right(or left) side).
IMPORTANT NOTICE: disabling RDP forwarding on HTML5/Webserver server ports will stop the usage of RDP protocol on same port with Websockets and HTTP protocol. That means, to continue usage of RemoteApp feature you must configure RemoteApp client access to be connected to real RDP port directly. As example instead port 443 then directly access RDP port 3389. In some use cases of load balancing the RDP port must be changed to avoid access tries on disabled RDP forwarding ports.
To disable RDP forwarding from HTML5/Webserver ports.
1. locate and open/edit(create) *\Clients\webserver\settings.bin
2. and add/save as next line: disable_rdp=true
3. restart HTML5 in AdminTool GUI to make the change effective.
After restart in *\Clients\webserver\weblog.txt you should see following message: RDP forwarding disabled! which would mean that setting was accepted.
Additionally if you wish you may still connect by RDP cookie challenge described in this FAQ“How to improve RDP security when forwarding from 80/443?”
This part describes how to disable specific SSL protocols or ciphers to increase potential security if you wish to disable as example TLSv1 and/or TLSv1.1 etc. Before continue first of all consider that you have installed latest Java version, if you use old Java6/7 versions then be aware they support such ciphers that are considered as unsecure nowdays!
1. locate folder ***\Clients\webserver\
2. create if not existing and open then with Notepad the file named \Clients\webserver\tls.bin
3. if wished to disable specific ciphers add these comma separated SSL_RSA_WITH_RC4_128_MD5, TLSv1, TLSv1.1, SSLv3 and so on..
4. Now save it and restart the server in GUI (and check *\Clients\webserver\web_log.txt, it will show updated status of disabled protocols or ciphers).
Notice: Enabled ciphers and protocols are logged to *\Clients\webserver\web_log.txt
PS: this change affects only RDPlus server SSL functionality, if you use some art of reverse proxy functionality where such services play the role of SSL decrypters then this option won’t affect there the ciphers in any desired form, so refer to FAQ guides of these third part services.
In order to get a “green padlock” in your web-brower on a RDPlus Web Access page, you will need a valid SSL certificate and access your domain by HTTPS address, as example https://rdplus.com.au Valid SSL certificates can be purchased from a lot of hosting/domain name providers such as GoDaddy, Verisign, Comodo, kSoftware, etc.
Starting with version 9.20, Terminal Service Plus provides an easy to use feature to generate a free and valid SSL certificate. In 3 mouse clicks you will get a secured valid certificate, renewed automatically, and configured automatically in Terminal Service Plus built-in web server. This feature uses Let’s Encrypt to provide a free and secure SSL certificate for your HTTPS connections.
Prerequisites necessary to get the free certificate for your domain A: you need full qualified domain (example rdplus.net, or microsoft.com, or google.com etc.) If you have only IP (example 217.203.80.56, or 78.56.43.21 etc.) then either buy domain or check the link signing IP B: your server with RDPlus installed and with properly configurated webserver must be accessible from internet on port 80 by calling your domain by HTTP protocol (example https://rdplus.com.au or http://microsoft.com etc.) (Go sure HomeLand IP protection is not causing your server to be inaccessible by Let’s Encrypt else you will fail) If you use different port than 80 then you will fail. If you enforce SSL forwarding on port 80 then you will fail too, however Let’s Encrypt claims to support forwarding now.
C: your DOMAIN must point to IP of RDPlus server and not to unspecified server that does not have RDPlus installed! D: your DOMAIN must match the IP that refers to your RDPlus server. E: your DOMAIN should not point to dynamical domain services like Dyndns since prohibited by Let’s Encrypt, however that is not a must since few dynamic domain services are still supported by Let’s Encrypt but we do not maintain such list.
By default HSTS is disbaled because few customers still accessed http://links from https://pages for same domain so this option is not enabled by default. To enable it follow next steps
1. open/edit(create) with Notepad **\Clients\webserver\settings.bin
2. and add/save as last line enable_hsts_https=true
3. restart HTML5 via AdmintTool GUI
4. now in **\Clients\webserver\web_log.txt you should see following message Enabled HSTS HTTPS header! indicating that the HSTS was activated.
As in notation above remember, after activating HSTS you won’t be able anymore to access http links from your page.
Some use case might require that Terminal Service Plus web server returns one or more custom HTTP Headers in addition to the standard ones, as example few penetration tests may want to see specific headers in HTTP response. This feature answers this specific need.
To add your own custom HTTP Header, you need to:
1. Create the file “headers.bin” in the folder “*\Clients\webserver” so that you get “*\Clients\webserver\headers.bin“
2. Add the custom headers separated by new line, like in example below:
3. Restart HTML5 webserver (AdminTool > Web > Restart Web Servers) to apply changes
Remember, frenetic hunting for security may have bad impact on HTML5 performance or make it totally unusable. We do not maintain a list of good practice headers, so add all your headers at your own risk since we do not provide support in case of breakage except recommending to revert all such changes!
Since HTML5 engine v6.23 it is possible to define leading tags BROWSER_ONLY and HTML5_ONLY as on example
BROWSER_ONLY X-XSS-Protection=1; mode=block
HTML5_ONLY X-Content-Type-Options=nosniff
etc., in such case the headers for internal webserver and HTML5 requests will be fetched from different lists else headers will be used for both instances.
PS: remember, by usage of third part webservers like IIS/Apache etc. the webserver headers from headers.bin are not effective for such third part webserver instance served files therefore you must setup these headers separately in target third part webserver.
To activate HSTS header please follow next FAQ, in such case HSTS header will be serverd only for SSL(HTTPS) protocol and avoided for HTTP, if you add HSTS headers by headers.bin then this may cause the browser to fire unwished browser log messages since HSTS header should be avoided for usage in HTTP protocol.
There are two basic ways how you may bind HTML5 client into your actual page.
A: by using URI as in the attached exampleiframe_bad_uri.html src=”/software/html5.html?user=mylogin&pass=mypass”
but this approach may have following disadvantages 1. AdBlockers may refuse such links 2. Internet filters may filter out such link requests as potential injury. 3. Mobile browsers may have browser specific char limits for URI requests. B:or by using window.name object as in the attached example iframe_good_name.html src=”/software/html5.html” name=”base64_encoded_string”
This approach has only one disadvantage, it requires enabled JavaScript engine but since HTML5 client is unable to run without JavaScript this limitation is unconsidered.
PS: the attached examples may need extra modifications for your needs so treat it accordingly as code of practice. To download *.html examples click on it with RIGTH mouse and then choose from context menu “Save as..”
Each time RDPlus starts the HTML5 gateway it generates automatically the file *\Clients\webserver\runwebserver.bat Let’s assume you want to change the default starting parameters on example below.
1. following is the path to Java executable belonging to each Java version. @”C:\Program Files\Java\jre1.8.0_131\bin\HTML5service.exe” RDPlus makes the copy of original “java.exe” and renames it to “HTML5service.exe” to distinguish own process from other java.exe processes.
2. following are start parameters for Java virtual machine -Djdk.tls.ephemeralDHKeySize=matched > increases SSL security by enforcing strength of DHK key size -Djdk.tls.rejectClientInitiatedRenegotiation=true > increases SSL security -Dorg.jboss.netty.epollBugWorkaround=true > Java TCP forever loop bug workaround on some buggy systems. -XX:+UseG1GC > force usage of new garbage collector -XX:+AggressiveOpts > use aggressive options to increase speed -XX:MinHeapFreeRatio=10 -XX:MaxHeapFreeRatio=10 > change behavior when Java should give free memory back to the system. Usually Java doesn’t give memory back to system once it was used for Java to avoid memory reallocation.
3. locally executed Java archive, no need to change> -cp “%~dp0httpwebs.jar”
4. following is the path to main www folder that may be changed inside AdminTool GUI -Duser.dir=”C:\\Program Files (x86)\\RDPlus\\Clients\\www”
5. locally executed Java program from archive in step 3.> com.jwts.socketjw.NSIOServer
6. parameters for initial start> 80 443 secret secret 127.0.0.1 -81 127.0.0.1 22 127.0.0.1 3389 A: 80 443 = the ports where HTML5 client listens, may be changed in AdminTool GUI, ssl is allowed by default on both.
B: secret secret = default passwords for private key inside cert.jks and for keystore self cert.jks It can not be changed from AdminTool GUI
C: 127.0.0.1 -81 tells to forward recognized http traffic to internal http WebServer, any negative number just tells to use automatically chosen port, by positive number as example 127.0.0.1 81 the http traffic will be forwarded to the given third part webserver. When using third part webserver RDPlus fixed this IPport value to 127.0.0.1 81 so if wished to use another port (as example 12345) then there is no way around than to change it in runwebserver.bat
D: 127.0.0.1 22 default IP and port for forwarding internal SSH traffic, it is there for backward compatibility since RDPlus does not anymore use SSH to encrypt traffic.
E: 127.0.0.1 3389 default IP and port to connect to RDP server. the IP part (except port part) in this setting can not be changed from AdminTool GUI. This setting affects how the RDP forwarder works, when RDP traffic recognized on ports 80/443 then it gets forwarded to the given default IP and port. And additionally if customer omits the server value and it stays empty inside index.html > var server = “”; then as default this setting is prefered too. Changing this IP or port to not existing values will disable ability to forward traffic and use it as default for HTML5 client.
7. >weblog.txt default output for (error)messages in weblog.txt
IMPORTANT NOTICE: when ever you change runwebserver.bat remember that AdminTool GUI automatically writes default settings in this file. To avoid that your settings get overwritten by RDPlus AdminTool GUI set Read-only attribute on runwebserver.bat file!
IMPORTANT: remember, if you have set Read-only attribute then RDPlus GUI won’t be able anymore to change default settings and in case if you update to newer Java version you must firstly remove Read-only attribute and restart HTML5gateway, afterwards redo all changes again manually.
By default all specific printer name settings are stored inside file “*\Clients\webserver\printer.bin“
Here example **** PRINTERS=PS:%DEFAULT%%PRINTMENU%MS Publisher Imagesetter%Universal Printer %;PS:%PRINTHIDE%MS Publisher Imagesetter%Hidden Menu Virtual Printer %; ****
1. PS: = says it is PostScript format of driver possible are PS: PostScript XPS: XML Paper Specification – Microsoft’s format PCL6: Printer Command Language PDF: Adobe’s format which but require supporting format converter and printer driver. In example %MS Publisher Imagesetter% is PostScript driver.
2. %DEFAULT%%PRINTMENU% = tells it should be default chosen printer and printmenu tells to display generated pdf content. Possible are following values %DEFAULT% => allowed to be set only once by one printer, do not set it twice or more! This setting makes printer default. Remove this tag by all simulated printers to use systems default preferences.
%PRINTMENU% => display pdf window, should not be mixed with printhide since excluding each other in parsing sequence!
%PRINTHIDE% => hide pdf window, requires browser with pdf mark support else print popup will never fire, as example Safari Mac does not support it.
%PRINTMARK% => by default activated on printmenu/printhide. It is auto printpopup mark of PDF language.
%NOCONVERT% => provides printer data without converting to PDF format.
%FORCEUNKNOWN% => skips print file format check, for mixing with noconvert.
%EXTRA_OPTS([extras])% => extra options passed to converter attached on start EXTRA_OPTS + OPT_PS Example: %EXTRA_OPTS([%nopdfmarks%])% would forcibly disable print mark passing to PDF converter.
%JOINDELAY(1000ms)% => concatenates prints to one file if new print arrived in lesser than given time in milliseconds. PS:%PRINTMENU%%JOINDELAY(4000ms)%MS Publisher Imagesetter%Next Universal Printer %; That example will postpone print converting for at least 4 seconds.
3. %MS Publisher Imagesetter% = tells to use default Microsoft printer driver, you may choose here any printer driver present on server but be aware that such printer driver is compatible with converting program, “MS Publisher Imagesetter” is PostScript format driver. Microsoft does not accept all drivers to be used for printing conversion.
4. %Universal Printer %; = tells how the printer should be named when displayed inside RDP session in available printer menu. Notice, all wished printers are separated by semicolon “;” as in example on top.
PS: remember, the name of printer displayed in session gets automatically attached in string (redirected *xyz*) and can not be controlled from client side.
UPDATE: on latest RDPlus updates to get highest compatibility with all browsers that do not have support of PDF auto print popup mark the default setting in “*\Clients\webserver\printer.bin” is to display PDF frame anyway with %PRINTMENU%, to change it just replace that setting by %PRINTHIDE% and restart HTML5 server in AdminTool GUI!
This walkthrough describes 4 different ways A, B, C, D how to import your own final to use certificate into webserver repository depending on the format of your certificate. The part E describes the import of CA reply. There is no common description for all different formats since each format may require specific extra actions so please choose the option below that meets your needs depending on the source format of your certificate! A: Converting SSL certificate from *.pfx/*.p12 format to cert.jks
1. Start new instance of Portecle > AdminTool GUI > Security > SSL Certificate Toolkit 2. Drop *your_key*.pfx (or *your_key*.p12) to Portecle > (type your password if required) 3. Top-Menu > Tools > Change Keystore Type > JKS (case sensitive) 4. Top-Menu > Tools > Change Keystore Type > JKS (unnecessary step, but do anyway) 5. With RIGHT mouse click on private key entry > Set Password: secret WARNING: IF YOU USE IN THIS STEP OTHER PASSWORD THAN secret THEN YOU WILL FAIL! 6. Top-Menu > Tools > Set Keystore Password: secret WARNING: IF YOU USE IN THIS STEP OTHER PASSWORD THAN secret THEN YOU WILL FAIL! 7. Top-Menu > File > Save Keystore As > cert.jks 8. Locate old *\Clients\webserver\cert.jks and replace it by new cert.jks 9. Restart HTML5 server in AdminTool GUI to make the change effective PS: notice, if you used other passwords than “secret” in steps 5. and 6. then the SSL will fail with wrong password since “secret” is the only password accepted by default.
1. Run openssl.exe pkcs12 -export -out your_key.pfx -inkey *domain_private*.key -in *domain_cert*.crt -certfile *CA*.crt type as pass for export as example: secret 2. After getting your_key.pfx continue with A: Converting SSL certificate from *.pfx/*.p12 format to cert.jks (on the top of this page).
PS: *domain_private*.key/*domain_cert*.crt/*CA*.crt may be named by you differently but should be basically similar.
C: Convert and import SSL certificate from other Windows importable formats. If signing authority provided *.pfx/*.cer or other file formats that do not contain trust path then as result the key in cert.jks is not trusted. The private key entry should contain full trust path, as example if cert.jks was finished and contains necessary private key and certificate then you see in details of such private key in Portecle: Certificates1 of 2, or 1 of 3, or 1 of 4 etc., that is the final state we need! Like in example below Certificates1 of 2
1. Firstly import all certificates (usually *.cer/*.crt format) you get from authority into Windows keystore to do so just click on each file and press Install Certificate 2. Import private key (usually *.pfx/*.p12 format) by clicking on it when you import the private key go sure you check check-boxes “Mark this key as exportable” and “Include all extended properties“ 3. Start certmgr.msc 4. Open – Personal > Certificates 5. Right click on your freshly imported private key > All Tasks > Export 6. Choose > “yes, export the private key“ 7. (very important) Check check-boxes “Include all certificates in the certification path if possible” and “Export all extended properties“ in this step Windows automatically includes certificates to trust path 8. After saving key to your_key.pfx continue with A: Converting SSL certificate from *.pfx/*.p12 format to cert.jks (on the top of this page).
E: How to import CA reply in cert.jks If Certificate Authority provided you CA reply after sending signing request you may have difficulties to import such CA replyso this FAQ handles this question. First of all, never delete/recreate private key for which you have created your CA request, they belong together! And before continue, please, go sure that cert.jks contains the private key for which you have created CA request and then received your CA reply, if your private key is not yet present inside cert.jks then import it firstly by Portecle > Tools > Import Key Pair.
1. Import all root and intermediate certificates you got from CA into cert.jks (default pass: secret), usually that are 2-3 certificates but could be more. You have to import certificates into cert.jks one by one with Portecle > Tools > Import Trusted Certificate. If you get asked by this action for default password of Java’s certificates store then use changeit, but usually it is never requested since assumed to be default password changeit but in worst case scenario try that password anyway. In case if you have ever changed Java’s certificates store password manually then use your new set password instead. Please remember, certificate and private key are two different entities, certificates have usually *.cer/*.crt extension! This step is necessary because when you will import CA reply with Portecle, it will try to build certification path, and if at least one necessary root/intermediate certificate is missed in cert.jks keystore then the import will fail with error! Sometimes CA does not send all root/intermediate certificates assuming those to be installed in Windows by default. In such case you have to export root/intermediate certificates from Windows store (as example by certmgr.msc) and after import these into cert.jks. But that could get hardest part to recognize which one certificate belongs to certification pathsince not always it is possible to distinguish these only by name, or request/download these root/intermediate certificates directly from CA homepage before starting with CA reply import.
2. In Portecle > Right click on your private key > Import CA reply file(BUT NO ROOT OR INTERMEDIATE CERTIFICATE). It may require password, so type pass you have originally used. If something went wrong check all intermediate certificates! If succeed then now the private key entry should contain full trust path, as example if cert.jks was finished and contains necessary private key and certificates then you see in details of such private key in Portecle: Certificates1 of 2, or 1 of 3, or 1 of 4 etc., that is the final state we need! As in example below Certificates1 of 2
3. Right click on freshly signed private key > Export > Private Key and Certificates (PKCS#12) > secret (as password assumed, or use your original one) > and save to file *your_key*.p12
4. After saving private key to *your_key*.p12 continue with A: Converting SSL certificate from *.pfx/*.p12 format to cert.jks (on the top of this page). The steps 3. and 4. of this E: part of FAQ are not explicitly necessary steps but the goal why to continue with FAQ part A: is to create new clean cert.jks file without unnecessary entries inside and without presence of few private keys in same key store(cert.jks) and very important, with default password which is “secret” where else the key store won’t be accepted.
1. First of all export the real Certificate + key pair
1.1. From IIS as example: Edit bindings
1.2 Thеn: Edit -> View -> Copy to File
1.3 Export the private key
Notice: if you are going to export already present SSL certificate from Windows store used by IIS, you may face the problem that “Export” entry is not clickable because “Mark this key as exportable” was not checked by importing that key. In such case you must have Аdministrator rights and use free tool called “Mimikatz” to export such keys from Windows keystore.
1.4 PKCS #12 (.PFX) Include all certificates + Export all extended properties
1.5 Set the pass to “secret” and save as file like cert.pfx
A: Converting SSL certificate from *.pfx/*.p12 format to cert.jks
By default HTML5 server is able to forward RDP requests from default web ports 80/443 to target RDP server. Some hacker tools reuse this fact to run RDP brute force attacks against these ports. As countermeasure you got in such case two choices, either completely disable RDP forwarding as described in this FAQ or alternatively you may disable RDP forwarding but enable at same time RDP cookie approved connections. That means, initial RDP connection packet must contain special cookie string known to the server in order to be successfully passed through. To enable this cookie approvement do following.
(0. firstly upgade to latest RDPus version since in older versions this feature may be not available)
1. follow this FAQ to disable RDP forwarding if not yet done
2. open with Notepad *\Clients\webserver\balance.bin
3. add as next line (and save changes)
/~~mySpecificRDPcookie=127.0.0.1:3389 RDPPORT;
(this would mean RDP client must send cookie /~~mySpecificRDPcookie to be passed to 127.0.0.1:3389, the /~~mySpecificRDPcookie is just an example, it could be any string except preceding /~~ which is mandatory)
4. if you use mstsc.exe to connect, then create and edit file *.rdp and add as next line
loadbalanceinfo:s:/~~mySpecificRDPcookie
(by other clients than mstsc.exe the cookie support may be lacking, we do not maintain the list of third part clients supporting cookies)
(5). if you use load balancing in half balancing mode (when gateway takes the role of RDP client and not subserver) then without knowing that cookie RDP client part of HTML5 client would fail to connect. To get over it open with Notepad *\Clients\webserver\setting.bin directly on gateway server and insert as next line following content with final changes saving
default_rdp_cookie=”/~~mySpecificRDPcookie”
6. restart HTML5 server in AdminTool GUI.
Oracle Remediation
Since Windows2012/2016 and Windows10 there exists new option for additional RDP security by enforcing only updated clients to avoid vulnerability exploitation of RDP by potential hackers by brute forcing the connection. This will require the RDP clients to support at least CredSSP v6.
1. start gpedit.msc
2. change: Computer Configuration > Administrative Templates > System > Credential Delegation > Encryption Oracle Remediation > Only Updated Clients >> Force Updated Clients
Remember, this requires at least HTML5 v6.12 client, check you web_log.txt if you are unsure.
Randomized local remote binding
New HTML5 v6.23 client supports randomized remote addresses for 127.*.*.* address space.
1. open with Notepad *\Clients\webserver\settings.bin
2. add as next line (and save changes)
rdp_remote_address_by_forward=”*”
rdp_remote_address_by_html5=”*”
3. restart HTML5 server in AdminTool GUI.
Sometimes user wants to store printer settings permanently, as example change default Letter to A4 format. Before continue upgrade your RDPlus installation to latest version where this feature is supported else you will fail!
1. start new HTML5 session with Administrator rights so that you get access to Control Panel\All Control Panel Items\Devices and Printers
IMPORTANT: changing printer settings from other places like printing able applications such as Notepad/WordPad etc. is not possible! If you see no one device in the location above but the printers are visible from applications then re-enable Device Setup Manager in services.msc
2. change settings to wished one and wait 30-60 seconds. Windows system usually sends printer settings blob data approximatelly 30-60 seconds after last printer settings change. Such blob data gets saved on server permanently! When ever such change is made and after elapsed 30-60 seconds the HTML5 client informs you about this event by writing following string to browser’s console > Printer blob for: Universal Printer, so you can go sure that such change was really accepted by server.
PS: remember, that will save settings only for your unique browser session. On another system or browser you will need to redo the settings. If you delete cookies or run browser in cookieless mode, you will fail to store such setting permanently. Simulated printers always have (redirected ***) in their printer name.
How to make default settings for all users If you want that saved settings are stored for all users and these settings are reused by all your users then do next: (In adminprintermode handled below – cookies are not required since users are not distinguished there)
A. log off all active users except your self on the server and additionally on you server delete all files inside folder *your_RDPlus_folder*\Clients\webserver\printer\
B. locate and execute *your_RDPlus_folder*\UserDesktop\files\adminprintermode.exe
C. now redo the steps – 1 and 2 – on the top of this FAQ
D. finally exit the session approximatelly 1 minute after last printer settings change. From now on each new user that opens new session will get served the printer blob data common for all users. If you decide to stop or change admin printer mode, always delete all files inside *\Clients\webserver\printer\
IMPORTANT: admin printer-settings-session can be marked only once, if you logoff your session and relogin again then following sessions can’t be marked as printer-settings-session anymore, in such case you will have to restart HTML5 server in AdminTool GUI to reset the state.
HTML5 full screen.
In order to support full screen mode the server has to support either on-the-fly-resizing or reconnection-on-resize or be prepared for full screen mode. On-the-fly-resizing requires support of dynamic channels with “Display channel” that is available in newer Windows systems like Windows2012R2, Windows10 etc.
Server supports on-the-fly-resizing (dynamic Display channel)
1. no future configuration needed, the full screen button will be present in top menu,
if not forcibly disabled (*\settings.js -> W.showfullscreenbutton = “no”;)
2. even if server supports on-the-fly-resizing you still may configure/edit
in this case the session will take from start the fully available screen size.
Notice: if no one of these points above (W.reconnectonresize = true; or W.full_screen = 2;) is effective then the full screen button will be deactivated.
Smartfit setting, only effective if server doesn’t support on-the-fly-resizing or was preset to fullscreen (W.full_screen = 2;)
in this case if RDP area overflows browser area then the browser tab will automatically display scroll bars.
3. smartfit set to * = true or * = 1 squeezes the RDP area by underflowing but if you set it to * =2 then
additionally it will stretch by overflowing.
Full screen enforced with W.full_screen = 2; or W.full_screen = 1;
1. by default when using enforced full screen mode any click inside working area will switch automatically to full screen.
to disable it edit settings.js > W.allowOnclickFullScreen = false;
IMPORTANT NOTICES A: Escape button(ESC) can neither be prevented nor it can be reassigned to another button(s), it is browsers native
behavior to not listen to Escape button in full screen mode and to leave full screen mode instead for security reasons.
B: Entering full screen mode is privileged event in browserstherefore such actions have to be performed
only by hardware initiated eventslike mouse clickand is purely browsers native limitation to increase security.That is the main reason why it is technically not possible to reenter full screen mode after exiting it on Escape button.
C: There is no implementation of full screen mode on mobile browsers due very poor and non consistent support
from mobile browsers side.
D: Mac Safari fullscreen option is disabled by default in settings.js > W.macSafariFullDisable = true; The reason
for this limitation, Safari does not support keyboard events while in fullscreen mode so the switching to fullscreen
on Safari Mac doesn’t make any sense. This limitation was created by Apple due some strange way of security
measurements and so it can’t be workarounded.
Here are the few points to check out if RDPlus Web Access is not available on your server :
1. RDPlus uses its own web server, make sure that HTTP and HTTPS (80 and 443) ports are not already used by another service. Start as admin cmd.exe > netstat -anb and make sure nothing else except html5service.exe takes default ports 80 and 443 As example Skype could take port 80 and 443 as well, or IIS or one of IIS based services, so go sure it is not your case!
2. Make sure that your firewall (software or hardware) isn’t blocking port 80 and/or port 443.
3. Sometimes things can go wrong in your Java installation, this component is required to be installed on your RDPlus server for your web access to work fine. Java can be (re)installed here : https://java.com/en/download/manual.jsp The 64 bits Windows Offline (64-bit) version is recommended.
4. Always make sure to install latest release of RDPlus available here as we correct bug on a daily basis, making our software always better and more compatible.
If you still did not solve the issue by checking the steps above then when creating support ticket A: provide output of execution result from step 1. netstat -anb B: provide output of file *\Clients\webserver\weblog.txt and/or *\Clients\webserver\web_log.txt if present.
Minimal prerequisites before continue
A: go sure you have setup IIS or Apache to run on port 81, if you can’t do that then such cases are considered asuncooperative!
B: go sure you have configurated RDPlus to run on port80 and 443, or those that do not conflict, example port 88/448! DO NOT SETUP PLUS AND IIS/APACHE ON SAME PORTS! that means, if IIS was configurated to use port 81/443 etc., and RDPlus was configurated to use port 81/443 THENTHEY WILL CONFLICT!
In such case go sure you followed the FAQ_IIS(or Apache), therefore reread the FAQ_IIS(or Apache) carefully and
fix these issues before continue!
C: go sure you access the server in browser by ports 80/443 (or any not conflicting) you have setup in RDPlus!
that means if you have setup RDPlus on port 80 but IIS on port 81, then you should access the link in browser
on port 80 like in example http://your_server, the HTTP requests will be forwarded from port 80 to 81 automatically!
To run RDPlus with IIS or Apache as webserver you have to setup IIS/Apache so, that RDPlus(html5service.exe) listens on port 80 and IIS(or Apache etc.) listens on port 81, since all HTTP1.0/1.1 requests will be automatically forwarded from port 80(html5service.exe) to port 81(IIS/Apache) to be processed by your third part webserver while at same time all HTML5-RDP requests will stay on port 80 and be handled by html5service.exe
Remember here, if you do not want RDPlus(html5service.exe) to take port 80 so that IIS still remains on port 80, then you should be aware to setup RDPlus on any other free port in bulit-in webserver mode as example on port 88 in AdminTool GUI => Web => Manage Web Servers. Be aware, just placing JavaScripts+html pages into root folder of your third part webserver like IIS/Apache doesn’t make these webservers HTML5-RDP capable since IIS/Apache do not support HTML5-RDP on server side! But in such case if moved RDPlus to non default port like 88 etc. the HTML5-RDP client will never work on port 80(http://your_server) but on that another free port as in given example http://your_server:88/
But if you by your any personal reasons can’t accept that requirement, also move IIS/Apache from port 80 to 81, and do not want to start RDPlus on another free port than 80 then stop the setup since we can’t help you out in such case, moreover support requests handling such uncooperative cases will be discarded caused by personal failure!
Error: “Third part webserver IIS / Apache failure, check FAQ!“
But if you agree with the requirements above and believe to have followed setup instructions in detail
you may still experience the error “Third part webserver IIS / Apache failure, check FAQ!“
In such case check if html5service.exe is really bound to port 80 and not an another service takes it already!
To check that run as Administrator “cmd.exe > netstat.exe -anb”
If an unknown running service is still displayed on port 80 instead of html5service.exe which represents RDPlus HTML5 Java process then you have an another problematic case that is highly occurring when Microsoft SQL service was installed in addition to IIS. If that was your case and you have Microsoft SQL installed then check following steps!
1. Open – Start > Programs > SQL Server 2008 R2 > Configuration Tools > Reporting Services Configuration Manager
Sometimes it is not exactly named so as described above but should be called similar (as example SQL Server 2012 etc.)
2. Open – Web Service URL
3. Change port as example to 81
4. Open – Report Manager URL > Advanced
5. Click on entry with port 80 > Edit
6. Change the port to same as in step 3.
Be aware, problem with MS SQL server may be one potential case of many possible Microsoft services that may run on port 80. If you do not run MS SQL server but port 80 is still bound by unknown service then you will have to discover it on hard way which Microsoft service is still taking that port, also Google for it what could cause it! Sometimes the cause of busy port 80 is installed Skype on the server with enabled webservice, if so, disable or move it to another port, as example port 82 and/or 453for SSL accordingly! If no one of proposed solutions work then move RDPlus away from these busy ports by setting up RDPlus to listen on any non default free port in built-in webserver mode AdminTool GUI => Web => Manage Web Servers.
Before continue please consider, by including own third part JavaScripts you loose any future support if issues occur within your scripts and do not occur without using it. We do not provide any support on self made issues and won’t help you in eliminating it! Moreover consider, that future version updates won’t take into account the probability of incompatibility with your already existing third part scripts or any future software conflicts caused by it’s usage. Moreover please consider, we won’t give you any future support to rewrite used AutoIT scripts to another languages such as Delphi, C++ etc., that will be always your task! So consider that everything you do as next you do at your own risk!
Prerequisites for preparation on webserver side. 1. locate file *\Clients\www\software\html5\settings.js 2. change variable according to the example > W.customerScripts = { 0: “../custom1.js” }; 3. place custom1.js into *\Clients\www\custom1.js
Prerequisites on rdp session side. A: to be able to exchange messages with RDP session you need running webime.exe process that represents WEBIME – RDPchannel. Please check, that each time you start any new RDP session that process webime.exe gets started together with the session. Usually that should be always the case since this process is used to push file upload messages, keyboard language switching messages and screen resizing messages, and except that it is needed for exchanging JavaScript messages too.
B: download and install AutoIT, that program is necessary to compile the AutoIT scripts to executable files, AutoIT is pretty small and allows you to enter the world of self made scripting very fast. (Please consider here, we won’t give you any future help how to rewrite the AutoIT script to another languages like Delphi, C++ etc., that stays always your task if you decide to do that!)
C: now main last part. You get attached in zip archive 3 different AutoIT scripts that behave differently. The scripts contain example of JavaScript body which may be changed in order to meet your needs. send_first_and_exit_after_first_back.au3 – this script sends first message to browser and waits for first message from browser back, very useful if you want to get some specific information from browser and display it inside RDP session.
send_first_and_exit_immediatelly.au3 – this script sends first message to browser and exits immediatelly, useful if you want to send some message from RDP session to browser without future interaction.
send_first_and_listen_permanently_for_following.au3 – this script runs in permanent mode, the sending of first message can be commented out if not needed. Usually first message is needed to indicate to browser that your listener was started. Afterwards the program stays in listening(server) mode and waits for future incoming messages from browser permanently. If you send first message but want to replay this first message each time the browser tab was refreshed and/or session was reconnected then replace _sendSingleMessage($data) by _sendPersistentMessage($data) or comment it completely out if you do not need to send first initial message to browser.
To compile these files to executables (consider you installed full AutoIT bundle before) just click with RIGHT mouse on any *.au3 script and compile it! Remember, AutoIT handle specific characters differently than JavaScript so as example double quotes have to be inserted twice “” while in JavaScript double quotes have to be preceded with back slash \” in order to be part of textual string. For future information about such details Google for it, do not ask such questions in support ticket, such tickets will be closed without future support since such information can not be handled by our first level support!
Now as handled in Prerequisites for preparation on webserver side -> 3. *custom1.js* place some function like window.mySpecificFunction = function(abc) { alert(abc); }; and call it from Autoit script by editing the matched inner JavaScript body, example of call window.mySpecificFunction(“”some dummy string””);
ClipBoard text usage with HTML5 client.
Remember, access to the ClipBoard on browsers level is highly privileged security related action and may not work at all depending on system or browser you use! Only pure text and images are supported for copy/paste!
1. to paste clipboard text data to session use Ctrl + V, this works mostly on all browsers, on Mac browsers Ctrl button has no effect, there you must use it with Right_CMD + V (left_cmd button not accepted!)
2. to copy text data to your local environment use Ctrl + C or to cut Ctrl + X, on Mac Ctrl has no effect, use it with Right_CMD + C or Right_CMD + X (Mac Safari has bug on older versions and does not wait for data from server on privileged action or adds data only on second Right_CMD + C pressing)
3. to copy data by mouse to your local browser environment is very tricky and requires browser support of ClipBoard API. On each mouse click you give the system grace time of 1 second, if in this time the data arrives from the server and ClipBoard API is supported then this data will be added to your system, but if the data was to late because of slow speed between server or data amount was just to big then this data will be added to server on next(second) click but only if ClipBoard API supported.
4. there is no technical way to paste clipboard data by mouse click from your local environment and send it to server therefore use Ctrl + V (or on Mac Right_CMD + V). Chrome and FireFox considered it as big potential security risk and do not allow that even on privileged action like mouse click. However Internet Explorer partially supports such onclick pasting but with displaying of security message which when not accepted will break future clipboard input therefore this approach is not implemented for IE since considered as unstable.
PS: copying files between browser and RDP session via ClipBoard access by Ctrl + V or by mouse click is technically not possible! Use drag-and-drop instead to send files to session and send files back to browser via \\tsclient\WebServer
ClipBoard image usage with HTML5 client.
By image copy/pasting you get same limitations like on ClipBoard text transfer but with even more restrictions.
1. To paste image data from your computer into RDP session just press Ctrl + V (on Mac Safari has bug and does not allow to access such pasted images therefore use Mac Chrome or Mac FireFox if you need to paste images on Mac) (there is no way to paste images by mouse click at all)
2. To copy image to your local environment is tricky, you may however use Ctrl + C, but this will not add the image from inside RDP session to your local clipboard automatically. Ctrl + C will just initialize sending of image clipboard data to browser, with same success you may initialize image clipboard data transfer with the mouse. When image arrives on your browser you will see shortly small preview of copied image area on top right side of your browser, as soon you saw that image arrived indicated by preview just make next click with right mouse button, this will initialize browsers native handler for right click. From that menu you must choose to copy the image to your local clipboard environment. Depending on browser you will see different menus and entries of the native handler for right click. Actually image clipboard transfer was successfully tested on modern/newest versions of IE11, IE12(Edge), Chrome, FireFox, and on Mac browsers too (Chrome, FireFox). However on Mac Safari as mentioned you can not paste images due Safari’ssecurity bug!
Yes, RDPlus is compatible with iPhone, iPad or Android devices.
Solution number 1: Use the Web access with an HTML5 connection client which enables the connection from almost any html5 compatible web browser (Safari, Firefox or Opera for example) or Solution number 2: connect to your RDPlus server with any RDP client for IPhone/IPad/Android, but be aware that are third part clients which may not implement printing at all or only on own way. We do not track support of third part clients or their specific features!
HTML5 client is based on pure HTML/JavaScript without any extra plugins and like any other HTML page that you open in browser it is restricted by security rules of browser you use. You get feeling that you use “native” client but that is just simulated visualization, you still stay inside browsers sand-box. Now imagine you, every HTML page that you visit in internet would get full access to your local drives, local printers, local scanners or any other local hardware but fortunatelly this horror scenario is not possible (at least not without reusing browser vulnerabilities or third part plugins but not of our interests)
In short – there are no such official browser APIs existing that would allow unrestricted access to your local hardwaresuch as local printers, local scanners, local logical devices or any other physical hardware like USB devices through HTML5 client. (local means the system where you run browser that starts HTML5 session) If you want to get logical access to your hardware you need native clients such as RemoteApp or Generated clients that do not rely on browsers but have almost unrestricted access to local hardware.
Notice, even if local drive access is not possible with browsers, file upload is still possible but on indirect way, as example just drop files to browser HTML5 session tab for uploading files to rdp server session or use upload form. For sending files back to your browser for example drop files to network drive //rdpclient/WebFile or use file upload tool, files will popup as regular file downloads. More about you will find under the link: https://rdplus.com.au/documents/html5-client-using-file-transfer/
Since local printers can not be accessed directly the printer gets emulated so the print to such emulated printer gets converted to pdf file that finally gets uploaded to browser and may be then printed to your local printer, however that requires browser with native pdf support or support via pdf plugin.
Let’s assume your application running in HTML5 client requires more size in height than default height value reported by your browser. You have 4 different ways how you may proceed.
A. Full-screen button. Before starting your application
1. click on Top-menu and go to Full-screen by clicking on Full-screen button
2. start your application
This would make your RDP area screen to be always equal to the size of your Full-screen area and rely on the actual size of your monitor. That will work only on Windows/Linux PCs, or with Mac when used Mac-Chrome/Mac-FireFox, but that won’t work for mobile devices. More about Full-screen usage can be found here: How to use full screen mode in HTML5 client?
B. Screen size hot-change. This way may meet your needs more effectively but could potentially make your screen looking uglified since the screen proportion ratio would be not 1:1 anymore and browser would try to squeeze the image to fit into browsers area. This way should work on all PC/Mac browsers similary. Before starting your application
1. on HTML5 page inside top address bar where you see *****/html5.html click there with the left mouse,
so that it gets focus
2. now press buttons “Ctrl” + “–” so oft you get satisfied screen size.
(on old Windows systems that do not support on-the-fly-resizing just refresh the tab after any such change)
3. start your application
(on older Internet Explorer 11 it is not allowed to call Ctrl+– when focusing address bar, there you have to do that on portal page by focusing HTML page area self and only after that start new session which would take the new dimension. (IE Edge unaffected)
C. Mobile-browsers only. On mobile browsers it works differently than on PC browsers. Since your program is very specific and requires minimum height rather than just width then do following
1. locate file on your server *\Clients\www\software\html5\settings.js
4. and change its default value, as example to 1400 like that > W.viewportminheight = “1400”;
5. now start new session and then your application.
In such case when ever your mobile browser will report size lesser than 1400pixels, it will enforce at least 1400px for RDP area, but make overflowing area to be scrollable down/up by panning (moving up/down with one finger).
D. Third part program support contact. These actions should be done by you anyway if possible since not RDPlus related.
1. contact creators/developers of your specific program
2. report your minimum screen size problem as a bug
3. additionally ask to make that area either scrollable or auto-adjustable according to the actual screen size.
However self-evident we can’t assist you on that point!
For security reasons, you might want to clear the login/password fields and/or reset the green ticks displayed at the right of these fields once the user clicked on the “Log on” button.
For RDPlus 7.30 and newer versions: this feature is included in the Webmaster Tookit program, in the “Preferences” tab, with the checkbox “Remember last login”. Uncheck it in order to publish Web Access pages which will not keep the last typed login.
For RDPlus 7.20 and older versions, please read the following instructions:
In order to do it, you will have to modify your Web Access page:
Open the Web Access page HTML files (usually “index.html” and “template.html” in “C:\Program Files(x86)\RDPlus\Clients\www\”) with a text editor (such as Notepad++)
Open “C:\Program Files(x86)\RDPlus\Clients\www\software\common.js” with a text editor (such as Notepad++)
Find these lines:
}
cplogon();
}
Replace them by these lines:
}
cplogon();
document.cookie = ‘Login_Editbox1=; expires=Thu, 01 Jan 1970 00:00:01 GMT;’; window.location.reload();
}
Go back to your browser and reload the page by pressing “Ctrl” and “F5” at the same, in order to clear your browser’s cache.
Well known problem, Safari on iOS or on MacOS refuses the websockets connection if one of the following issues is present on users side
1. user uses IP to access the server via https (example https://22.44.55.11 – but http://22.44.55.11 is not affected!)
2. or user uses https with self-signed certificate for domain (example https://my_domain.com – but again http://my_domain.com unaffected)
3. or user uses outdated/invalid certificate for https connection.
That is not RDPlus issue but pure invention of Apple to stop any potential hacker activities on iOS/Mac devices for websockets when the secured connection authority(https certificate) can’t be verified. As workaround the client drops to compatibility mode with slow XHR connection.
To fix this issue you have few different ways how you may proceed.
1. buy domain(example https://my_domain.com) and sign it by authority(example Let’s Encrypt etc.), that is what Apple expects from you to do.
2. or use http address (insecure, if only port 443 used then try http://my_domain.com:443/ – No SSL redirection allowed!)
3. or install self signed certificate on iOS/Mac device directly. (very tricky indeed)
4. or use another browser (at least possible for Mac but not possible for iOS!)
Remark: under specific circumstances the IPs can be signed, but smarter it would be to buy domain and sign it for free.
HTML5 client use few different technics to prevent potential security breaches by hacker activities. But by usage of third part custom load balancers or specific unknown (reverse)proxies such requests may be wrongly considered as potential security breach and so causing false positive non working state. To disable these checks entirely do also following.1. Locate *\Clients\webserver\settings.bin and open it with Notepad
2. add as last lines following content
ip_equality_check=false
websockets_origin_host_match=false
x_ip_forward_header_match=false
approve_by_client_cookie=false
approve_by_cookie=false browser_user_agent_check=false timing_equality_check=falsepage_refresh_from_same_ip=false 4. save that file and restart html5 server in AdminTool GUI to take these changes effect.
5. Close the browser completely to clear its temporary cache and retry again.
Sometimes it is not necessary to disable all checks above so you can disable only those checks that cause incompatibility on your side, especially “ip_equality_check“, “websockets_origin_host_match” and “approve_by_client_cookie” may be most problematic settings. This can be caused by Load Balancers that generate new IP path to your target server through different servers, or when proxy passes Websocket connection not “as is” but as separate Websockets client instance with future data showeling, or when the path of HTTP request gets rewritten and doesn’t match with in-browser-address path. Sometimes users browsers go through different proxies on customers side, as example some Androids go through Google’s proxy servers for HTTP requests but at same time direct for Websockets connection, that causes finally IP mismatching since such behavior may be the indication of possible hacker activities and gets prevented by HTML5client already on the stage before sending users data to server.
Important notice: HTML5 client should be always first instance in the network chain, it plays the role of SSL decrypter. Even if you decide to use third part web server like IIS/Apache the HTML5 instance should be still the SSL decrypter else no Websocket connectivity will be available (or you will have to setup IIS/Apache in reverse proxy mode if HTML5 should stay second instance). The HTML5 instance has to decrypt it to distinguish packets to be correctly forwarded. Let’s assume you have 3 different domains pointing to same IP my-domain.com (200.200.200.200 -> 127.0.0.1) second.my-domain.com (200.200.200.200 -> 127.0.0.1) some-domain.com (200.200.200.200 -> 127.0.0.1)
In order to serve different certificates according to the domain name do following.
1. create subfolder “multicerts” under “*\Clients\webserver\” folder like so “*\Clients\webserver\multicerts\“
2. rename approved *.jks files for example above https://my-domain.com/ > ***\webserver\multicerts\my-domain.com.jks https://second.my-domain.com/ > ***\webserver\multicerts\second.my-domain.com.jks https://some-domain.com/ > ***\webserver\multicerts\some-domain.com.jks
(if you have multidomain certificate *.my-multidomain.com and you want to serve this certificate for all domains ending with .my-multidomain.com inclusive my-multidomain.com then add leading point to jks certificates name as in example https://****.my-multidomain.com/ > ***\webserver\multicerts\.my-multidomain.com.jks)
3. restart HTML5 in AdminTool GUI or reread configuration locally on server http://127.0.0.1/w0j3?cert.jks
In such case when ever you access https://my-domain.com, https://second.my-domain.com or https://some-domain.com you will get different certificates served (however this requires SNI support by browser, but all modern browsers support it for longer time) For other unrecognized (not in “multicerts” folder) domains the default *\Clients\webserver\cert.jks will be served. This SNI feature makes sense only for authority signed certificates, for self signed certificates one such cert is enough, since it makes no sense to serve different self signed certificates.
Important notice, please consider, HTML5 client as browser page has no native access to your system unlike mstsc.exethat is native RDP client with direct system access. Also HTML5 client has to rely on values that your browser reports and if the browser provides wrong values then the only way to fix browsers values is to tell the program the correct time zone shifting as in example given below.
To adjust time zone for HTML5 client do following.
1. firstly go sure you have updated HTML5 client to the latest available version: AdminTool > License > Check for update
2. afterwards go sure that time zone redirection is enabled as in picture
2. if automatical redirection still displays wrong time then locate variable *\Clients\www\software\html5\settings.js > W.timeZoneOffsetShift = “0:0”; and change it depending on your needs “-60:-1” or “60:1” according to the missed time shift reported by your browser. In example left part “-60:-1” would shift time 60 minutes forward/back, and right part would adjust time zone UTC+/-shift. And by “-60:0” you would adjust time only while time zone would remain same, or by “0:-1” time zone offset would differ.
Set own time zone name than default. For the same time zone asexample UTC -4 etc. there may exist many different names because many countries at same time are in same time zone, usually the displayed name has no disadvantages on the functionality if it matches the time line (in exampleUTC -4) but mismatches the default name, so the problem (if any) is only of cosmetical nature since it is technically impossible to recognize time zone name via browser. Nonetheless to set own time zone name for automatical recognition from system regedit strings do following.
1. locate variable in *\Clients\www\software\html5\settings.js > IMPORTANT: due changes in new HTML5 5.62 version the W.timeZonesRegistry was changed to W.timeZonesRegistryNew
W.timeZonesRegistryNew = “Dateline%UTC-11%Aleutian@Hawaiian%Marquesas%Alaskan@UTC-09%Pacific@UTC-08%Mountain@US Mountain%Central@Easter Island@Central America%Eastern@SA Pacific%Atlantic@Pacific SA@Venezuela%Newfoundland%Greenland@E. South America@Montevideo%UTC-02%Azores@Cape Verde%GMT@Greenwich%Romance@W. Central Africa%GTB@Kaliningrad%Russian%Iran%Caucasus%Afghanistan%West Asia%India%Nepal%Central Asia%Myanmar%Altai%China%North Korea%Aus Central W.%Korea%AUS Central@Cen. Australia@AUS Central%West Pacific@AUS Eastern@West Pacific%Lord Howe%Central Pacific%Russia Time Zone 11@New Zealand@Russia Time Zone 11%Chatham Islands%Tonga@Samoa@Tonga%Line Islands“;
All names represent 39 different time zones -12 > Dateline -11 > UTC-11 -10 > Aleutian@Hawaiian -9.5 > Marquesas -9 > Alaskan@UTC-09 -8 > Pacific@UTC-08 -7 > Mountain@US Mountain -6 > Central@Easter Island@Central America -5 > Eastern@SA Pacific -4 > Atlantic@Pacific SA@Venezuela -3.5 > Newfoundland -3 > Greenland@E. South America@Montevideo -2 > UTC-02 -1 > Azores@Cape Verde 0 > GMT@Greenwich 1 > Romance@W. Central Africa 2 > GTB@Kaliningrad 3 > Russian 3.5 > Iran 4 > Caucasus 4.5 > Afghanistan 5 > West Asia 5.5 > India 5.75 > Nepal 6 > Central Asia 6.5 > Myanmar 7 > Altai 8 > China 8.5 > North Korea 8.75 >Aus Central W. 9 > Korea 9.5 > AUS Central@Cen. Australia@AUS Central 10 > West Pacific@AUS Eastern@West Pacific 10.5 > Lord Howe 11 > Central Pacific 12 > Russia Time Zone 11@New Zealand@Russia Time Zone 11 12.75 >Chatham Islands 13 > Tonga@Samoa@Tonga 14 > Line Islands
If displayed time zone in example is UTC -4 which stands for Atlantic by default (final displayed name is the choice of system) but wished is another name as exampleCentral Brazilian then open in registry editor regedit.exe following key path HKEY_LOCAL_MACHINE\SOFTWARE\Microsoft\Windows NT\CurrentVersion\Time Zones\ and look for the name of wished time zone path name and replace in variable settings.js > W.timeZonesRegistryNewmatching string Atlantic with new string Central Brazilian (the string Standard Time can be omitted) according to regedit path name. Example > W.timeZonesRegistryNew = “****%Venezuela%Atlantic%Newfoundland%*****”; change to > W.timeZonesRegistryNew = “****%Venezuela%Central Brazilian%Newfoundland%*****”; In new HTML5 5.62 version the format has changed, now the containing string may contain up to 3 different types of time zones. As example Central@Easter Island@Central America consist of three time zone types, upper semisphere time transitionwinter-summer-winter like in USA, lower semisphere summer-winter-summer transition like in Brazil, and zone without winter/summer transition like in Russia.
Conclusion: finally time zone adjustment consist of three parts, displayed time in hours:minutes, displayed UTC+/- offset, where both values are adjustable by W.timeZoneOffsetShift, and the displayed name for the specific UTC+/- time zone adjustable by W.timeZonesRegistryNew.
By default the HTML5 client tries to recognize browsers default language and then use it inside RDP session. This behavior is controlled by tag “as_browser” However you may find the full list of available language tags in http://***your_server***/software/language.htmlunder “Locale”
You have the choice to set fixed language either A: per client directly from HTML5 top menu.
B: or from portal by setting it in AdminTool GUI which will be effective for everyone.
Remember: when using HTML5 client in mulitple language scenario go sure that language used inside Web-HTML5-RDPsession is synchronized with the language actually set on your PC/Laptop/Mac etc. else some chars that are represented and crossing in every language map may produce wrong char by sending scan code actual for another language. Also that means, if you changed the language from English to German inside web-session then change it to German on PC/Laptop/Mac too.
If you get the message “Wrong Network Level Authentication credentials!”
then you have met following conditions
A1. you have activated NLA authentication forcibly
B1. and you have typed wrong or empty password on logon page, or logon was deleted and not anymore present in Windows internal data store.
If you are sure your logon and password are correct and under same circumstances (same user, same password, same domain, same server IP/domain, same port) with mstsc.exe you can successfully login then probably you faced one known security limitation of HTML5 gateway that blocks connection to servers outside of intranet and instead it reroutes the traffic to local server 127.*** where the wished user/pass logon is not present and as consequence not accepted, and so by conditions as above you get again wrong password message.
By default non intranet RDP IPs (except 192.168.*.*, 10.*.*.*, 172.16-32.*.*, 127.*.*.*) are disabled to be accessed to avoid security risk that your gateway could be potentially reused to access unknown RDP servers outside of your intranet/local network. Do following if you wish to reenable all internet servers!
Reenabling RDP internet servers 1. open/edit(create) *\Clients\webserver\settings.bin 2. and add/save disable_internet_servers=false 3. restart HTML5 via AdminTool GUI
however the above setting “disable_internet_servers=false” is highly not recommended since that would allow to reuse your gateway to get access per RDP protocol to any server that does not belong to your network, especially internet addresses. To avoid such scenario and at same time block unknown RDP addresses you could add alternatively the wished server(s) to the list of allowed servers.
Allow only specified servers for RDP access for improving security 1. open/edit(create) *\Clients\webserver\rdplist.bin 2. add line separated as example 155.1.3.3:3389 demo.rdplus.net:3389 my_server.com 129.56.134.22 etc. 3. restart HTML5 via AdminTool GUI
If you still get the “wrong NLA credentials” message even after checking all the points listed above then check if you can connect locally on the server to IP 127.0.0.2 with same login and same password you tried to use with HTML5 client before and failed afterwards. Most probably you will fail with mstsc.exe too, but in such case change password to something easier to remember under admin accoount and then retry to login again. Additionally check *\Clients\webserver\web_log.txt to identify to what RDP server exactly the HTML5 client tries to connect, probably it connects to another server than you expect and so your credentials are unsurprising not accepted there.
If everything else described above did not help then create support ticket with providing of working RDP access logon or TeamViewer access so we can investigate in your issue. Remember, without access to your server such kind of errors can not be fixed therefore providing access to your problematic server is mandatory!
If you get permanently by same logon the message “CredSSP required by server!”
then most probably you have met following conditions
A2. you have activated NLA authentication forcibly (see the picture above from A1) B1. and you have activated “User must change password at next logon”.
To fix it either deactivate NLA if you still need the option of changing password at next logon, or remove that logon option from users logon (as example in lusrmgr.msc)
When HTML5service.exe is not anymore running and accordingly not displayed in the task list or service not anymore listed by AdminTool GUI as started even if it was running fine before then most likely Java VM has crashed with “out of memory” error. In such case Java usually creates crash dump file in *\Clients\webserver\hs_err_pid*****.log with extended information about occured crash.
There are two options how to solve that problem, either install more physical RAM or try to force Java to run in extreme mode. In this mode Java VM will reserve more memory and won’t give the memory back to system but reuse it for future tasks. To do that follow walkthrough below.
1. stop HTML5 server in AdminTool GUI firstly
2. Uninstall all Java versions you find. Moreover, after uninstalling remove two folders with all subfolders if existing “C:\Program Files\Java\” and “C:\Program Files (x86)\Java\”
3. then download and install latest Java JDK version from here Java JDK download As example: Windows x64 206.76 MB jdk-8u162-windows-x64.exe or newer version if available. Remember, you need exactly 64bit version by 64bit Windows (never use 32bit version on 64bit Windows) JDK version is needed because it is able to use extra specific options/switches unlike usual JRE edition.
4. logoff all users except your self, not just disconnect but logoff each user completely! THAT IS MANDATORY!
5. now restart in AdminTool GUI the HTML5 webservice, for now that is needed to force RDPlus to write new Java path into starting batch file runwebserver.bat
6. now locate *\webserver\runwebserver.bat and open/edit it with Notepad.
7. since you should have already restarted HTML5 server in AdminTool GUI in step 5. then now go sure that the path to Java directory in the file *\webserver\runwebserver.bat refers to REALLY existing path for freshly installed Java JDKversion, you should uncheck Attribute: Read-Only from file runwebserver.bat if it was set before HTML5 restart. So finally inside that file you should get something like following —————– @”C:\Program Files\Java\jdk1.8.0_162\bin\HTML5service.exe” -Djdk.tls.ephemeralDHKeySize=matched -Djdk.tls.rejectClientInitiatedRenegotiation=true -Dorg.jboss.netty.epollBugWorkaround=true -XX:+UseG1GC -XX:+AggressiveOpts -XX:MinHeapFreeRatio=10 -XX:MaxHeapFreeRatio=10 -cp “%~dp0httpwebs.jar” -Duser.dir=”C:\\Program Files (x86)\\RDPlus\\Clients\\www” com.jwts.socketjw.NSIOServer 80 443 secret secret 127.0.0.1 -81 127.0.0.1 22 127.0.0.1 3389 >weblog.txt —————–
8. now to the line above add two new parameters -server and -XX:+AggressiveHeap
if you use Java9 and higher add additionally following parameters
it should look something like @”****\HTML5service.exe” -server -XX:+AggressiveHeap -Djdk.tls.ephemer***** and additionally to that REMOVE three options -XX:MinHeapFreeRatio=10 and -XX:MaxHeapFreeRatio=10 and -XX:+UseG1GC So you will avoid the situation that Java returns freed memory back to system. So finally you should get the batch file approximatelly looking like that —————– @”C:\Program Files\Java\jdk1.8.0_162\bin\HTML5service.exe” -server -XX:+AggressiveHeap -Djdk.tls.ephemeralDHKeySize=matched -Djdk.tls.rejectClientInitiatedRenegotiation=true -Dorg.jboss.netty.epollBugWorkaround=true -XX:+AggressiveOpts -cp “%~dp0httpwebs.jar” -Duser.dir=”C:\\Program Files (x86)\\RDPlus\\Clients\\www” com.jwts.socketjw.NSIOServer 80 443 secret secret 127.0.0.1 -81 127.0.0.1 22 127.0.0.1 3389
or for Java9 and higher
@”C:\Program Files (x86)\RDPlus\Java\bin\HTML5service.exe” –add-opens java.prefs/java.util.prefs=ALL-UNNAMED –add-opens java.base/java.lang.reflect=ALL-UNNAMED –add-opens java.base/sun.security.ssl=ALL-UNNAMED –add-opens java.base/java.nio=ALL-UNNAMED –add-exports java.prefs/java.util.prefs=ALL-UNNAMED –add-exports java.base/java.lang.reflect=ALL-UNNAMED –add-exports java.base/sun.security.ssl=ALL-UNNAMED –add-exports java.base/java.nio=ALL-UNNAMED -server -XX:+AggressiveHeap -Djdk.tls.ephemeralDHKeySize=matched -Djdk.tls.rejectClientInitiatedRenegotiation=true -Dorg.jboss.netty.epollBugWorkaround=true -XX:+AggressiveOpts -cp “%~dp0httpwebs.jar” -Duser.dir=”C:\\Program Files (x86)\\RDPlus\\Clients\\www” com.jwts.socketjw.NSIOServer 80 443 secret secret 127.0.0.1 -81 127.0.0.1 22 127.0.0.1 3389 —————– IMPORTANT: do not just copy/paste entire line from this walkthrough since you could have different Java path or different ports inside your original line, so make changes on your original line!
9. IMPORTANT: set on this changed file runwebserver.bat > Attribute: Read-Only, so that this file can’t be overwritten anymore! If you forget to finish that step then all your changes will be reverted to default values by AdminTool GUI
10. now final step, start(restart) HTML5 server in AdminTool GUI again.
By next opportunity install more physical RAM else your Windows programs will suffer due lack of the physical memory!
By default the settings.js can be found inside folder *\Clients\www\software\html5\ where * represents the path to RDPlusinstallation or its branding name path, as example C:\Program Files (x86)\RDPlus\Clients\www\software\html5\settings.js
This settings.js is only effective when running HTML5 client with default built-in webserver. If you use third part webserver like IIS or Apache then you should find the right settings.js file in root subpath of belonging webserver, as example for IIS by default that would be following path C:\inetpub\wwwroot\software\html5\settings.js or any else according to your webserver type and configured path!
Thank you for your interest in RDPlus!
Our full price list can be found directly in our STORE
However, if you have any further question you can send us an email to [email protected]
Yes, you can set an IP range this way :
open the AdminTool,
click “Settings and license”
then go to “IPs Whitelist”
You can use IP ranges like 192.168.1.0/24 and 192.168.1.12-192.168.1.18
An example with the subnet mask 192.168.1.0/24 :
You will have and IP range of all IPs from 192.168.1.1 to 192.168.1.254
Other example with the subnet mask 192.168.1.1-192.168.1.10
This means you have whitelisted all IPs from 1 to 10.
Since we don’t use RPC over HTTP, RDS-Knight “Brute Force Protection” only monitors RDP connections, for technical reasons.
RDS-Knight “Brute Force Protection” has no effect for HTML5 connections, logging being done on the server itself (so IP source 127.0.0.1, that it would be annoying To block).
For other connection modes (mstsc, client generated, RemoteApp web client) RDP Defender works correctly, provided that the Windows logs include the source IP address.
The Windows logs used by RDP defender are :
– Log ID 4625 present in the security log.
– Log ID 140 present in Microsoft-Windows-RemoteDesktopServices-RdpCoreTS/Operational
There is always a log 4625, but the IP address is not always there, if SSL connection method is used.
There is not always a log 140, because it is only present on the most recent version of Windows.
If this log is present, the IP address will always be there.
If this log is not present and the log 4625 does not display the IP address, the solution is to disable the SSL for RDP.
The GPO below can also be set to allow these logs to be present :
“Computer Configuration \ Windows Settings \ Security Settings \ Local settings \ Security Options”:
“Network security: Restrict NTLM: Incoming NTLM traffic” and set it to : Deny all accounts”.
Make sure that your version of RDS Knight is the latest. There was a display issue bug that has been fixed since version 3.6
The 127.0.0.1 addresses shown is normal : When connecting using HTML5, a local session is created with 127.0.0.1 IP address, then the graphical display of the session is forwarded in a web browser using HTML5.
We had to develop a specific component to be able to capture remote IP from the client browser. This is available with latest release of RDS Knight (3.6) after restarting RDPlus web services or rebooting your server, and to make sure this is in place you can edit the settings.bin file located in `C:\Program Files (x86)\RDPlus\Clients\webservers\settings.bin` and make sure that the line `log_rdp_ip=”1mb” is present. This will only affect login through web interface, as brute force robots were already blocked since they all use standard RDP for attacks.
Please keep also in mind that RDS Knight works with Windows Firewall, so if a third party firewall is already set into place, it will most likely conflict with RDS Knight and prevent it from applying its rules.
ServerGenius version 3.3 comes with structural changes regarding the update process of monitored computers. These changes requires to update ServerGenius monitored computers manually.
Configuration steps
First, make sure to update ServerGenius with the latest version available. The latest setup is available here: https://rdplus.com.au/download/
Then, from the monitored computer, download the latest Setup-Agent.exe setup file from your ServerGenius web portal.
Run the program Setup-Agent.exe by clicking twice on it. The License Agreement page appears.
Select I accept the agreement after reviewing it and click Next. The Ready to Install page appears.
Click Install to update the server monitored by ServerGenius. Please wait for a short period of time while the installation progresses.
Click Finish to close the setup wizard.
Finally, check that your updated server is actively monitored by ServerGenius by looking at the ServerGenius dashboard. The monitored server should appear green after a few minutes.
Thank you for using ServerGenius. Please do not hesitate to reach us if you face any issue while following these instructions. Happy monitoring!
In ServerGenius, all your data is saved in an open format. We use a PostgreSQL database to store both global and servers and websites specific data.
The PostgreSQL database files are stored in the “db” directory inside ServerGenius setup directory.
Even if you can access these files both in read and write mode, we recommend that you always use read-only access mode, in order to avoid any conflict between ServerGenius and your own applications.
Do not hesitate to contact us if you want to know more on developing your own applications using ServerGenius data.
1) Check for updates
Please check regularly for updates, as most of them offer performance improvements. We recommend you to apply ServerGenius updates out of working hours since the update may perform long running background operations on the database.
ServerGenius latest update is always available from the following direct link.
2) Apply recommended configuration
A database will always take all computing resources available to complete requests as soon as possible. Therefore, it is recommended to size ServerGenius server according to its usage.
Please find below our recommendations based on the number of monitored servers:
Monitored servers
CPU
Memory (RAM)
1-2
2
8
3-4
4
16
5+
8
32
Installing ServerGenius on an SSD type disk drive is recommended for better performance.
Also, you may need to allocate additional disk space for ServerGenius Server, depending on the number of servers and websites monitored, and coincidelly the amount of data collected and stored in the PostgreSQL database.
Finally, please note that it is generally a good idea to run a monitoring application such as ServerGenius on a dedicated server. This prevents other applications to reduce available resources.
3) Customize database configuration
ServerGenius relies on PostgreSQL database engine. The PostgreSQL database configuration file can be customized based on the server’s hardware configuration to enable optimal performance.
The following information are required to build your custom configuration file:
Memory (RAM)
Number of CPUs
Storage type (HDD, SSD or SAN)
Several websites are able to generate the most relevant configuration file based on these information, such as https://pgtune.leopard.in.ua.
For example, please find below a recommended configuration for a 2 CPU, 8 GB RAM server using HDD storage:
These settings should be replaced in the database configuration file located at: C:\Program Files (x86)\RDS-Tools\ServerGenius\pgsql\data\postgresql.conf. Then, the service ServerGeniusDatabase must be restarted for the changes to take effect.
4) Rebuild database indexes
A database index is a data structure that improves the speed of data retrieval operations on a database. Indexes are used to quickly locate data without having to search every row in a database table every time a database table is accessed.
We recommend you to rebuild database indexes periodically in order to speed up data access. This maintenance task may take a while and we recommend you to proceed outside of working hours. From an elevated command prompt, navigate to the ServerGenius\pgsql\bin directory and enter the following command:
When prompted for a password, type password. This operation may take up to an hour and may increase performance dramatically.
5) Contact our customer support
If all the above recommendations failed to provide you an acceptable experience with ServerGenius, please do not hesitate to contact our customer support at [email protected] We will be happy to help you regain control of your ServerGenius installation.
In order to facilitate our technical support and to reproduce your issue, we might ask you an export of your database.
In order to do so, from an elevated command prompt, navigate to the ServerGenius\pgsql\bin directory and enter the following command:
Once the export has finished, please share us the file located at C:\Program Files (x86)\RDS-Tools\ServerGenius\pgsql\export1.dump with any file transfer service.
Issue
After installing and configuring RDPlus Remote Support, administrator cannot remember his account username and/or password.
No other user having the administrator role, global settings cannot be changed and agents account cannot be managed anymore.
Fix Overview
You can create a new administrator account by editing a record in RDPlus Remote Support internal database, thus forcing the product to go through its post setup configuration step and asking for details in order to create a (new) administrator account.
Please understand that after the record has been changed in the database, any visitor browsing to RDPlus Remote Support Web Portal will have the opportunity to create an administrator account. Only the first visitor validating the form will create an administrator account.
We highly recommend you disable public access to your RDPlus Remote Support portal before following the steps below, for instance by enabling a firewall.
Resetting to post-install step
Download and install an SQLite database editor, for instance SQLite Studio.
Run the SQLite database editor and open RDPlus Remote Support internal database, usually located at this location: “C:\Program Files\RemoteSupport\webportal\remotesupport.db”.
Open the “settings” table:
Locate the row with the “name” value at “issetupdone” – it should have the “yes” value.
Replace this “yes” by a “no”:
Click on the green mark toolbar button to “commit” (i.e. apply) this change in the database:
Creating a new Administrator account
RDPlus Remote Support is now back at its post-install step.
Browse to RDPlus Remote Support Web Portal home page: it will display the same form displayed after the first installation on the server:
Please enter the details to create a new administrator account.
Our licenses are permanent.
You don’t have to purchase them every year, but only once!
However the Update and Support service fee is “per year”.
Step 1: Installing RDPlus Remote Support on your computer
Installation is straightforward.
Just run Setup-RDPlus-RemoteSupport.exe on the Windows machine you’ve chosen to use as the Remote Support Server.
Files are decompressed and copied into the folder: “C:\Program Files\RemoteSupport”.
The Remote Support trial is a fully featured version limited to 15 days with 5 Agents.
After the installation, there will be a new icon on your Desktop:
Step 2: Using RDPlus Remote Support
The RDPlus Remote Support interface is now ready to launch and configure.
Start by configuring your Administrator password.
Then, create additional Agents accounts on the Web Console.
You might want to customize the product to fit your corporate branding.
Don’t forget to activate your license and to update to the latest version! RDPlus provides regular updates and feature additions for all their products.
Installation is straightforward. Just run the RDPlus Remote Support setup program on the Windows machine you’ve chosen to use as the Remote Support Server.
Please note that you must run this Setup as an Administrator. But don’t worry, Windows will notify you and ask for your agreement.
Welcome
Please close any other running programs and click Next.
License Agreement
Click on “Next” to agree to the license.
Port Configuration
By default, the Remote Support Server listens on port 443, which is the standard HTTPS secured web port.
We recommend to keep using this port.
By default, the Remote Support web server is configured to use the standard HTTPS port number (443). However, if another web server is already active on this system (IIS for example) the RDPlus built-in web server will experience a port number conflict.
The easy solution is to change these default values (4430 for example) during setup in this case.
Domain Configuration
You can skip this step if you plan on using RDPlus Remote Support without any domain name.
We recommend setting a domain name or subdomain name which resolves to the computer you are installing RDPlus Remote Support on. Please contact your System Administrator / IT Department if you need help on configuring this domain name – you can test RDPlus Remote Support right now by using “localhost” as the domain.
To configure RDPlus Remote Support for access using an internet domain name, enter the domain name here and choose which kind of Security Certificate you would like to use, a free certificate generated within Remote Support, or a paid Certificate purchased from a Certificate Authority.
You may also configure your Domain after installation from the Remote Support Web Console.
Install with Free Certificate
Free Certificate is provided by Let’s Encrypt and requires port 80 to be open and available to validate your domain ownership.
Ready to install
Confirm your settings and click Install to continue.
Congratulations!
Your RDPlus Remote Support Server installation is complete.
Click Finish to open the Remote Support Web Console and start creating Agent accounts!
The free trial version is fully featured for 15 days with 5 Agents.
Administrator Account Setup
Launch RDPlus Remote Support by clicking on the shortcut created on your desktop.
The next step is to configure your Remote Support Administrator account.
Enter your Administrator information and click ‘Register’.
You’re now ready to confirm or adjust your server configuration, them jump in and start setting up agent accounts and sharing Windows sessions.
Uninstall RDPlus Remote Support
In order to completely uninstall RDPlus Remote Support, go to “C:\Program Files\RemoteSupport” and run the “unins000” application.
Click on yes on the next window to completely remove RDPlus Remote Support and all of its components.
The software will be completely uninstalled from your machine.
Open the RDPlus Remote Support interface and click on the License tab. Then, click on the “Activate your License” button:
Enter the Action Key your received via email and select the software you wish to activate.
Your Remote Support product is now activated!
RDPlus Remote Support in one sentence
RDPlus Remote Support enables easy Windows Desktop Session Sharing for Support Agents to provide fast, effective support to their End-Users, no matter where they are!
Terminology and Architecture
The RDPlus Remote Support Server can be installed on any modern Windows PC or Server.
The RDPlus Remote Support Server is both your Web Console and Connection Relay.
It creates web-based Windows Desktop Session Sharing connections, with both Support Agents and End-Users participating via their preferred web browser, seamlessly using the Remote Support Client.
Network
The Remote Support Server is usually installed near your ISP’s Router.
A NAT (Network Address Translation) rule redirects the HTTPS ports (default value is port 443) from the external IP to the LAN IP of your Remote Support Server.
In this configuration, your Remote Support Server is the only system exposed to Internet.
Remote Support also supports Public DNS (Domain Name Services) and CA or Self-Signed SSL/TLS Certificates.
Administrator Web Console
Overview
Once logged in, the Administrator is greeted by a simple set of menus that gives them full control over the support environment.
Administrator Settings
The first menu item is Admin Settings, these settings are detailed in the Settings > Administrator Settings chapters of this documentation.
Agent Accounts
The second menu item is Agent Accounts.
From this screen, the administrator can add, delete or edit agent accounts.
Let’s click on Add New Agent to set the first one up.
Simply fill in the agent information and click ‘Add’.
Your new agent is now ready to go.
Remote Computers
The third menu item is Remote Computers.
This page is also available to Support Agents and is detailed in the Agent Interface chapter of this documentation.
Overview
Once logged in, Agents are greeted by a list of available Remote Sessions with End-Users, as well as an easy way to create a custom link and invite End-Users to share their Remote Computer.
Agents can also customize their own account settings from the ‘Hello, Agent Name’ button then ‘Settings’ menu item on the top right corner of the page.
Remote Sessions
Send a link
Each Support Agent has a custom link that is sent to the end user.
Customize the link
Information such as support ticket number and end-user name can be quickly embedded in the link.
Agent can also shorten the URL if needed using the ‘Shorten’ button.
Sending options
Agent can send the link via email or simply copy it using the buttons of the section below.
The link system
Each link matches with a specific session.
This means each agent will need to customize his agent link to generate a new session as soon as the end-user sharing his session changes.
If an agent share the same exact link to multiple end-users, they will all end in the same session and won’t be able to share their screen at the same time.
Send a connection ID
Agent can also send a connection ID instead to the end user.
Connection ID is a 6 digits code to be entered by the end user after having manually started the Remote Support client.
To generate a connection ID, the agent will need to go to the ‘Share a connection ID’ section by clicking on the button with the same name.
Available Connections
When the End User has clicked on the link and is ready for connection, their information will appear in the support Agent’s interface.
Simply click ‘Connect’ to begin the Remote Support session.
Join a session owned by an other support agent
By default, the agent only see the sessions currently being shared, which have been created using his agent URL.
As a result, in order to see and join other sessions, the agent will need to click on the ‘Show all sessions’ button.
Remote Computers
Each agent has access to the list of available unattended computers.
Three actions are available on computers: connect, open a command prompt and remove.
Unattended computers can be organized using groups and quickly find using the search bar.
Access the unattended machine
When a machine is available, this icon will be used.
When a machine is unavailable, this icon will be used.
Send command line
The agent will also be able to send CLI commands through the web command prompt linked to the machine by clicking on the ‘Open a Command Prompt’ button.
Note: Depending on the browser you are using, you may be limited to a certain number of command prompts open at the same time. If you need to go over this limitation, you will need to open a different browser.
Known limitations:
Chrome version 92: 5
Firefox version 91: 5
Edge (chromium) version 92: 5
Remove a computer
The agent can delete a computer from the unattended computer list, and make it unavailable as well, by clicking on the ‘Remove’ button Note: To see the machine again, the agent will need to enable unattended access again using the setup process in the web-console or end-user link.
Organise the unattended computers
Support agent can create groups to organize configured unattended computers.
Computer and groups can be simply moved from one group to another using drag and drop.
Add a new group
To add a new group, click on ‘Add new group’, then give the created group a name and press ‘Enter’.
Rename an existing group
To rename an existing, select the group by clicking on it, then click on ‘Rename’.
Delete an existing group
To delete an existing, select the group by clicking on it, then click on ‘Remove’.
Search groups or computers
To search for groups or computers, a search bar is available.
Matching results will dynamically appear as you type.
Add Unattended Computers
The agent can add a computer to the unattended computer list in multiple ways.
Add this computer
The agent can add the computer he is currently using to the unattended computer list and make it available by clicking on the ‘Add this computer’ button. The agent will be prompted to run the Remote Support setup.
Add an End-User Computer
A URL specific to each agent is available to make Unattended Access configuration easy and user-friendly using a simple web page.
The agent will be able to copy the link using the Copy button next to the URL displayed.
Note: this URL expires after 48 hours. After that another URL should be displayed and used by the agent.
Once the URL has been clicked and the page displayed, the customer will be able to enable unattended access by clicking on the ‘Allow’ button.
Note: enabling unattended access requires admin privileges. A privilege elevation prompt will display if the current user does not have these.
Add a computer using command line
If you need to enable unattended access on multiple computers, this can be done using the command line interface.
The Remote Support Client Setup file,’RemoteSupport.exe’ can be found here.
The arguments to use are the following (arguments must be separated by a space):
/createcomputer

/username [supportagentusername]
For example: /username "rodney"

/password [supportagentpassword]
For example: /password "myoverlynotcomplicatedbutverylongpasswordsothatnoonefindit"

/relayurl
For example: /relayurl "remotesupport.mycompany.com"

/relayport
For example: /relayport "443"
A complete example: to register the current machine as unattended to the server remotesupport.mycompany.com you may use:
The agent can delete a computer from the unattended computer list, and make it unavailable as well, by clicking on the “Remove” button.
Note: To see the machine again, the agent will need to enable unattended access again using the setup process in the web-console or end-user link.
Change the visibility of a computer
The visility of a computer can be changed from the agent only to everyone using the button ‘Change visibility to everyone’. By default, when the computer is added, the visibility of a computer is restricted to its owner. The owner of the computer refers to the agent who shared his custom URL, which has been used to add the computer to the unattended computer list.
Note: only the owner of the computer can change its visibility.
Change computer visibility button
Session Logs
Once Remote Support Sessions end, they are automatically recorded in the ‘Session Logs’ section.
The table can be exported to csv using the button ‘Export to csv’.
Agent Account Settings
Agents can customize their own account settings by clicking on the ‘Hello, Agent Name’ button on the top right corner of the page and then clicking on the ‘Settings’ menu item.
Profile
Agents can edit their name, email and title from a simple account management page.
Password
Agents can change their password from a standard password management page.
Overview
An End-User will receive a custom link from a Support Agent.
After clicking on the link, the End-User will be prompted to install the RDPlus Remote Support Client.
End-User connection screen
Once the End-User has installed the RDPlus Remote Support Client and agreed to allow the connection, they will see the Support Agent chat box appear on their screen.
The chat box enables text communication and file sharing between the Agent and End-User.
Please note that closing the chat box will end the Remote Support Session.
Overview
Once the End-User has installed the RDPlus Remote Support Client and agreed to allow the connection, the Support Agent can connect to this Remote Support Session from his Agent Web Console
Agent Connection Screen
After clicking on the ‘Connect’ button, the RDPlus Remote Support Client will run.
The Support Agent is now connected to the End-User’s desktop session.
The Agent can take control and troubleshoot independently or collaboratively: multiple Agents can connect to the same Remote Computer.
Agent Chat Box
The Agent Chat Box is more than just a way to communicate with the End-User.
It contains vital information and functionality the Support Agent needs, listed below from top to bottom:
Settings
Give the Support Agent the ability to change settings such as the current Remote Support client language.
Send Command
Enables the Support Agent to send the ctrl+alt+del keyboard command or start Task Manager on the Remote Computer.
Change Monitor Displayed
Scrolls through available displays if the Remote Computer uses a multi-monitor configuration.
Enable/Disable Clipboard Synchronization
Controls the Remote Agent’s ability enable or disable clipboard functionality between the Agent and End-User PCs.
Remote Computer Information
Displays OS, Hardware and User Account data from the Remote PC, as configured in Advanced Administrator Settings
Participants
Show the participant list of the current session.
Upload File
Allows the Support Agent to move files from his support environment to the Remote PC for troubleshooting or repairs.
Show Chat
Brings the Chat Box back to the main chat window.
Overview
Once logged in, the Administrator is greeted by a simple set of menus that gives them full control over the support environment.
The first menu item is Admin Settings. Here, Administrators will find 4 sections – Email, Server, Customization and Advanced.
Customization
Customize the logo or banner displayed to the end-user during support sessions.
Hardware Requirements
RDPlus Remote Support Client runs on both 32 and 64-bit editions of Windows computers.
RDPlus Remote Support Server may only be installed on 64-bits editions of Windows computers.
Operating System
RDPlus Remote Support is compatible with the following OS:
Windows 7 Service Pack 1
Windows 8/8.1
Windows 10 Pro
Windows 11 Pro
Windows Server 2008 SP2/Small Business Server SP2 or 2008 R2 SP1
Windows Server 2012 or 2012 R2
Windows Server 2016
Windows Server 2019
Windows Server 2022
Dependencies
RDPlus Remote Support requires .NET Framework to be installed on the computer.
The minimum version supported is .NET Framework 4.5.2.
If the .NET Framework is not installed on the computer, RDplus Remote Support setup program will try to download and install it.
Updating RDPlus Remote Support is easy and can be done by clicking on the corresponding tile on the Home Dashboard of the Licensing program:
RDPlus Remote Support automatically downloads and applies its update program when requested.
The update program is designed to continuously improve all RDPlus Remote Support functionalities and keep your current RDPlus Remote Support settings safe.
Your amount to pay has been updated
The previous conversion quote has expired. Here is your new quote: